

Deploying a new blog with Github Pages is a breeze. All you need is a new repo named after your Github username
Github also kindly provides several whitelisted plugins for ease-of-use which can be found here. Unfortunately, some of these are a bit outdated (I’m looking at you jekyll-paginate). More bad news is that because the plugins are whitelisted you can’t use any other plugins.
We’re developers though, like a whitelist will stop us…
Basic Setup
If you just want a super simple Github Pages site and don’t care about custom plugins, the guide that Github provides here will be more than adequate.
If you’re interested in a more streamlined process keep reading and I’ll walk you through automating a build/deploy process.
Automated Site Deploy with TravisCI
To circumvent the plugin restriction, we’ll automatically build our site on TravisCI using jekyll build and then pushing the static site up to our master branch on Github. It’s a straight-forward process but can become tedious if you have to do it everytime you write a new post. The workflow is described in the below flowchart.

Github Branch Setup
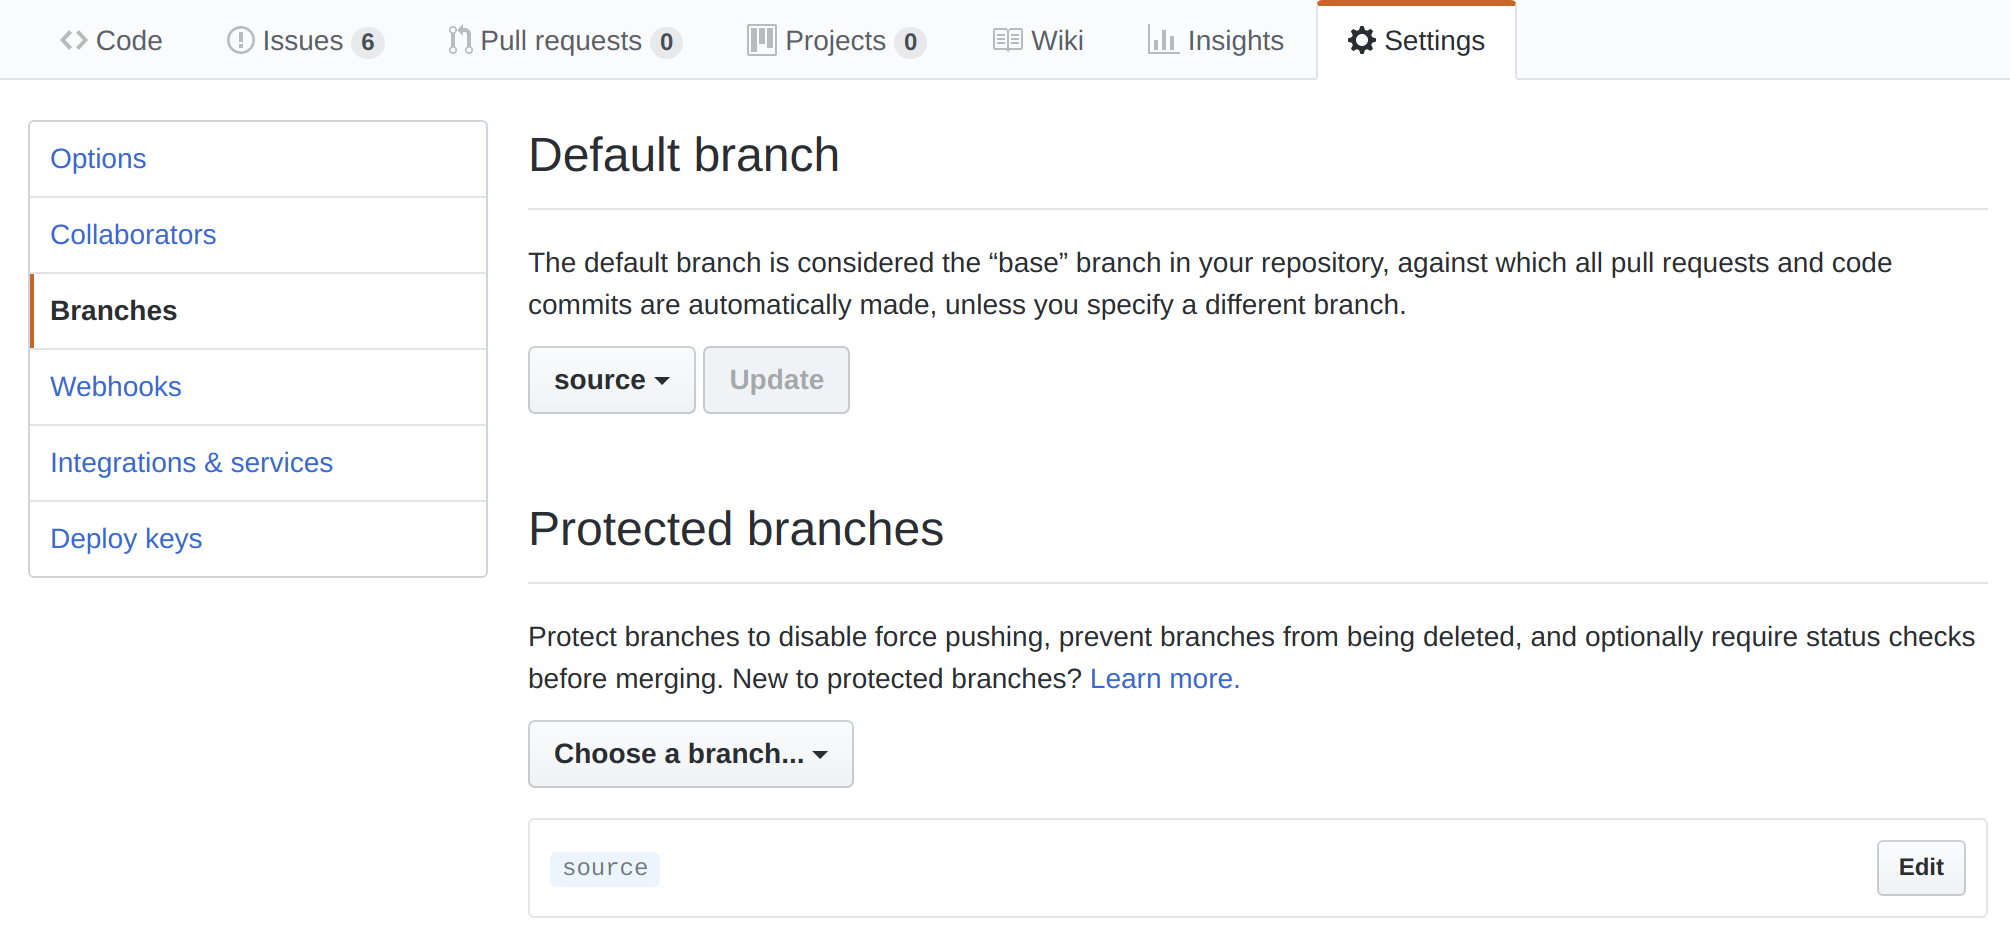
The first thing we’ll want to do is create a new branch off of master called source. (The naming here isn’t important but choose something you’ll remember). Once you’ve created your source branch there will be no need to use the master branch anymore for this repo.
Source will become where you write your blogs posts while master will remain where Github Pages loads your static site from. For example master will only include the site/ directory while source will have the entire jekyll project.
I would highly recommend changing your default branch in your repository to source. Optionally, you can make the source branch protected to prevent it from being accidently deleted or overriden.
Github Personal Access Token
Next, we’ll want to give TravisCI something to authenticate against to perform git pushes for us. To do this let’s create a personal access token.
Note
You can also pass your personal access token securely by encrypting it into your.travis.ymlfile.
First click the Settings menu, located under your profile in the top right of Github.
Next look for Developer Settings on the left sidebar and click it.
Once there navigate to Personal access tokens and click the button Generate new token. Name the token something memorable (I use Travis CI) and set the permission scopes to everything under repo.
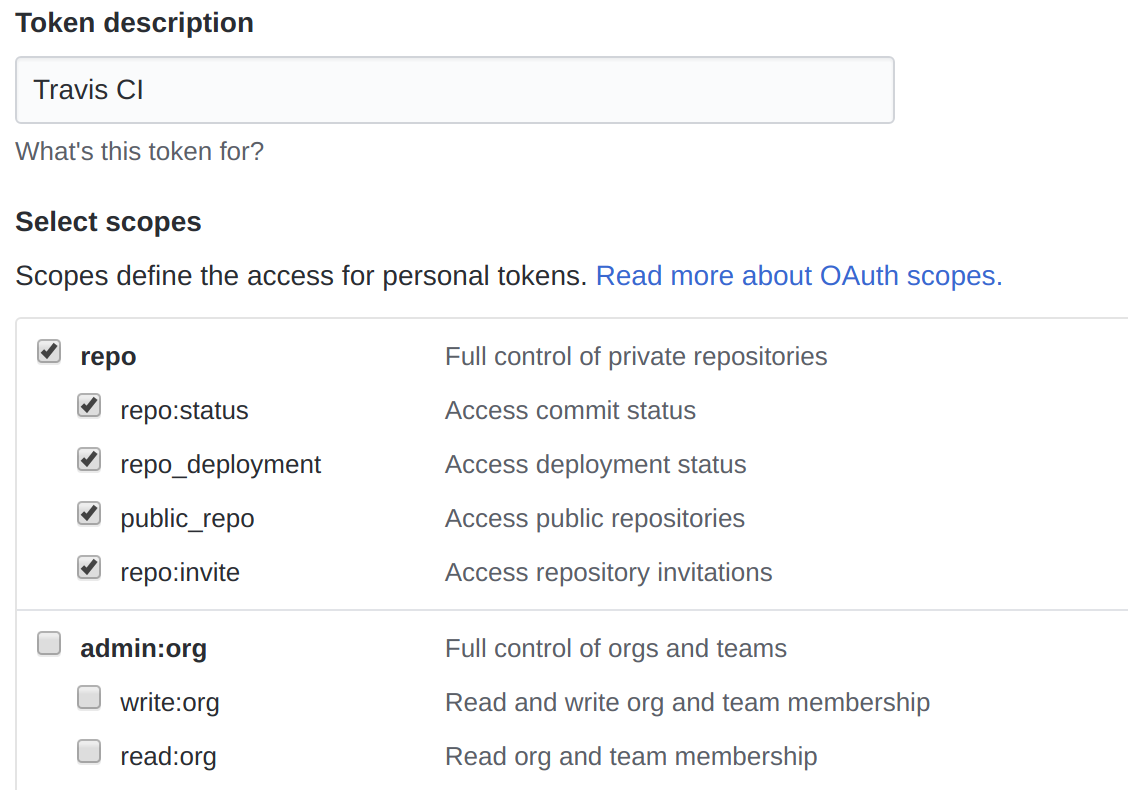
Make sure to copy your new token to your clipboard as we’re going to need it later on.
Jekyll site configuration
We need to configure a few things for our Jekyll site to function appropriately with TravisCI.
First add the following to your Gemfile.
source "https://rubygems.org"
ruby RUBY_VERSION

# We'll need rake to build our site in TravisCI
gem "rake", "~> 12"
gem "jekyll"

# Optional: Add any custom plugins here.
# Some useful examples are listed below
group :jekyll_plugins do
  gem "jekyll-feed"
  gem "jekyll-sitemap"
  gem "jekyll-paginate-v2"
  gem "jekyll-seo-tag"
  gem "jekyll-compose", "~> 0.5"
  gem "jekyll-redirect-from"
end
Any plugins we’re using above in our Gemfile we’ll also want to list in our Jekyll site _config.yml file.
Additionally, we want to exclude certain files and directory so that they don’t end up in the master branch once TravisCI builds the source branch.
Using the above example your _config.yml might look like:
title: Your blog title
email: your.email@gmail.com

# many other settings
# ...

# Any plugins within jekyll_plugin group from Gemfile
plugins:
  - jekyll-feed
  - jekyll-sitemap
  - jekyll-paginate-v2
  - jekyll-seo-tag
  - jekyll-compose
  - jekyll-redirect-from

# Exclude these files from the build process results.
# Prevents them from showing up in the master branch which
# is the live site.
exclude:
  - vendor
  - Gemfile
  - Gemfile.lock
  - LICENSE
  - README.md
  - Rakefile
Because we’re using our master branch to display our statically generated site, we’ll want to remove the site/ directory from tracking.
Add this to your .gitignore.
.sass-cache
.jekyll-metadata
_site
Next, and most importantly, we need a .travis.yml file to let TravisCI know how we want it to run. I’m going to run through it line-by-line with explanations of the settings.
language: ruby
rvm:
- 2.3.1
install:
- bundle install
deploy:
  provider: pages
  skip_cleanup: true
  github_token: $GITHUB_TOKEN
  local_dir: _site
  target_branch: master
  on:
    branch: source
language: ruby Use the ruby language
rvm: - 2.3.1 Use RVM to set ruby version to 2.3.1
install: - bundle install Run bundle install to install all gems.
provider: pages Use TravisCI’s Github Pages provider
skip_cleanup: true Preserve files created during build phase.
github_token: $GITHUB_TOKEN Our personal access token. This is currently a reference to an environment variable which will be added in the TravisCI setup section below.
local_dir: _site Use all files found in this directory for deployment.
target_branch: master Push resulting build files to this branch on Github.
on: branch: source Only run TravisCI for this branch.
You can find additional information from the deployment documentation.
All of this together basically says, “Using the source branch from this repo, push all the files found within the site directory to the master branch of the repo”. This only works by using the following Rakefile to manually build the site.
# filename: Rakefile
task :default do
  puts "Running CI tasks..."

  # Runs the jekyll build command for production
  # TravisCI will now have a site directory with our
  # statically generated files.
  sh("JEKYLL_ENV=production bundle exec jekyll build")
  puts "Jekyll successfully built"
end
The Rakefile above is run on every build. Because of this you can add other checks to this process such as html_proofer. These will be required to pass without failure before TravisCI will deploy the build.
Let’s move onto the last step. Setting up TravisCI for Github Pages.
TravisCI Setup
Now that we have our site setup we need to hook it into TravisCI.
First you’ll want to sign into TravisCI using your github account. This will give you a listing of all of your repositories.
Find your repository and enable it. It should be in the format of username.github.io.

As seen above, click the gear icon next to the newly enabled repository to go to the setting page.
Remember when I said this?
Make sure to copy your new token to your clipboard as we’re going to need it later on.
Now’s the time to dig up that token code again.
NoteGITHUB_TOKENneeds to match your.travis.ymlfile's linegithub_token: $GITHUB_TOKENto properly authenticate usage.
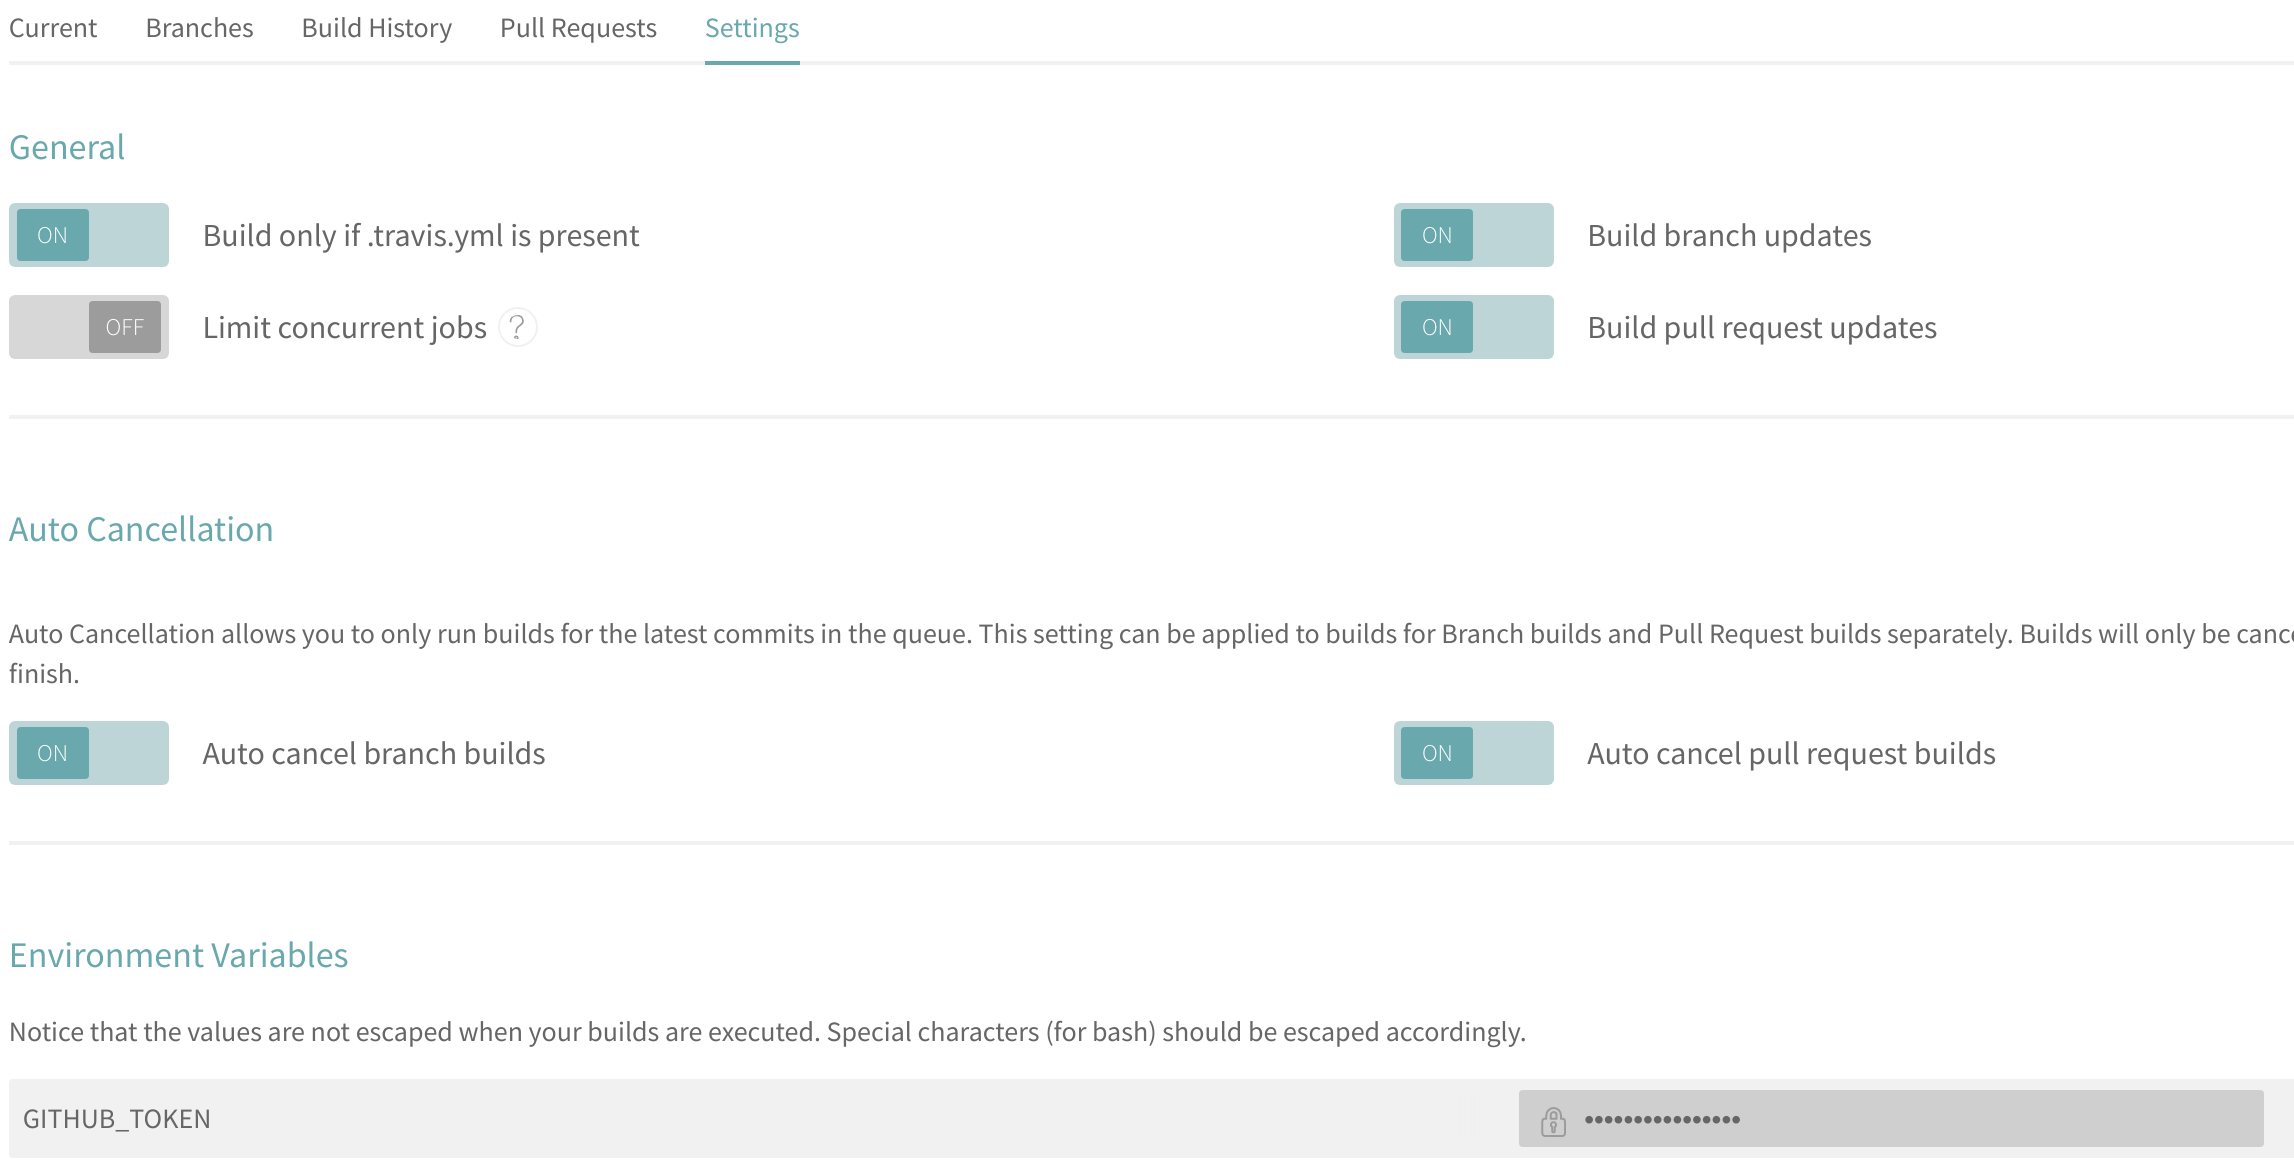
Once you have the code create a new environment variable named GITHUB_TOKEN on the TravisCI settings page.

Here’s a screenshot of the generic settings that I recommend using for your build process.
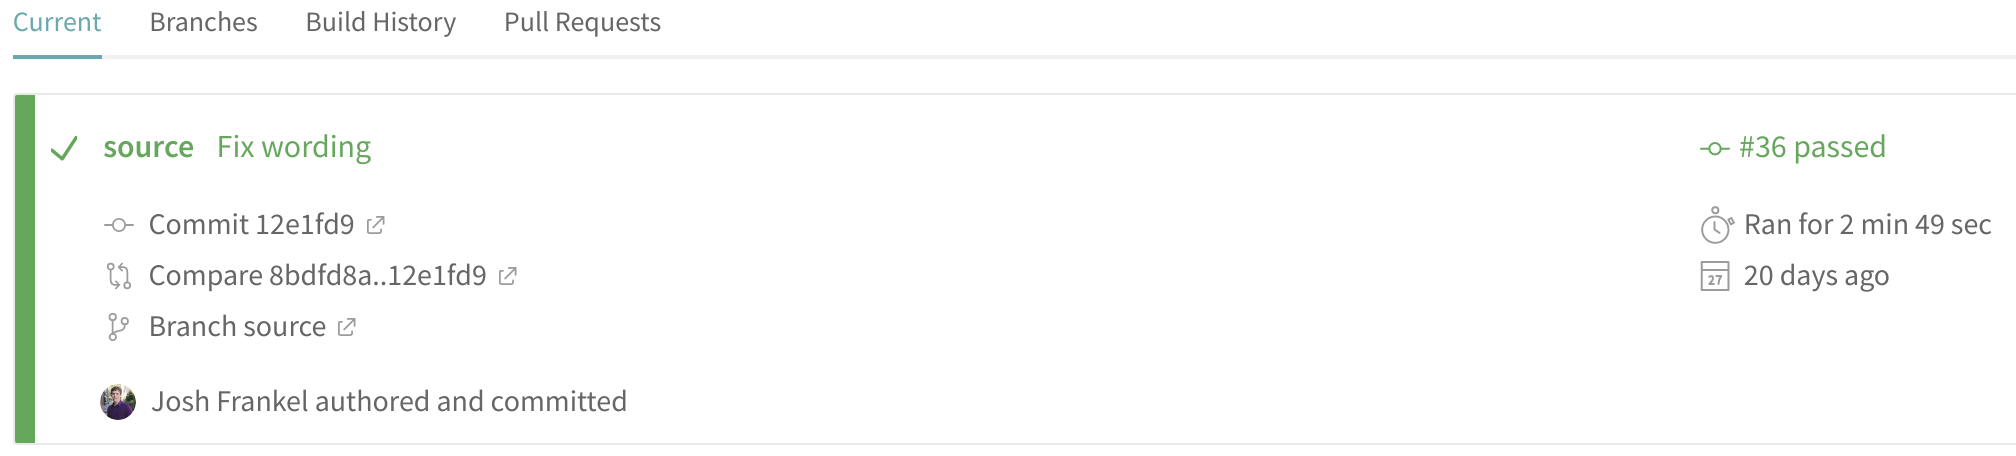
Once, you’ve got everything set up try out pushing a new commit to your source branch. You should see the TravisCI build start, pass, and eventually if you navigate to username.github.io your site will be live! If for some reason your build fails look through the job log for any details on errors. I’d be happy to help troubleshoot them in the comments.
That’s it! Start blogging.
Optional: Custom Domains
You can give your readers a more specialized experience by enabling a custom
domain for them to navigate to. This is accomplished by pointing your username.github.io site at a domain registrar where you have purchased a domain name. (e.g. joshfrankel.me)
Don’t worry if this sounds scary. It is actually easy to setup. Namecheap has an excellent article that guides you through the entire process.
What you need to do is first create a CNAME file in your Github repository. The CNAME file should just hold your domain name in it. For example mine is below:
# filename: CNAME
joshfrankel.me
This tells Github Pages where you site is being published at.
Below I’ve listed the basic setup for what you’ll need to do for other domain registrars. (From the Namecheap documentation)
A record for @ pointing to 192.30.252.153A record for @ pointing to 192.30.252.154- CNAME record for www pointing to your username.github.io (the username should be replaced with your actual GitHub account username):
Update (July 27th, 2018)
Github has updated their servers and as such you’ll need to point your DNS at the following ip addresses. Similar to the above, you’ll want to create A records pointing at @ for each of the below ip addresses. Here’s the related documentation.
If you configured A records through your DNS provider, your A records must point your custom domain to the following IP addresses:
- 185.199.108.153
- 185.199.109.153
- 185.199.110.153
- 185.199.111.153
If you now navigate to your repository’s settings page you should see something like this:
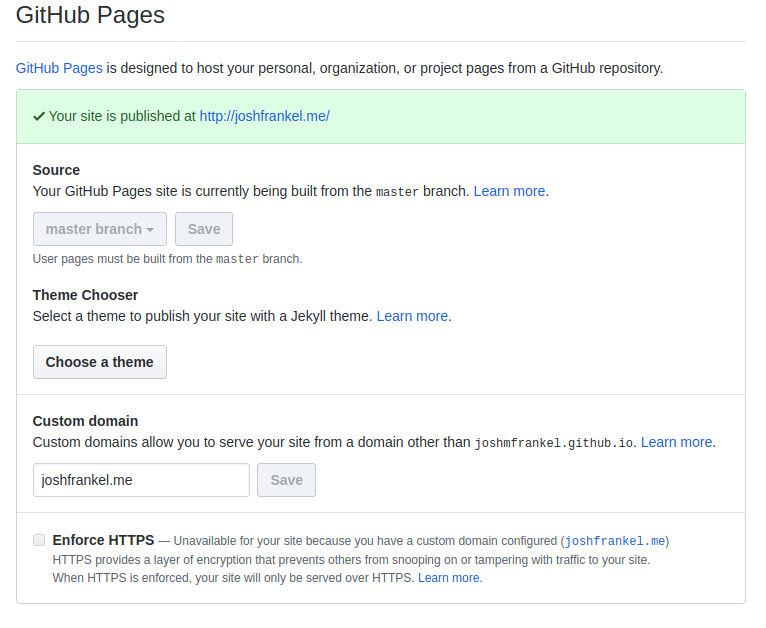
Note The small print around enablement of https states that it is unavailable for custom domains at present. However, there are additional resources and guides out there for setting up third-party services such as CloudFlare for enabling https for Github Pages. This may also be possible through other DNS hosts such as Namecheap (which I’m using).
Optional: Enable html_proofer
…you can add other checks to this process such as html_proofer. These will be required to pass without failure before TravisCI will deploy the build.
Like I mentioned above, one of the benefits of having a Rakefile is that
custom checks need to pass before the build will be sent out for deployment. One
of those is a really helpful gem called html_proofer which allows for testing
of rendered HTML to ensure validity.
We can set this up with a few easy steps. First we’ll want to add html_proofer
to our Gemfile.
# Gemfile

gem "rake", "~> 12"
gem "jekyll"
# Outside the jekyll plugin group
gem "html-proofer"
Next we’ll add a few lines and configuration to our existing Rakefile
to start testing the built _site folder contents.
require "html-proofer" # Require gem for using within tasks

task :default do
  puts "Running CI tasks..."
  sh("JEKYLL_ENV=production bundle exec jekyll build")
  # Add HTMLProofer.check_directory("./_site").run in order to start checking
  # for invalid HTML
  HTMLProofer.check_directory(
    "./_site",
    url_ignore: [/linkedin.com|php-fig.org|bower.io|bost.ocks.org|elementary.io/]
  ).run
  puts "Jekyll successfully built"
end
The call to html_proofer should occur after the jekyll site is built from the
JEKYLL_ENV=production bundle exec jekyll build line. This ensures that
there are newly built files to validate against the linter’s settings.
The basic code to get this working is: HTMLProofer.check_directory("./_site").run. This tells html_proofer to
look through the _site directory and run all available linters.
We can test all this out locally by running the following command rake in our development directory. The rake command runs the default task found in the Rakefile.
> rake
Running CI tasks...
JEKYLL_ENV=production bundle exec jekyll build
Configuration file: /home/josh/Development/joshmfrankel.github.io/_config.yml
            Source: /home/josh/Development/joshmfrankel.github.io
       Destination: /home/josh/Development/joshmfrankel.github.io/_site
 Incremental build: disabled. Enable with --incremental
      Generating...
         AutoPages: Disabled/Not configured in site.config.
        Pagination: Complete, processed 1 pagination page(s)
                    done in 0.819 seconds.
 Auto-regeneration: disabled. Use --watch to enable.
Running ["ImageCheck", "ScriptCheck", "LinkCheck"] on ["./_site"] on *.html...

Checking 65 external links...
Ran on 53 files!

HTML-Proofer finished successfully.
Jekyll successfully built
At this point if you have existing content you’re likely to see many errors that need fixing. Take some time and fix as many of these as you can. A well tested blog is an efficient blog.
As you can see from my example above html_proofer has many additional configuration
options. Once of which is url_ignore. This is especially helpful for ignoring
linting errors related to SSL, required sign-ins, and paywalls. For example, I have a social icon on my site that links to https://www.linkedin.com/in/joshmfrankel. LinkedIn requires a user
to be logged in in order to view active profiles. Because of this the html_proofer
check will fail. Therefore I added it to a blacklist of urls to ignore while
linting.
Closing thoughts
Is there something I could explain more? Were the steps above easy to follow? Got a Jekyll plugin you are digging? I’d love to hear about it in the comments below.
Thanks for reading.
Re-sequencing primary keys in Rails to fix uniqueness violations
Ensure dropping a database table is reversible
Join the conversation