

If you’ve worked with calendars, then you know the frustration of having two systems not keep events in sync. There are essentially three levels to keeping events in sync. The first is integration with every email provider you wish to support. Not a light initiative. The second is to find a product which aggregates multiple providers into a single API interface. Better solution, but open your wallet. Lastly, build a lightweight system that relies on the iCalendar standard. This last option is the focus of the article. Throughout the remainder of this post, we’ll explore pushing an event to an external provider’s calendar and keeping it in sync across systems without writing a single API request or integration.
What we’re building
To start, let’s say we want an application that stores a calendar event as a database record. What is the easiest way to ensure that the event stays in sync between the database and an attendee’s personal calendar?
Let’s add some guardrails to this project. This way we can avoid scope creep.
- Creating a new calendar event adds it to an attendee’s external calendar application
- Updating or cancelling event effect the attendee’s event details
- Event organizers receive attendee RSVP status updates
How this works
Here’s a basic sequence diagram of the various layers to this process. Looks like a lot, but most of this is implemented by the provider email account, such as Gmail or Outlook.
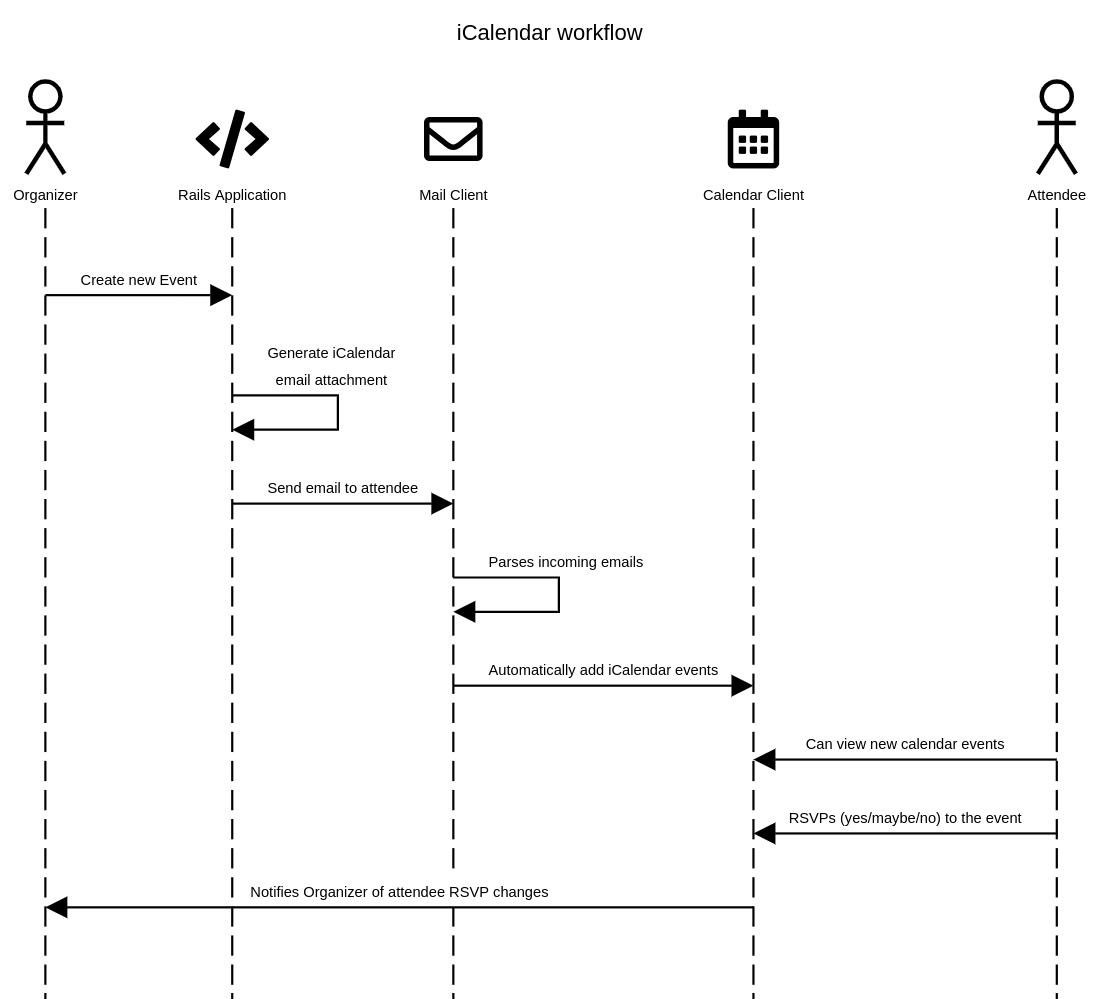
- Organizer creates an event
- Our application generates an iCalendar attachment and sends the attendee an email
- Attendee’s mail client parses incoming email and adds valid iCalendar attachments to their connected Calendar
- Attendee changes their RSVP status, which sends email to Organizer
Really, the only thing we can control is steps 1 and 2. Step 3 and 4 are entirely in the hands of whatever the mail client is. This is a good time to call out a caveat with this approach, which is we are at the mercy of how the mail client parses incoming mail and iCalendar files. That being said, iCalendar is a widely accepted standard.
The above sequence diagram illustrates how we’ll accomplish a zero-integration strategy for placing calendar events on attendee calendars. This works by following the iCalendar standard for attaching calendar events to emails. For Mail Clients that have connected calendars (e.g. Gmail & Google Calendar), they parse incoming emails. When the email contains a valid iCalendar file, it is automatically added to the attendee’s calendar.
Pretty slick right?
The documentation regarding iCalendar is thorough and useful when working with calendar event attachments. Check it out here.
Now, there are a couple caveats with using this approach.
- Updating an event in your external calendar will not update it in the application
- The organizer won’t have the event on their calendar unless they are also added as an attendee
- Relies on iCalendar specification while standard, is up to the provider to implement correctly
With that out of the way, let’s build ourselves a basic Rails application to work with.
Creating a new application
We’ll need to generate a new sample application for this functionality.
rails new ics_demo --skip-javascript --skip-helpers

# Setup ActionMailbox
rails action_mailbox:install
rails db:migrate
Add gem 'icalendar' to your Gemfile. This gem implements the iCalendar standard within Ruby, making it dead simple to craft calendar attachments.
Next we’ll need a mailer for which our attachments will be placed on. Run rails generate mailer EventInvitation event_create event_update event_cancel
rails generate mailer EventInvitation event_create event_update event_cancel
      create  app/mailers/event_invitation_mailer.rb
      invoke  erb
      create    app/views/event_invitation_mailer
      invoke  test_unit
      create    test/mailers/event_invitation_mailer_test.rb
      create    test/mailers/previews/event_invitation_mailer_preview.rb
Change the receiver email address to an email you can access. You’ll want this to be different from your primary Gmail address (more on this later).
class EventInvitationMailer < ApplicationMailer
  def event_create
    @greeting = "Event created"

    mail to: "[your_email]@gmail.com"
  end

  def event_update
    @greeting = "Event Updated"

    mail to: "[your_email]@gmail.com"
  end

  def event_cancel
    @greeting = "Event Cancelled"

    mail to: "[your_email]@gmail.com"
  end
end

# event_invitation_mailer.html.erb
<%= @greeting %>
Change delivery error setting in development.rb for easier debugging
config.action_mailer.raise_delivery_errors = true
Now, in order to test this we’ll need a reliable way to send emails in development. Google Apps to the rescue!
Google App Password for development
First we need to create new app password for your Google account: https://myaccount.google.com/apppasswords. The reason we use an app password is it allows us to provide an authorized SMTP setup without having to deal with two-factor authentication.
Make sure that the receiver address is different from your email used for the Google App password, or else you won't be able to associate calendar events correctly.
Select Mail for app and Other for device. Name the app Rails Mailer or what you like. Make sure to save the app password.
Add the dotenv gem to your gemfile. gem 'dotenv-rails', groups: [:development, :test]. This allows us to create a root level .env file which contains environment variables. Make sure to re-bundle.
# .env
GMAIL_USERNAME="your_email@gmail.com"
GMAIL_PASSWORD="XXXX-your-app-password"
Following the Rails guide for setting up Gmail as an ActionMailer provider, you’ll end up with the following:
# development.rb
config.action_mailer.delivery_method = :smtp
config.action_mailer.smtp_settings = {
  address:              'smtp.gmail.com',
  port:                 587,
  domain:               'example.com',
  user_name:            ENV["GMAIL_USERNAME"],
  password:             ENV["GMAIL_PASWWORD"],
  authentication:       'plain',
  enable_starttls_auto: true
}
Emails can be sent from development by running the following code in your rails console
EventInvitationMailer.event_create.deliver_now
Check your inbox to confirm you’ve received the message. Time to see those events popping up on your calendar. Check your spam or filters if you don’t see the message appear.
Attaching an iCalendar event to an email
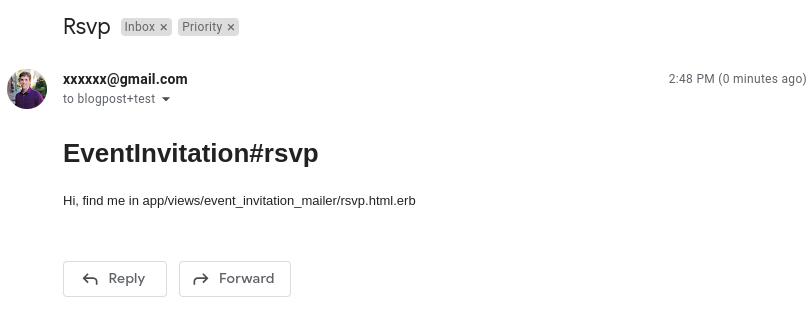
Now that we’ve configured our basic application for mail delivery, we should start sending calendar events out as email attachments. Add the following to the body of your mailer’s rsvp method:
def event_create
  ical = Icalendar::Calendar.new

  ical.event do |event|
    event.dtstart = 1.hour.from_now
    event.dtend = 2.hours.from_now
    event.sequence = 1
  end

  ical.ip_method = "REQUEST"

  attachments["invite.ics"] = {
    mime_type: "text/calendar; method=REQUEST",
    content: ical.to_ical
  }

  mail to: "different_address@gmail.com", subject: "My First Event"
end
dtstart indicates the starting time of the event and is required. dtend indicates the ending time and is required.
Sequence is the order in which an iCalendar file is received in. It determines which action should take place. Additionally, it prevents out-of-sequence updates (e.g. updating an event before it is created).
Try sending yourself an email. You should see it come through along with the calendar event being placed on your associated calendar. Again, make sure that the email address you are sending to is different than the address you used for the Google App password.
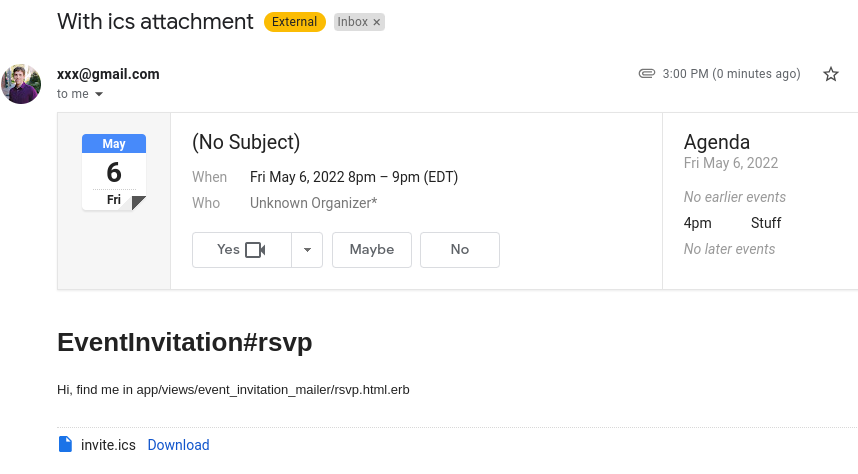
The new event looks pretty nice in our mailbox. If you hover over the email in Gmail’s listing view there is also now a new button called RSVP with some quick actions.
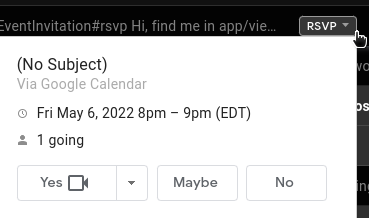
Super handy!
Now the above is the absolute minimum to enable this process and will only create events currently. Updating or Canceling an event take different request
parameters which we’ll investigate next. But, before we dig into updating and canceling, we need a
mechanism for telling external systems that the event we’re updating or cancelling refers to the
same event we created. This is where the event.uid property comes in handy.
Tying events together
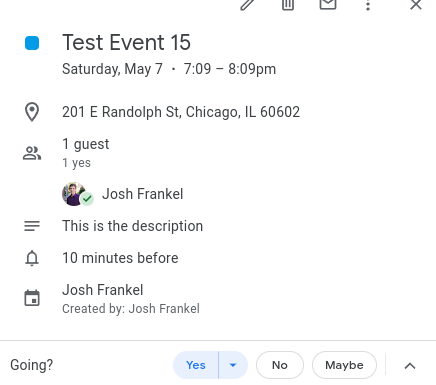
Event uid is the unique identifier for the event. Think about this like a primary key for the calendar event. It allows multiple iCalendar files to be sent through email and will associate them to the same uid. Useful for if the same event gets sent multiple times or updated. This way it won’t keep adding new ones to your calendar. We can utilize the built-in iCalendar gem method new_uid to generate a new uid.
ical = Icalendar::Calendar.new
uid = ical.new_uid

ical.event do |event|
  ...
  event.uid = uid
end
Alternatively, if you have a uuid on your database record which is associated with the calendar event, you can utilize that to ensure stability between your system and the external calendar. I prefer this approach in the long-run.
# Creating a record that represents the calendar event
some_record = Event.new #=> <Event uid="1c4bd300-ab99-425a-82fd-1e2720d23cdb">

ical = Icalendar::Calendar.new

ical.event do |event|
  ...
  event.uid = some_record.uid # Use the record to map the icalendar files uid
end
Onto updating and cancelling events.
Updating an Event
In order to update the calendar event, the only real change to our event_create method is to specify the
sequence number and ensure the uid matches the original event. Sequence number maps to the order in which iCalendar files
were recieved in. If you notice the creating of an event example above, I used
event.sequence = 1. That’s because when an event is first created it will
always be the first.
Now for updating an event we need sequence to be greater than 1.
However, do we really want to manage the number for how many updates were made? Probably, not.
This is why I came up with a nifty little trick using the integer representation of Time. Seen
below as event.sequence = Time.now.to_i. Using this will ensure that the order in which
updates are made always stays accurate with the upside of us not having to care about saving
the current sequence number.
def event_update
  ical = Icalendar::Calendar.new

  ical.event do |event|
    ...
    event.dtstart = 1.hour.from_now
    event.dtend = 2.hours.from_now

    # Now we don't need to store which sequence number we're on
    event.sequence = Time.now.to_i

    # This should be the equal to the id used when the event was created
    event.uid = some_record.uid
  end

  ical.ip_method = "REQUEST"

  attachments["invite.ics"] = {
    mime_type: "text/calendar; method=REQUEST",
    content: ical.to_ical
  }

  mail to: "different_address@gmail.com", subject: "My Test Email"
end
Now if you have your Calendar open you can watch in real-time as the event’s time changes. You can test this out in your console with:
EventInvitationMailer.event_update.deliver_now
Cancelling an Event
Surprisingly, the dtstart property is required for cancelling an event
Like updating event you’ll need to maintain the same uid and ensure that the sequence is further along than previous calendar events. The important change here is the addition of the status property with value “CANCELLED”. This tell’s the calendar that the event has been cancelled by the organizer and therefore should be removed from attendee’s calendars.
def event_cancel
  ical = Icalendar::Calendar.new

  ical.event do |event|

    # Suprisingly, dtstart is required in order to properly cancel an event
    event.dtstart = 1.hour.from_now
    event.sequence = Time.now.to_i
    event.uid = uid
    event.status = "CANCELLED" # Required
  end

  ical.ip_method = "REQUEST" # "CANCEL" also seems valid

  attachments["invite.ics"] = {
    mime_type: "text/calendar; method=REQUEST", # "CANCEL" also seems valid
    content: ical.to_ical
  }

  mail to: "different_address@gmail.com", subject: "My Test Email"
end
If done correctly, you’ll receive an email with a header that states the event was cancelled.
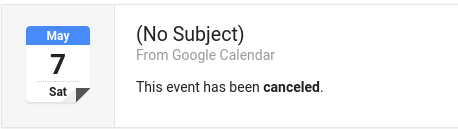
Additionally, you can watch the calendar event disappear from your Google calendar.
There’s the basics of using iCalendar with external systems. Now, we’ve really only scratched the surface of what is possible here. We also haven’t solved our third goal, “3. Event organizers receive attendee RSVP status updates”. Let’s dig into solving that, along with some settings I recommend making your events more robust.
Recommended settings
I’ve compiled my own recommendations to help make iCalendar events more detailed and useful. Each of these adds more context to the calendar event, which is helpful to inform prospective attendees.
Organizer
This is whoever created the event. RSVPing to the event should send the organizer an email. CN stands for displayable name. This is a great way to make invites look more personal for both organizers and attendees. Adding this also satisfies our third goal, hooray!
event.organizer = Icalendar::Values::CalAddress.new(
  "MAILTO:organizer@gmail.com",
  cn: "\"Josh F\""
)
A gotcha with receiving rsvp status changes as an organizer is that if you use a Gmail address, it must be verified as also the event's creator. I was able to test this locally by instead using an outlook.com address
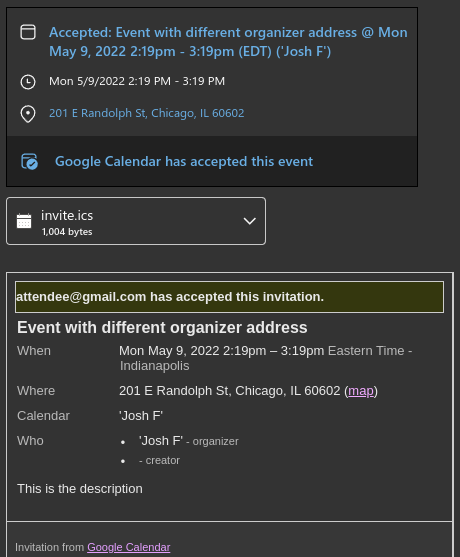
Without this, your event will display “Unknown Organizer”. Additionally, if RSVPing to the event sends an email within your Calendar client, without a valid email address you’ll receive a bounce back saying the mail failed to deliver. You can disable this functionality by specifying an rsvp value for the attendee of false, like so:
event.attendee = Icalendar::Values::CalAddress.new(
  "mailto:different_address@gmail.com",
  rsvp: "FALSE"
)
If you utilize organizer, you’ll also need to specify it when you cancel an event, or else the calendar system will not remove the event as it will think you’re trying to change organizers.
Summary
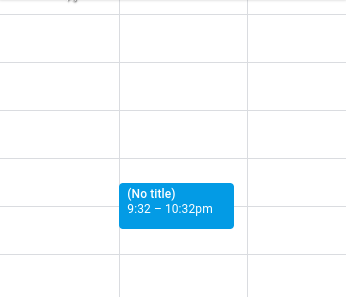
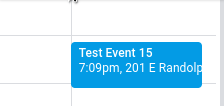
This is the title of the Event placed on the calendar. Without this, your events will display “No title”. Useful information to show your event attendees. See documentation
ical.event do |event|
  ...
  event.summary = "Test Event 15"
end
Description
This is the body of the calendar event. This contains a more detailed message regarding the nature of the event itself. See documentation
ical.event do |event|
  ...
  event.description = "This is the description"
end
Sequence
This is the order in which an iCalendar file is received in. It determines which action should take place. Additionally, it prevents out-of-sequence updates (e.g. updating an event before it is created). See documentation
A trick you can do here is to use the current time as an integer value to ensure that the sequence is always increasing without having the burden of managing the next number in the sequence.
ical = Icalendar::Calendar.new
ical.event do
  event.sequence = Time.now.to_i
end
Location
This is the physical location where an event is taking place at. Both Gmail and Outlook display this as part of the calendar invite. See documentation
ical.event do |event|
  ...
  event.location = "201 E Randolph St, Chicago, IL 60602"
end
Below is an example of what a calendar event looks like when you fill out all its details:
Attendee automatically planned attendance
In addition to having the event on your calendar, you can also specify an attendee’s initial rsvp status. This allows you to automatically RSVP attenee’s as planning to attend. In order to activate this, we need to provide additional details about the attendee for the event. Add the following to your ical.event block:
ical.event do |event|
  ...
  event.attendee = Icalendar::Values::CalAddress.new(
    "mailto:different_address@gmail.com",
    partstat: "accepted"
  )
end
partstat refers to the attendee’s participation status. In our case, marking it as accepted sets the attendee as planning on coming as well as making it visible on their calendar.
There are several other properties that can be added to CalAddress which can be found here
Wrapping up
Now we have a basic no-integration method for adding events to attendee’s calendar application. Like mentioned earlier, there is a lot more that can be done here. I’m actually working on a potential tech spike which incorporates ActionMailbox. Stay tuned for more.
Was this helpful for your calendar event system? Did you have any tips for working with iCalendar? I’d love to hear about them in the comments below. Thanks for reading.
Introducing SimpleCov+ Action: A Github action for ensuring test coverage
Creating blurred background images with overlay text in CSS
Join the conversation