

Hotwire is one of the slickest features to come to the development community. It comprises of Turbo, Stimulus, and Strada. It also brings many of the benefits of a single page application into a template rendering server environment.
I value the opportunity that this technology presents but have to acknowledge that it was created by Basecamp. You’ve likely read Basecamp’s recent decision to ban discussion of politics in the workplace along with disbanding their Diversity & Inclusion committee. My post is not an endorsement of these decisions. I’m planning to fully address their decision and how I think it impacts workplace inclusivity and company culture in a future post. The purpose of this post is to look at the new technology and I look forward to spending more time and thought reflecting on those decisions.
Setup Turbo and Stimulus
First off let’s create a new application using the below generator
# Note: This is on Rails 6.1.3.1
rails new hotwire-search-example --skip-sprockets --skip-turbolinks --webpack=stimulus
We’re not planning on using sprockets or turbolinks because webpacker will handle asset loading and hotwire’s turbo is the next evolution of turbolinks. So let’s make that second part happen by adding the turbo-rails gem to our Gemfile.
# Gemfile
gem 'turbo-rails'
Turbo-rails comes with an installer command we can use once we’ve re-bundled. Since we’ve opted for Webpacker, Turbo will be installed with Yarn or NPM.
bundle install
rails turbo:install
Turbo Drive
This is essentially the new version of turbolinks. All the same features are present such as displaying a progress bar while loading and using the history api. There are also capabilities for form submission and responses instead of just simply links.
Turbo Drive accelerates links and form submissions by negating the need for full page reloads.
Turbo Hotwire
In this tutorial we’re going to let Turbo Drive just do its thing as it works fine out of the box. For more detailed options check out Navigating with Turbo Drive
Turbo Frames
Turbo Frames are ye old frames we all love to hate except with Turbo Frames they are useful. These can be used to selectively update portions of a page (or fragments) without a full page refresh.
Turbo Frames decompose pages into independent contexts, which scope navigation and can be lazily loaded.
Turbo Hotwire
Turbo Frames decompose pages into independent contexts, which scope navigation and can be lazily loaded.
We’ll need some initial data for us to search. Let’s generate a User model so we can search for a User by their name.
rails g scaffold User name:text
rails db:migrate
We’ll use scaffold to give us some quick controller actions and views.
Next start up your server rails s and open your browser to localhost:3000/users. You’ll see something like the following:

Create at least one user with the scaffolded controller. Now click show on the created user and follow up with edit. Notice how each click here is a full page refresh. Now let’s change that.
Replace your app/views/users/show.html.erb view with the following:
<h1>User Managment</h1>

<%= turbo_frame_tag "user" do %>
  <p id="notice"><%= notice %></p>

  <p>
    <strong>Name:</strong>
    <%= @user.name %>
  </p>

  <%= link_to 'Edit', edit_user_path(@user) %> |
  <%= link_to 'Back', users_path %>
<% end %>
Also replace app/views/users/edit.html.erb with:
<%= turbo_frame_tag "user" do %>
  <%= render 'form', user: @user %>

  <%= link_to 'Show', @user %> |
  <%= link_to 'Back', users_path %>
<% end %>
You’ll notice we’re using a turbo flavored ERB tag turbo_frame_tag courtesy of the turbo-rails gem. This tag will insert a <turbo-frame> tag into the HTML. We specify a unique ID for the turbo-frame by passing "user" as the first argument to the turbo-frame. What this does is create the following HTML code in our view:
<turbo-frame id="user">
  ...
</turbo-frame>
We’ve specified in both our show.html.erb and edit.html.erb that the unique ID is “user” by using turbo_frame_tag "user". This allows content within the turbo-frame to update.
With that done navigate back to localhost:3000/users.
Click on “show” for one of the displayed users. Notice how the title of the page is “User Management” based on the <h1> we added to show.html.erb. Now click “edit”. The page doesn’t refresh but rather the frame is replaced. Additionally, the <h1> for “User Managment” has remained on the page. This is because that particular <h1> is outside of the turbo-frame tag.
That is a turbo-frame at its most basic. We’ve made the transition viewing to editing a user seamless.
There’s a catch here though. Try clicking the “back” link on either of those pages. It doesn’t work. The reason is frames capture navigation and act on only that specific frame. So having the back link inside the frame tries to reload the frame but fails. What we want here is for the back link to send us back to the listing page. You can accomplish this by adding the data attribute , data: { "turbo-frame": "_top" } which will act upon the current loaded page.
Add the following to your edit.html.erb and show.html.erb back button links
<%= link_to 'Back', users_path, data: { "turbo-frame": "_top" } %>
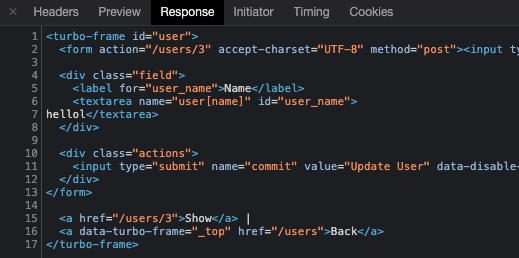
Now the link properly redirects us back to the listing page. Now you could move the back link outside of the turbo frame which would allow you to avoid the _top data attribute above but for now we’ll stick with what we have. Below I have a screenshot of what is part of the server response when clicking the edit link.
One last thing before moving onto Turbo Streams. The <h1>User Management</h1> text works well if the navigation flow is #show->#edit. If you navigate to #edit first it won’t displayed because the show view is where it is located. You could remove the #edit link on the listing page to force users to first click #show or you could abstract this <h1> into a partial for reuse. There are several options here to keep things consistent but we won’t get into the weeds here.
Turbo Streams
Now the for the fun part. Let’s make our listing page searchable.
Turbo Streams deliver page changes over WebSocket, SSE or in response to form submissions using just HTML and a set of CRUD-like actions.
Turbo Hotwire
First create a new controller within the users namespace:
rails g controller users/searches index
Now you don’t have to use a namespaced controller but it allows you to maintain a strict adherence to RESTful actions in the main users_controller.rb. Also it separates the search responsibility to its own controller class.
The above command doesn’t quite get our routes.rb file into the format we want. Make sure yours matches the following:
  resources :users do
    collection do
      post :search, to: "users/searches#index"
    end
  end

#=> search_users POST    /users/search(.:format) users/searches#index
# Note that turbo stream expects POST by default
Next we’ll add a simple search form to our users/index.html.erb file like so:
<h1>Users</h1>

<%= form_with url: search_users_path do |form| %>
 <%= form.text_field 'search_term', placeholder: 'Enter search terms...' %>
 <%= form.submit 'Search', data: { disable_with: false } %>
<% end %>

<table>
  <thead>
Search forms don’t get much simpler.
One thing to note above is the usage of , data: { disable_with: false } on the submit button. Without this when we submit our form and wait for the turbo stream, the submit button becomes disabled until refresh. Adding this option opts us out of the detault rails form functionality.
With our route and form in place let’s build out our stream in the controller’s response. We can do this by responding to the new format turbo_stream. We’ll want to ensure that the previous instance variable @users which is iterated over on the index.html.erb table is present and contains User records here as well. I’ve implemented a basic search via a SQL LIKE clause but you can certainly get much fancier here.
# /app/controllers/users/searches_controller.rb
def index
  respond_to do |format|
    format.turbo_stream do
      @users = User.where("name LIKE :name", name: "%#{params[:search_term]}%")

      # Rendering code will go here
    end
  end
end
Upon a successful search request we’ll first look for the turbo-stream format in the request headers. This can be seen as the Content-Type text/vnd.turbo-stream.html or format.turbo_stream.
Next we want the server response to render a turbo_stream back to the front-end which replaces an HTML ID (:userListing above is the DOM ID target) with a template partial. There are several other turbo-stream operations you can use in addition to replace (append, prepend, replace, update, remove).
      render turbo_stream: turbo_stream.replace(
        :userListing,
        partial: "users/listing"
      )
    end
With that in place, the full controller action should now look like the following:
# /app/controllers/users/searches_controller.rb
def index
  respond_to do |format|
    format.turbo_stream do
      @users = User.where("name LIKE :name", name: "%#{params[:search_term]}%")

      render turbo_stream: turbo_stream.replace(
        :userListing,
        partial: "users/listing"
      )
    end
  end
end
Now right now this won’t do much other than respond with some data. No page elements can be changed because the target of the turbo-stream (the :userListing DOM ID doesn’t yet exist). Let’s fix that by moving the <tbody> part of the users/index.html.erb table into a separate ERB partial. Name it users/_listing.html.erb like we’ve specified above in the render turbo_stream with partial: "users/listing". We’ll also add simple empty state for when there are no results returned in the @users variable.
<!--app/views/users/_listing.html.erb-->
<tbody id="userListing">
  <% @users.each do |user| %>
    <tr>
      <td><%= user.name %></td>
      <td><%= link_to 'Show', user %></td>
      <td><%= link_to 'Edit', edit_user_path(user) %></td>
      <td><%= link_to 'Destroy', user, method: :delete, data: { confirm: 'Are you sure?' } %></td>
    </tr>
  <% end %>

  <!-- Blank state -->
  <% if @users.empty? %>
    <tr>
      <td><em>No matching users</em></td>
    </tr>
  <% end %>
</tbody>
Make sure to add id="userListing" onto the top level tag so that turbo-streams knows what to target. Earlier we made sure that our new controller action utilized the same instance variable for the users collection with @users for both our UsersController#index and Users::SearchesController#index. Now each controller has a collection of User records available to iterate through.
Lastly, make sure you’re rendering the new partial within index.html.erb so that we have the proper DOM ID on the page.
<%= form_with url: search_users_path do |form| %>
 <%= form.text_field 'search_term', placeholder: 'Enter search terms...' %>
 <%= form.submit 'Search', data: { disable_with: false } %>
<% end %>

<table>
  <thead>
    <tr>
      <th>Name</th>
      <th colspan="3"></th>
    </tr>
  </thead>

  <%= render partial: "users/listing" %>
</table>
And that’s pretty much it. Check out our example in action below:
There was hardly any code needed to make this happen. Just hooking up various parts of the system together to work in concert.
The response from the browser uses a Turbo Stream template:
<!-- Browser Turbo Stream response -->
<turbo-stream action="replace" target="userListing"><template><tbody id="userListing">
    <tr>
      <td>yarp
</td>
      <td><a href="/users/5">Show</a></td>
      <td><a href="/users/5/edit">Edit</a></td>
      <td><a data-confirm="Are you sure?" rel="nofollow" data-method="delete" href="/users/5">Destroy</a></td>
    </tr>

</tbody>
</template></turbo-stream>
Sprinkling in Stimulus
One thing our above search feature is missing, is the ability to shortcut and bookmark search terms. Search features
often implement this by using a GET request and moving the search terms into a url query string. This allows for
bookmarking a specific search query. Turbo Stream injects the format text/vnd.turbo-stream.html into the headers for POST, PUT, PATCH, and DELETE only. This means that GET requests aren’t supported
Enter Stimulus.
While Turbo usually takes care of at least 80% of the interactivity that traditionally would have required JavaScript, there are still cases where a dash of custom code is required. Stimulus makes this easy with a HTML-centric approach to state and wiring.
Hotwire.dev
You may remember from the beginning of our tutorial the rails generator line of --webpack=stimulus. This configured the
Stimulus JavaScript framework for us. You can see a basic example from the
framework by navigating to app/javascript/controllers/hello_controller.js. It will look a bit like:
import { Controller } from "stimulus"

export default class extends Controller {

  connect() {
    console.log('hi')
  }
}
Change the name of this file to search_controller.js since it will be working with our search form. There are a couple steps we’ll need to do here:
- Link our Stimulus controller to the DOM
- Call Stimulus controller method when user clicks submit
- Update the url’s query string with the search_term
Now we’ll want to map our search_controller.js to an element in our HTML.
Identifiers serve as the link between elements and controllers.
Stimulus Handbook
We can do this by using identifiers as they associate controllers with the DOM. Identifiers use the data-controller="search" syntax to map to controller names.
<%= form_with url: search_users_path, data: { controller: "search" } do |form| %>
With our search form hooked up to our controller, we need to capture the search term when the
user clicks submit. We can do so using Stimulus actions. These use the data-action="event->controller#action" syntax.
data-actionspecifies that there is an event method in our controller associated with this element.click->search#addQueryStringsays, “When the user clicks this element, call the addQueryString() method from the search controller”
Add this to the submit button.
<%= form.submit 'Search', data: { disable_with: false, action: "click->search#addQueryString" } %>
We’ll fill out a stubbed method in our Stimulus controller for now.
import { Controller } from "stimulus"

export default class extends Controller {
  addQueryString() {
    console.log('You clicked me');
  }
}
You can try this out and notice that every time you click submit there is a message in your browser console.
The last step is to retrieve the value the user supplies in our form. This can be accomplished by using Stimulus targets.
Stimulus lets us mark important elements as targets so we can easily reference them in the controller through corresponding properties.
Stimulus Handbook
A Stimulus target uses the data-controller-target="name" syntax. For our example we’ll use data-search-target="term" to capture the user’s input. Add this to our form to finish out its connection to Stimulus.
<%= form_with url: search_users_path, data: { controller: "search" } do |form| %>
 <%= form.text_field 'search_term', placeholder: 'Enter search terms...', data: { "search-target" => "term" } %>
 <%= form.submit 'Search', data: { disable_with: false, action: "click->search#addQueryString" } %>
<% end %>
With that done, we can create our target back in our Stimulus controller. This will automatically
build a this.termTarget property within our controller.
import { Controller } from "stimulus"

export default class extends Controller {
  static targets = [ "term" ]

  addQueryString() {
    console.log(this.termTarget.value);
  }
}
While having this.termTarget available to us is really useful it can start to
clutter your method calls with extra cruft. Luckily the Stimulus tutorial explains
that we can use a getter method here to clean things up.
import { Controller } from "stimulus"

export default class extends Controller {
  static targets = [ "term" ]

  addQueryString() {
    console.log(this.term);
  }

  get term() {
    return this.termTarget.value;
  }
}
Now that we have the input value we can build a simple (albeit naive) implementation of adding a query string to the url.
  addQueryString() {
    if (this.term === "") {
      const cleanURL = location.protocol + "//" + location.host + location.pathname;
      history.replaceState({}, document.title, cleanURL);
    } else {
      history.replaceState(null, null, `?search_term=${this.term}`);
    }
  }
The above says, “Given a user’s search term add it to the query string search_term attribute. When there isn’t a search term them revert the url back to the base domain.”. I won’t go into detail on the history api which is used above. It is likely there is a more efficient way to do this but for this example it works. If you’d like to learn more about the history api check out this mozilla article. With the two branches in place our query string will match whatever search term the user enters.
The final step in making our search form bookmarkable is to ensure that our controller respects an existing query string
request. For example, if I request localhost:3000/users/?search_term=josh then I would expect my listing to pre-populate with Users that match the term josh. Doing this is pretty simple as what we need is a conditional check within our UsersController#index.
  def index
    @users = if params[:search_term].present?
      # Since we're using this in two controllers now it might be
      # wise to abstract it out into a Model method
      User.where("name LIKE :name", name: "%#{params[:search_term]}%")
    else
      User.all
    end
  end
And with that we’ve got a fully functional search form which is bookmarkable.
Where’s Strada?
At the writing of this article, Strada has yet to be released. Sounds like sometime this year we’ll see it become part of the Hotwire approach.
[Strada] standardizes the way that web and native parts of a mobile hybrid application talk to each other via HTML bridge attributes. This makes it easy to progressively level-up web interactions with native replacements.
Hotwire
Conclusion
We used minmal JavaScript and relied primarily on Turbo to make it dynamic. Really this is just the tip of the iceberg into what can be accomplished with Hotwire. Have you used Hotwire on a project? What techniques did you find useful? Hit me up in the comments below as I’d love to discuss.
As always thanks for reading and happy coding.
Add joy to your test suite with Cardi B
Examining power and privilege in the workplace; Basecamp's problematic policies
Join the conversation