

Upgrading to a new version of Rails is always an adventure. There are gems to update, deprecations to fix, and pitfalls to dodge. Recently, I’ve upgraded Rails from 5 to 6 and have come away with lessons I’ve learned and a general process to follow.
Before digging into the process, here’s some lessons I’ve learned:
Take small steps
")
Compartmentalizing changes during an upgrade process helps to avoid bugs in production and allows for an easier time investigating dependency related issues. What I mean by this is upgrading a single gem (or unit of change) in a pull request. Otherwise, if you were to upgrade several things at once, it becomes increasingly difficult to discover which change is causing the issue. Worse still you may change multiple things and find out that they work well separately but not at the same time. All of this to say it is more efficient to just split every unit of work into an individual changeset as it will save you time in the long run.
You can boil this tip down to the sentiement of Be Patient.
Get ready to read
")
Reading documentation, changelogs, issues, and pull requests is important as you traverse an upgrade. Knowing how one gem interacts with another will help you anticipate roadblocks. Changelogs are especially great as they call out major differences and/or breaking changes between versions.
Planning, planning, planning
")
Having a good plan of action for how to implement all the changes necessary for the upgrade will help keep you focused on the finish line. Identifying work that can be done prior to upgrading helps make the actual upgrade go much easier. You can use such categories to help direct your efforts during this process.
Admit when you need help
")
Going it alone on something as complicated as an upgrade can be a daunting task. In reality trying to upgrade a system without talking to the domain experts (or engineers who built the various features) will end up taking much more time in the long haul. Additionally, getting stumped by a particularly hairy dependency upgrade can be avoided by asking questions early and often. Many times I’ve found myself coming up with solutions for a problem only to ask a single question of a colleague which helps me realize that the problem I was solving doesn’t actually need solving. Pair programming can also come in handy here as well as two brains are better than one.
Breaks are an efficient use of your time
")
Upgrade processes can take huge amounts of effort. Or little to none. Either way taking a break when you’re stuck can be a great way to ease frustration and come back to the problem refreshed. There have been so many times that I’ve been stumped and taking a break away from my computer I’ve come up with a viable solution. It’s also good for your health :-)
Now onto the steps I’ve identified for a successful upgrade.
A Standard Upgrade Progress
I’ve broken my process down into five steps.
- Have a good test suite
- Investigate Rails upgrade guide & core gem changelogs
- Plan and organize your work
- Create a frankenbranch to identify update necessary for Rails
- Execute an upgrade plan
While these steps are listed in sequential order there are times when going back a number will be necessary. Generally this happens when you discover unknown scope and/or work that is necessary in later steps. For example, you may find that while implementing a fix in step 5 you uncover that another dependency also requires an upgrade. This would send you back into step 2 (or even 1 if there isn’t adequate test coverage) which is perfectly fine. There is going to be some organic back and forth between steps. The goal of having these steps is to repeat them as necessary to identify additional work.
First things first. Having a good test suite gives confidence to upgrading.
1. Have a good test suite
Before I start a new Rails upgrade, I first stop off at the test suite. I’ll take a quick look through it and determine if there are any parts that don’t have coverage. Later on when working with specific gems or code I’ll double check that it has code coverage when updating it. It’s important to lean on your tests to ensure that your application works both in the current version as well as the new version. Having test coverage that covers the critical paths will be important to ensure that regressions failures are avoided during the upgrade process. This doesn’t necessarily mean you hit a certain coverage percentage just rather that your core offering for your product is properly exercised by tests.
Having test coverage that covers the critical paths will be important to ensure that regressions failures are avoided during the upgrade process.
There are other things you can invest in such as automated testing or continuous integration. While these make everything much easier they aren’t necessary for an upgrade process. That being said you do want to make sure you can run your entire test suite fast enough to inform your work. In case it doesn’t then you should spend the energy setting up automated testing and speeding up your test suite. This will be a great tool for discovering bugs and incompatibilities in the new Rails version. Many times I’ve pushed up a change to CI in order to watch the logs that are generated from the test runner. This helps in finding bugs and/or upcoming deprecations. I recommend CodeShip and TravisCI as potential providers.
It’s worth noting that you may have to revisit your test suite if you find that there is missing test coverage for an upgraded feature. Once you’re confident that you have a great test suite to rely on then you can move onto investigating what it will take to upgrade.
2. Investigate Rails upgrade guide & core gem changelogs
Rails has a profusion of resources to help guide you in any upgrade process. There is upgrade documentation, version release notes, and core gem changelogs. For step 2, I spend time reading through each of these as well as returning back to these references in later steps. During this step I’ll make notes of what exactly will need to be changed and what will need a spike of code to determine what should be changed. Below I’ll go through the various resources with explanations to their usefulness. Let’s start with upgrade documentation.
The general upgrade documentation keeps a high-level overview of many of the potentials changes you may encounter while upgrading. It even gives you a guide on moving between one version to the next. I always start upgrades by reading the upgrading to rails guide in its entirety. It’s an excellent starting place for any new upgrade and hits many of the high priority changes that you’ll encounter.
Next up, the version release notes are specific to a given Rails version. They contain a much more detailed list of what’s new in this version as well as changes made to core gem’s that Rails relies on. If you don’t know, Rails gemifies things like ActiveRecord, ActiveModel, and ActiveSupport. The version release notes give great information on each dependent gem. Here’s the Rails 6.0 release notes as an example.
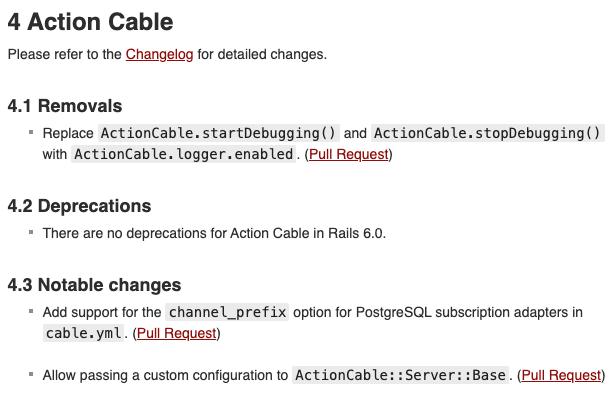
If you look at the above screenshot, you’ll notice that specific gems within Rails (such as Action Cable) have been broken out into sections. The sections titled Removals is especially important as it lists out breaking changes in the new version. Deprecations give you a heads up that functionality is going to soon be removed in the next version released which gives you time to plan for transitioning to the new standard. Notable changes gives you a detailed view of specific changes that may or may not effect your implementation. Each of these is useful in their own domain.
Looking at tagged versions of a gem allows you to see code at a specific point in time.
Finally, if the version release notes don’t have enough information you can go directly to the changelogs from the main
repository. Notice that there are folders in Github for activemodel, activerecord, and others. These
are literally gems consumed by Rails. Clicking into any of these gem folders you’ll notice each has a Changelog.md which
can be immensely helpful in understanding what is happening version to version.
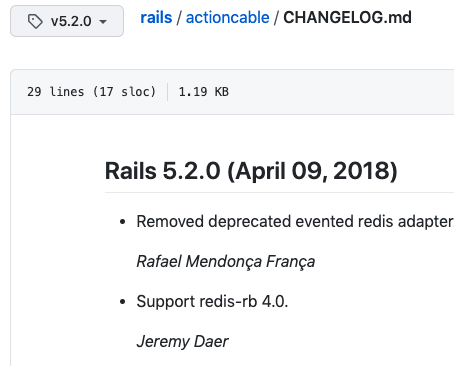
When viewing a changelog you’ll want to be sure that you’re looking at the tagged version that you’re upgrading to (unless of course you’re upgrading to edge in which case look at the master branch). If you look at the top right corner of the screenshot above, you’ll notice that I am looking at the 5.2.0 version of the Action Cable changelog. Looking at tagged versions of a gem allows you to see code at a specific point in time.
3. Plan and organize your work
Now that you have an idea of what you’re up against and the order to which you’ll need to complete it in, I’ve found that using the following as an organization strategy for work to be helpful. It also allows the rest of the team to better visualize how far along the upgrade is (though this should also be communicated). These can be split into separate epics or a single one with tags. However, it works for you these categories are helpful in planning your work.
- Gem upgrades
- Pre-upgrade
- Primary upgrade
- Post-upgrade
I’ve found that starting with the most risky story first is a good way to make unknown scope become known scope.
Gem upgrades contains all the gems that require their version to be upgraded in order to support the new Rails version.
Pre-upgrade consists of work required to adjust or fix removed or broken functionality. This can also contain identified stories from the Investigate Rails upgrade guide & core gem changelogs step.
Primary upgrade is a single pull request that contains at least the Rails version bump but can also contain work that must be deployed at the same time.
Post-upgrade are stories that aren’t required for the primary upgrade to work but should be completed soon after. These are generally fixing deprecations and opting into new Rails features.
Ready to start making this upgrade happen?
4. Create a frankenbranch to identify update necessary for Rails
Now that we’ve identified major changes from the documentation and started the planning process, we’ll need to make we can begin implementing them on a frankenbranch. When I say frankenbranch, I mean a branch that includes all (yes, all) the necessary changes to upgrade to the next version of Rails you’re aiming for. This can help determine which gems need to be upgraded as well as issues that have to be fixed prior to upgrading Rails. This branch isn’t designed to be merged (please don’t) but rather be used as an investigative tool for planning. There are several things that are useful goals of this approach:
- Determine what it takes to run
rails serverlocally - Determine what it takes to run
rails serveron a staging environment - Find all the issues and deprecations that arise in your test suite
- Organize units of change into categories: gem upgrades, pre-upgrades, primary-upgrade, and post-upgrades
First step, create a new branch. Next adjust your Gemfile to point the Rails version at your target version. Then attempt to run bundle update rails. When you do this you’ll most likely start seeing version mismatches in your console.
Gem dependency mismatches
Here’s an example of the rails-controller-testing gem having a mistmatch in version from running the previous command
  rails-controller-testing (~> 1.0.1) was resolved to 1.0.2, which depends on
    actionpack (~> 5.x, >= 5.0.1)
This one indicates that rails-controller-testing relies on ActionPack being greater than or equal to 5.0.1 but not greater than 5.x. Since we’re trying to upgrade to Rails 6, having a constraint of ~> 5.x won’t work for us.
Now that we know rails-controller-testing has a version mismatch, we can peek at its .gemspec file, here. What we’ll find is that for the gem’s 1.0.1 version the Actionpack dependency is locked to everything before Rails 6’s version. Using the tag filtering in Github we can incrementally move through the versions until we find one that satisfies the new dependency requirement.

By filtering a repository by a version tag you can see a snapshot of what the code looked like at the time of release. This also can help you move backwards through time on the Changelog or Gemspec. I’ve also used this to directly look through code for particulary challenging conflicts where I needed to understand exactly what changed between versions.
Now we can go back to rails-controller-testing.gemspec and see the following on the 1.0.2 version.
  s.add_dependency "actionpack", "~> 5.x", ">= 5.0.1"
  s.add_dependency "actionview", "~> 5.x", ">= 5.0.1"
  s.add_dependency "activesupport", "~> 5.x"

  s.add_development_dependency "railties", "~> 5.x"
Two options here: We can read the gem’s changelog to see if a specific version calls out support for Rails 6 or we can incrementally change the tagged version while viewing the gemspec to see which version relaxes the dependency constraint. Luckily for us the next version 1.0.3 does just that.
  s.add_dependency "actionpack", ">= 5.0.1.x"
  s.add_dependency "actionview", ">= 5.0.1.x"
  s.add_dependency "activesupport", ">= 5.0.1.x"

  s.add_development_dependency "railties", "> 5.0.1.x"
Now we know that one of our Gem Upgrade category tasks will be Upgrade rails-controller-testing to 1.0.3. Like I mentioned above this will become a single pull request change.
From what we now know above about this gem, we can run the following command on our frankenbranch bundle update rails-controller-testing --conservative. The –conservative flag says when updating this gem do no update any of its dependencies. Using the –conservative flag with bundle is really useful for minimizing changesets as well as avoiding upgrading things that you don’t need to upgrade.
Using the --conservative flag with bundle is really useful for minimizing changesets as well as avoiding upgrading things that you don't need to upgrade
Fixing removed functionality
In addition to gem ugprades, you’ll also run into things that just plain don’t work anymore. One such example is using the Arel table .exists method in order to create existence queries. Previously you could call things like: Users.where(active: true).exists and return SQL like
EXISTS (SELECT "users".* FROM "users" WHERE "users"."deleted_at" IS NULL AND "users"."created_at" IS NOT NULL)
However in Rails 6 calling .exists directly will return:
NoMethodError: undefined method `exists' for #<User::ActiveRecord_Relation:0x00007fbf68013090>
Did you mean?  exists?
Now the previous Rails version does tip us off on this issue a bit with a helpful deprecation warning Delegating exists to arel is deprecated and will be removed in Rails 6.0. Ok so it sounds like delegation was removed for the .exists method. This presents us with a simple fix in that we can write out the previous delegation in full using .arel.exists. Now we can properly use an existence query within Rails 6.
The above is another single unit of change to be contained within an individual pull request. Unlike the rails-controller-testing version upgrade above, fixing arel.exists falls into the pre-upgrade category for planning purposes. While you’ll discover things that don’t work and have valid fixes prior to upgrading Rails, there are times where trying to fix an issue or upgrade a gem either needs to happen at the same time as the Rails upgrade or post-upgrade. I call these tangled dependencies.
Tangled dependencies
These are gems and functionality that can’t be fixed prior to upgrading to the next version of Rails. A simple example of this is Rails 6 DNS rebinding in relation to how it effects the development environment. Specifically if you use a custom domain like .lvh.me or alternative domains outside of localhost, dns rebinding will block the request. This is a new config settings called hosts that is only available with Rails 6 but will prevent custom domains as soon as Rails 6 is used. In other words this change must be deployed along with Rails 6. As much as you can, it’s good to separate out changes prior to upgrading Rails for ones that must happen simultaneously. In the case of the new configuration value, it should happen at the same time as we upgrade. When we finally get to upgrading Rails we can add the following to our development.rb environment file to enable it for lvh.me:
config.hosts << ".lvh.me"
So far we’ve come across straight-forward fixes for the above but there are times when it might be impossible to fix an issue.
Unreconcilable issues
These don’t happen often but sometimes there might be a gem or core functionality that just plain won’t work anymore. An example of this is needing a gem version that relaxes its gemspec dependency versions. Like the rails-controller-testing example above, think of a gem that is preventing the Rails upgrade but doesn’t have a version that fixes the mismatch. In these types of cases you have a couple options: look for a pull request on the gem that fixes it, use a different gem, upgrade the gem yourself, or remove the functionality entirely.
If you do find a pull request on a gem that fixes your issue you can point your Gemfile’s gem at that specific branch using the github and branch attributes.
gem "activerecord-session_store", github: "rails/activerecord-session_store", branch: "secure-session-store"
The above is an actual example of a change I had to make in order to continue the upgrade. Note in the above I’m pointing at the github repository for the main gem but in reality it is much safer to instead: fork the gem and point your Gemfile at the forked gem & branch. By forking you ensure that the unmerged branch doesn’t change (as you now control it). I’ve adjusted the above to show off what I mean below. Now my user joshmfrankel is the owner of the fork.
gem "activerecord-session_store", github: "joshmfrankel/activerecord-session_store", branch: "secure-session-store"
There’s a completely different approach you can take to unreconciable issues. Sometimes remove functionality entirely. In a different case, I noticed that we had search functionality through ElasticSearch for a single feature while the rest of the application used Algolia. Part of the upgrade was going to require me to upgrade ElasticSearch which was proving very complicated and error prone. Eventually I talked to a colleague with experience in Algolia and realized we already had all the proper search indexes in the other search solution. From this I was able to refactor the single feature from ElasticSearch over onto Algolia. Not only did this clear the way for the Rails 6 upgrade but also removed our dependency completely for ElasticSearch. A win win.
Repeat as necessary
The rest of this step is to keep repeating the above until you’ve satistifed our original goals. I’ll list them again below:
- Determine what it takes to run
rails serverlocally - Determine what it takes to run
rails serveron a staging environment - Find all the issues and deprecations that arise in your test suite
- Organize units of change into categories: gem upgrades, pre-upgrades, primary-upgrade, and post-upgrades
Once you’re at this point you’re ready to start executing on your upgrade plan.
5. Execute an upgrade plan
With a clear plan in place and knowledge of what needs to happen in order to upgrade, we begin that actual upgrade process. What this means is starting with the gem upgrades and pre-upgrade categories above and moving through the identified stories. We want each change to be separate to limit the potential of bugs making their way into production. Again this means if you need to change .exists to .arel.exists, that you don’t also upgrade a
gem in the pull request. Keeping work isolated will help the process flow smoothly.
Once you’ve finished out the gem upgrades and pre-upgrade work, then you get to do the fun step of the primary upgrade
Primary upgrade
During this step you’ll be running bundle update rails as well as the rails upgrade command rails app:update. The upgrade command will ask you if you want to add/ignore/replace any existing framework file it is trying to add. I’m assuming we’re working with an existing app so most of the time you should ignore replacing existing files. One file you’ll want to keep is the new_framework_defaults_6_0.rb. This is a new convention from Rails 5 that lists out specific feature flags that can be opted into at a later date allowing for an easier time migrating to new Rails’ versions. Keep these as either commented out or false. Enabling these should be places as individual stories within the post-upgrade category.
Something else important to note during the primary upgrade is the need for extensive testing. You’ll want to perform a full regresssion test of every critical pathway in the application. Can users login? Can they buy products you sell? Do they receive email? Anything and everything could potentially break so taking your time with this is worth the investment. What you don’t want to have happen is a new Rails version deploying, finding out there is a bug in production, and rolling back isn’t an option due to differing functionality. If you’re team has a QA tester now’s the time to buy her or him a coffee as this is quite the undertaking. If your team doesn’t, then enlist other engineers to help out will increase the chances of finding any issues before production.
Post-upgrade
Congratulations! You are over the major hurtle. With the new Rails version into production you can breathe a little easier.
For the post-upgrade, generally you’ll be fixing deprecation warnings that clutter your test suite logs and slowly enabling the new_framework_defaults_6.0.rb one at a time. Additionally, you’ll want to monitor application peformance to see how the app functions post upgrade to identify any application contention in production. Maybe a controller endpoint is much slower now. Or a report is timing out. Things like this are worth going back and looking over.
Conclusion
While the above process is fairly straight-forward, I can’t over-empahsize enough the importance of keeping your changes small and isolated. This is such an important skill when undergoing an upgrade (one of which I’ve seen the consequences of not following). Don’t be afraid to repeat the steps above as needed. This can only help improve the separation of units of change. Aside from that, the heart of upgrade work is methodically pushing change forward. From reading documentation to discovering the proper gem versions, it’s about the details.
With that we’re done. What did you think about the process above? Have you done a Rails upgrade? Let me know by dropping a comment below.
Thanks for reading.
A Journey into Writing Union queries with Active Record
Ordinal abbreviations for dates in Rails
Join the conversation