<?xml version="1.0" encoding="utf-8"?><feed xmlns="http://www.w3.org/2005/Atom" ><generator uri="https://jekyllrb.com/" version="4.4.1">Jekyll</generator><link href="http://joshfrankel.me/feed.xml" rel="self" type="application/atom+xml" /><link href="http://joshfrankel.me/" rel="alternate" type="text/html" /><updated>2026-06-09T13:56:32+00:00</updated><id>http://joshfrankel.me/feed.xml</id><title type="html">Development Simplified</title><subtitle>A blog about ruby, sql, performance, and patterns. By Josh Frankel.
</subtitle><author><name>Josh Frankel (@joshmfrankel)</name><uri>http://joshfrankel.me/</uri></author><entry><title type="html">Give your Capybara a Bath; Decreasing Flaky Tests</title><link href="http://joshfrankel.me/blog/give-your-capybara-a-bath-decreasing-flaky-tests/" rel="alternate" type="text/html" title="Give your Capybara a Bath; Decreasing Flaky Tests" /><published>2026-06-08T00:00:00+00:00</published><updated>2026-06-08T00:00:00+00:00</updated><id>http://joshfrankel.me/blog/give-your-capybara-a-bath-decreasing-flaky-tests</id><content type="html" xml:base="http://joshfrankel.me/blog/give-your-capybara-a-bath-decreasing-flaky-tests/"><![CDATA[<p>There’s nothing more frustrating than waiting for that last test or CI pipeline to finish, only
for it to flake out. This decreases confidence in your test suite, increases spend on CI pipeline
runtime, and decreases engineering happiness. Feature tests are especially prone to flakiness, as
they rely on directly interacting with the application UI and browser. Adding JavaScript into the
mix only increases failure likelihood. I’ve recently refactored a test suite to combat several known
flaky patterns which I’ve outlined below.</p>

<!--excerpt-->

<h2 id="use-capybara-responsibly">Use Capybara Responsibly</h2>

<p>When using any feature or acceptance testing framework, minimizing flakes is important to keeping
your test suite reliable.</p>

<blockquote>
  <p>Capybara is smart enough to retry finding the link for a brief period of time before giving up and throwing an error.</p>
  <ul>
    <li><a href="https://rubydoc.info/github/teamcapybara/capybara/master">Capybara’s documentation</a></li>
  </ul>
</blockquote>

<p>The most important rule you can follow is to use Capybara as it was designed
so that it properly waits for elements to be available. When done correctly, you can avoid introducing
flaky strategies into your test suite. <a href="https://rubydoc.info/github/teamcapybara/capybara/master#_a_name__asynchronous_javascript_ajax_and_friends____a_Asynchronous_JavaScript__Ajax_and_friends_">Capybara’s documentation</a> along with <a href="https://thoughtbot.com/blog/write-reliable-asynchronous-integration-tests-with-capybara">Thoughtbot’s blog post</a> give excellent guidance on the subject. As long as you follow these standard guidelines, Capybara is smart enough to wait for elements to be available without resorting to manual synchronization.</p>

<p>Here’s an <a href="https://deepwiki.com/teamcapybara/capybara/4.2-synchronization#synchronization">AI generated representation of Capybara’s Syncrhonization mechanic</a>
from Deepwiki.</p>

<h2 id="phew-that-capybara-smells">Phew, that Capybara Smells</h2>

<p><img src="/img/2026/capybara-in-the-mud-in-brazil-joe-mcdonald.jpg" alt="Capybara in the mud in Brazil by Joe McDonald" /></p>

<p>Common flaky smells you may see include:</p>

<ul>
  <li>Using <code class="language-plaintext highlighter-rouge">sleep</code> or <code class="language-plaintext highlighter-rouge">wait_until</code> to wait for elements to be available</li>
  <li>Constructing <code class="language-plaintext highlighter-rouge">retry</code> loops for inconsistent elements</li>
  <li>Using retry mechanisms like <code class="language-plaintext highlighter-rouge">rspec-retry</code> or Datadog retry</li>
  <li>Executing JavaScript directly (sometimes unavoidable)</li>
  <li>Broadly scoped matchers instead of narrow, specific page sections</li>
  <li>Attempting to click hidden or background elements</li>
  <li>Areas of high interactivity and/or animation timing</li>
</ul>

<p>These code smells indicate low confidence tests. If <strong>retry</strong> or <strong>sleep</strong> is necessary for a test to pass
there is generally a better process or standard which will eliminate the need for these patches.</p>

<p>Wouldn’t it be nice if we could automatically detect these smells and make them easier to spot? That’s
where Rubocop comes in.</p>

<h3 id="sleep-is-a-test-smell"><strong>sleep</strong> is a Test Smell</h3>

<div class="language-ruby highlighter-rouge"><div class="highlight"><pre class="highlight"><code><span class="n">it</span> <span class="s1">'checks a thing'</span> <span class="k">do</span>
  <span class="n">visit</span> <span class="s1">'/flaky_page'</span>

  <span class="n">click_on</span> <span class="s1">'A Slow Action'</span>
  <span class="nb">sleep</span> <span class="mi">2</span>

  <span class="n">click_on</span> <span class="s1">'Another action'</span>

  <span class="n">expect</span><span class="p">(</span><span class="n">page</span><span class="p">).</span><span class="nf">to</span> <span class="n">have_content</span><span class="p">(</span><span class="s1">'Static content before slow action'</span><span class="p">)</span>
<span class="k">end</span>
</code></pre></div></div>

<p>The above test uses a manual <code class="language-plaintext highlighter-rouge">sleep</code> call to wait for a slow action to complete. The correct way to
approach this is to expect the exact side-effect from the slow action. The below showcases looking
for specific content that changes after the action completes instead of only checking for content
that remains unchanged.</p>

<div class="language-ruby highlighter-rouge"><div class="highlight"><pre class="highlight"><code><span class="n">it</span> <span class="s1">'checks a thing'</span> <span class="k">do</span>
  <span class="n">visit</span> <span class="s1">'/flaky_page'</span>

  <span class="n">click_on</span> <span class="s1">'A Slow Action'</span>
  <span class="n">expect</span><span class="p">(</span><span class="n">page</span><span class="p">).</span><span class="nf">to</span> <span class="n">have_content</span><span class="p">(</span><span class="s1">'Side effect from `Slow action`'</span><span class="p">)</span>

  <span class="n">click_on</span> <span class="s1">'Another action'</span>

  <span class="n">expect</span><span class="p">(</span><span class="n">page</span><span class="p">).</span><span class="nf">to</span> <span class="n">have_content</span><span class="p">(</span><span class="s1">'Side effect from `Another action`'</span><span class="p">)</span>
<span class="k">end</span>
</code></pre></div></div>

<p>We can indicate to future engineers that <code class="language-plaintext highlighter-rouge">sleep</code> is a standard violation with the following custom
Rubocop rule. The <code class="language-plaintext highlighter-rouge">def_node_matches</code> is the magic which allows detection of the <code class="language-plaintext highlighter-rouge">sleep</code> call which
contains an integer amount.</p>

<div class="language-ruby highlighter-rouge"><div class="highlight"><pre class="highlight"><code><span class="nb">require</span> <span class="s2">"rubocop/cop/base"</span>

<span class="k">module</span> <span class="nn">RuboCop</span>
  <span class="k">module</span> <span class="nn">CustomCops</span>
    <span class="k">module</span> <span class="nn">Capybara</span>
      <span class="k">class</span> <span class="nc">AvoidSleep</span> <span class="o">&lt;</span> <span class="no">RuboCop</span><span class="o">::</span><span class="no">Cop</span><span class="o">::</span><span class="no">Base</span>
        <span class="n">def_node_matcher</span> <span class="ss">:sleep_call?</span><span class="p">,</span> <span class="o">&lt;&lt;~</span><span class="no">PATTERN</span><span class="sh">
          (send nil? :sleep (int _))
</span><span class="no">        PATTERN</span>

        <span class="k">def</span> <span class="nf">on_send</span><span class="p">(</span><span class="n">node</span><span class="p">)</span>
          <span class="k">return</span> <span class="k">unless</span> <span class="n">sleep_call?</span><span class="p">(</span><span class="n">node</span><span class="p">)</span>

          <span class="n">add_offense</span><span class="p">(</span>
            <span class="n">node</span><span class="p">,</span>
            <span class="ss">message: </span><span class="o">&lt;&lt;~</span><span class="no">MESSAGE</span><span class="sh">
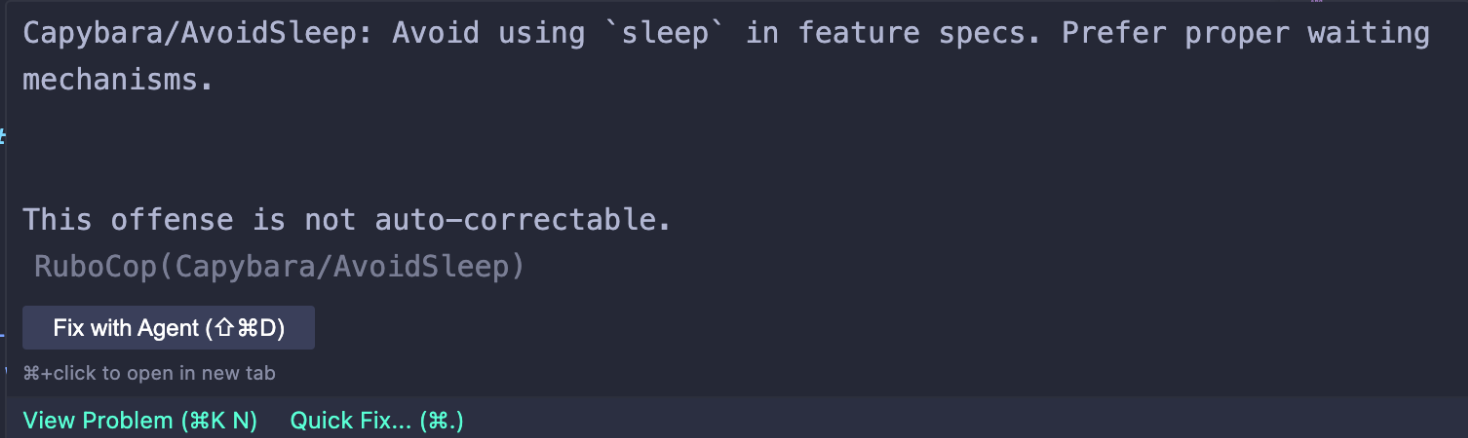
              Avoid using `sleep` in feature specs. Prefer proper waiting mechanisms.
</span><span class="no">            MESSAGE</span>
          <span class="p">)</span>
        <span class="k">end</span>
      <span class="k">end</span>
    <span class="k">end</span>
  <span class="k">end</span>
<span class="k">end</span>
</code></pre></div></div>

<p>In addition to the above custom rule you’ll want to add it to your <strong>rubocop.yml</strong> configuration
file. This allows us to scope the check only to Feature tests.</p>

<div class="language-yml highlighter-rouge"><div class="highlight"><pre class="highlight"><code><span class="na">require</span><span class="pi">:</span>
  <span class="pi">-</span> <span class="s">./rubocop/custom_cops/capybara/avoid_sleep.rb</span>

<span class="na">Capybara/AvoidSleep</span><span class="pi">:</span>
  <span class="na">Enabled</span><span class="pi">:</span> <span class="kc">true</span>
  <span class="na">Description</span><span class="pi">:</span> <span class="s2">"</span><span class="s">Avoid</span><span class="nv"> </span><span class="s">using</span><span class="nv"> </span><span class="s">`sleep`</span><span class="nv"> </span><span class="s">in</span><span class="nv"> </span><span class="s">feature</span><span class="nv"> </span><span class="s">specs."</span>
  <span class="na">Include</span><span class="pi">:</span>
    <span class="pi">-</span> <span class="s2">"</span><span class="s">**/features/**/*_spec.rb"</span>
</code></pre></div></div>

<p>This will end up being picked up in your editor as the below is an example within Cursor.
<img src="/img/2026/rubocop-sleep.png" alt="Cursor Rubocop Issue popover" /></p>

<h3 id="retry-is-a-test-smell"><strong>retry</strong> is a Test Smell</h3>

<div class="language-ruby highlighter-rouge"><div class="highlight"><pre class="highlight"><code><span class="n">it</span> <span class="s1">'checks an indetermine thing'</span> <span class="k">do</span>
  <span class="n">visit</span> <span class="s1">'/flaky_page'</span>

  <span class="n">click_on</span> <span class="s1">'A Slow Action'</span>

  <span class="n">with_retry</span> <span class="k">do</span>
    <span class="n">click_on</span> <span class="s1">'Another action'</span>
  <span class="k">end</span>

  <span class="n">expect</span><span class="p">(</span><span class="n">page</span><span class="p">).</span><span class="nf">to</span> <span class="n">have_content</span><span class="p">(</span><span class="s1">'Static content before slow action'</span><span class="p">)</span>
<span class="k">end</span>

<span class="k">def</span> <span class="nf">with_retry</span>
  <span class="n">attempts</span> <span class="o">=</span> <span class="mi">0</span>
  <span class="n">maximum_retries</span> <span class="o">=</span> <span class="mi">5</span>
  
  <span class="k">begin</span>
    <span class="k">yield</span>
  <span class="k">rescue</span> <span class="no">Capybara</span><span class="o">::</span><span class="no">Cuprite</span><span class="o">::</span><span class="no">ObsoleteNode</span><span class="p">,</span> <span class="no">Ferrum</span><span class="o">::</span><span class="no">NodeNotFoundError</span>
    <span class="n">attempts</span> <span class="o">+=</span> <span class="mi">1</span>

    <span class="k">raise</span> <span class="k">if</span> <span class="n">attempts</span> <span class="o">&gt;=</span> <span class="n">maximum_retries</span>
    
    <span class="k">retry</span>
  <span class="k">end</span>
<span class="k">end</span>
</code></pre></div></div>

<p>The above attempts to perform <code class="language-plaintext highlighter-rouge">click_on 'Another action'</code> up to 5 times. It is retrying because it
isn’t confident that the previous <code class="language-plaintext highlighter-rouge">click_on 'A Slow Action'</code> is finished in time for the next click.
Like the above <code class="language-plaintext highlighter-rouge">sleep</code> example, the proper fix is to expect the end-state using standard Capybara
waiting techniques.</p>

<div class="language-ruby highlighter-rouge"><div class="highlight"><pre class="highlight"><code><span class="n">it</span> <span class="s1">'checks a thing'</span> <span class="k">do</span>
  <span class="n">visit</span> <span class="s1">'/flaky_page'</span>

  <span class="n">click_on</span> <span class="s1">'A Slow Action'</span>
  <span class="n">expect</span><span class="p">(</span><span class="n">page</span><span class="p">).</span><span class="nf">to</span> <span class="n">have_content</span><span class="p">(</span><span class="s1">'Side effect from `Slow action`'</span><span class="p">)</span>

  <span class="n">click_on</span> <span class="s1">'Another action'</span>

  <span class="n">expect</span><span class="p">(</span><span class="n">page</span><span class="p">).</span><span class="nf">to</span> <span class="n">have_content</span><span class="p">(</span><span class="s1">'Side effect from `Another action`'</span><span class="p">)</span>
<span class="k">end</span>
</code></pre></div></div>

<p>Introducing a Rubocop rule here is event easier than <code class="language-plaintext highlighter-rouge">sleep</code> as there is an <code class="language-plaintext highlighter-rouge">on_retry</code> hook method. We
can simply designate <code class="language-plaintext highlighter-rouge">retry</code> as unnacceptable.</p>

<div class="language-ruby highlighter-rouge"><div class="highlight"><pre class="highlight"><code><span class="nb">require</span> <span class="s2">"rubocop/cop/base"</span>

<span class="k">module</span> <span class="nn">RuboCop</span>
  <span class="k">module</span> <span class="nn">CustomCops</span>
    <span class="k">module</span> <span class="nn">Capybara</span>
      <span class="k">class</span> <span class="nc">AvoidRetry</span> <span class="o">&lt;</span> <span class="no">RuboCop</span><span class="o">::</span><span class="no">Cop</span><span class="o">::</span><span class="no">Base</span>
        <span class="k">def</span> <span class="nf">on_retry</span><span class="p">(</span><span class="n">node</span><span class="p">)</span>
          <span class="n">add_offense</span><span class="p">(</span>
            <span class="n">node</span><span class="p">,</span>
            <span class="ss">message: </span><span class="o">&lt;&lt;~</span><span class="no">MESSAGE</span><span class="sh">
              Avoid using `retry` in feature specs. Prefer proper waiting mechanisms.
</span><span class="no">            MESSAGE</span>
          <span class="p">)</span>
        <span class="k">end</span>
      <span class="k">end</span>
    <span class="k">end</span>
  <span class="k">end</span>
<span class="k">end</span>
</code></pre></div></div>
<div class="language-yml highlighter-rouge"><div class="highlight"><pre class="highlight"><code><span class="c1"># rubocop.yml</span>
<span class="na">require</span><span class="pi">:</span>
  <span class="pi">-</span> <span class="s">./rubocop/custom_cops/capybara/avoid_sleep.rb</span>
  <span class="pi">-</span> <span class="s">./rubocop/custom_cops/capybara/avoid_wait.rb</span>

<span class="na">Capybara/AvoidSleep</span><span class="pi">:</span>
  <span class="na">Enabled</span><span class="pi">:</span> <span class="kc">true</span>
  <span class="na">Description</span><span class="pi">:</span> <span class="s2">"</span><span class="s">Avoid</span><span class="nv"> </span><span class="s">using</span><span class="nv"> </span><span class="s">`sleep`</span><span class="nv"> </span><span class="s">in</span><span class="nv"> </span><span class="s">feature</span><span class="nv"> </span><span class="s">specs."</span>
  <span class="na">Include</span><span class="pi">:</span>
    <span class="pi">-</span> <span class="s2">"</span><span class="s">**/features/**/*_spec.rb"</span>

<span class="na">Capybara/AvoidWait</span><span class="pi">:</span>
  <span class="na">Enabled</span><span class="pi">:</span> <span class="kc">true</span>
  <span class="na">Description</span><span class="pi">:</span> <span class="s2">"</span><span class="s">Avoid</span><span class="nv"> </span><span class="s">using</span><span class="nv"> </span><span class="s">`wait:</span><span class="nv"> </span><span class="s">int`</span><span class="nv"> </span><span class="s">in</span><span class="nv"> </span><span class="s">feature</span><span class="nv"> </span><span class="s">specs."</span>
  <span class="na">Include</span><span class="pi">:</span>
    <span class="pi">-</span> <span class="s2">"</span><span class="s">**/features/**/*_spec.rb"</span>
</code></pre></div></div>

<h3 id="wait-x-is-a-test-smell"><code class="language-plaintext highlighter-rouge">wait: x</code> is a Test Smell</h3>

<p>If you notice certain methods have explicit <code class="language-plaintext highlighter-rouge">wait: x</code> arguments that is a test smell. Capybara is
really good at waiting a default time for its built-in methods.</p>

<div class="language-ruby highlighter-rouge"><div class="highlight"><pre class="highlight"><code><span class="n">it</span> <span class="s1">'checks a thing'</span> <span class="k">do</span>
  <span class="n">visit</span> <span class="s1">'/flaky_page'</span>

  <span class="n">click_on</span> <span class="s1">'A Slow Action'</span>
  <span class="n">expect</span><span class="p">(</span><span class="n">page</span><span class="p">).</span><span class="nf">to</span> <span class="n">have_content</span><span class="p">(</span><span class="s1">'Side effect from `Slow action`'</span><span class="p">,</span> <span class="ss">wait: </span><span class="mi">10</span><span class="p">)</span>

  <span class="n">click_on</span> <span class="s1">'Another action'</span>

  <span class="n">expect</span><span class="p">(</span><span class="n">page</span><span class="p">).</span><span class="nf">to</span> <span class="n">have_content</span><span class="p">(</span><span class="s1">'Side effect from `Another action`'</span><span class="p">)</span>
<span class="k">end</span>
</code></pre></div></div>

<p>These generally indicate there is
an intermediate expectation missing to help ensure the element is available. I’m going to broken
record here but the fix is largely the same with most flakes. Expect the next possible state to ensure
proper waiting.</p>

<div class="language-ruby highlighter-rouge"><div class="highlight"><pre class="highlight"><code><span class="n">it</span> <span class="s1">'checks a thing'</span> <span class="k">do</span>
  <span class="n">visit</span> <span class="s1">'/flaky_page'</span>

  <span class="n">click_on</span> <span class="s1">'A Slow Action'</span>
  <span class="n">expect</span><span class="p">(</span><span class="n">page</span><span class="p">).</span><span class="nf">to</span> <span class="n">have_selector</span><span class="p">(</span><span class="s2">"#slowActionContainer div.expanded"</span><span class="p">)</span> <span class="c1"># Wait for expansion to indicate content displayed</span>
  <span class="n">expect</span><span class="p">(</span><span class="n">page</span><span class="p">).</span><span class="nf">to</span> <span class="n">have_content</span><span class="p">(</span><span class="s1">'Side effect from `Slow action`'</span><span class="p">)</span>

  <span class="n">click_on</span> <span class="s1">'Another action'</span>

  <span class="n">expect</span><span class="p">(</span><span class="n">page</span><span class="p">).</span><span class="nf">to</span> <span class="n">have_content</span><span class="p">(</span><span class="s1">'Side effect from `Another action`'</span><span class="p">)</span>
<span class="k">end</span>
</code></pre></div></div>

<p>Wait is a bit more tricky to add a Rubocop rule. Because it isn’t a direct method call but an argument
passed to a Capybara matcher, we need to look for an argument pairing of <code class="language-plaintext highlighter-rouge">wait</code> and an integer. The
<code class="language-plaintext highlighter-rouge">(pair (sym :wait) (int $_))</code> ensures we do just that and capture the integer for output messaging.
Additionally, we rely on the hook method <code class="language-plaintext highlighter-rouge">on_pair</code> since we aren’t sending a method call like we did
with <code class="language-plaintext highlighter-rouge">sleep</code>.</p>

<div class="language-ruby highlighter-rouge"><div class="highlight"><pre class="highlight"><code><span class="nb">require</span> <span class="s2">"rubocop/cop/base"</span>

<span class="k">module</span> <span class="nn">RuboCop</span>
  <span class="k">module</span> <span class="nn">CustomCops</span>
    <span class="k">module</span> <span class="nn">Capybara</span>
      <span class="k">class</span> <span class="nc">AvoidWait</span> <span class="o">&lt;</span> <span class="no">RuboCop</span><span class="o">::</span><span class="no">Cop</span><span class="o">::</span><span class="no">Base</span>
        <span class="n">def_node_matcher</span> <span class="ss">:wait_pair?</span><span class="p">,</span> <span class="o">&lt;&lt;~</span><span class="no">PATTERN</span><span class="sh">
          (pair (sym :wait) (int $_))
</span><span class="no">        PATTERN</span>

        <span class="k">def</span> <span class="nf">on_pair</span><span class="p">(</span><span class="n">node</span><span class="p">)</span>
          <span class="n">wait_integer</span> <span class="o">=</span> <span class="n">wait_pair?</span><span class="p">(</span><span class="n">node</span><span class="p">)</span>
          <span class="k">return</span> <span class="k">unless</span> <span class="n">wait_integer</span><span class="o">&amp;</span><span class="p">.</span><span class="nf">positive?</span>

          <span class="n">add_offense</span><span class="p">(</span>
            <span class="n">node</span><span class="p">,</span>
            <span class="ss">message: </span><span class="o">&lt;&lt;~</span><span class="no">MESSAGE</span><span class="sh">
              Avoid using `wait: </span><span class="si">#{</span><span class="n">wait_integer</span><span class="si">}</span><span class="sh">` in feature specs. Prefer proper waiting mechanisms.
</span><span class="no">            MESSAGE</span>
          <span class="p">)</span>
        <span class="k">end</span>
      <span class="k">end</span>
    <span class="k">end</span>
  <span class="k">end</span>
<span class="k">end</span>
</code></pre></div></div>
<div class="language-yml highlighter-rouge"><div class="highlight"><pre class="highlight"><code><span class="c1"># rubocop.yml</span>
<span class="na">require</span><span class="pi">:</span>
  <span class="pi">-</span> <span class="s">./rubocop/custom_cops/capybara/avoid_sleep.rb</span>
  <span class="pi">-</span> <span class="s">./rubocop/custom_cops/capybara/avoid_wait.rb</span>
  <span class="pi">-</span> <span class="s">./rubocop/custom_cops/capybara/avoid_retry.rb</span>

<span class="na">Capybara/AvoidSleep</span><span class="pi">:</span>
  <span class="na">Enabled</span><span class="pi">:</span> <span class="kc">true</span>
  <span class="na">Description</span><span class="pi">:</span> <span class="s2">"</span><span class="s">Avoid</span><span class="nv"> </span><span class="s">using</span><span class="nv"> </span><span class="s">`sleep`</span><span class="nv"> </span><span class="s">in</span><span class="nv"> </span><span class="s">feature</span><span class="nv"> </span><span class="s">specs."</span>
  <span class="na">Include</span><span class="pi">:</span>
    <span class="pi">-</span> <span class="s2">"</span><span class="s">**/features/**/*_spec.rb"</span>

<span class="na">Capybara/AvoidWait</span><span class="pi">:</span>
  <span class="na">Enabled</span><span class="pi">:</span> <span class="kc">true</span>
  <span class="na">Description</span><span class="pi">:</span> <span class="s2">"</span><span class="s">Avoid</span><span class="nv"> </span><span class="s">using</span><span class="nv"> </span><span class="s">`wait:</span><span class="nv"> </span><span class="s">int`</span><span class="nv"> </span><span class="s">in</span><span class="nv"> </span><span class="s">feature</span><span class="nv"> </span><span class="s">specs."</span>
  <span class="na">Include</span><span class="pi">:</span>
    <span class="pi">-</span> <span class="s2">"</span><span class="s">**/features/**/*_spec.rb"</span>

<span class="na">Capybara/AvoidRetry</span><span class="pi">:</span>
  <span class="na">Enabled</span><span class="pi">:</span> <span class="kc">true</span>
  <span class="na">Description</span><span class="pi">:</span> <span class="s2">"</span><span class="s">Avoid</span><span class="nv"> </span><span class="s">using</span><span class="nv"> </span><span class="s">`retry`</span><span class="nv"> </span><span class="s">in</span><span class="nv"> </span><span class="s">feature</span><span class="nv"> </span><span class="s">specs."</span>
  <span class="na">Include</span><span class="pi">:</span>
    <span class="pi">-</span> <span class="s2">"</span><span class="s">**/features/**/*_spec.rb"</span>
</code></pre></div></div>

<h2 id="strategies-for-complex-flakes">Strategies for complex flakes</h2>

<p>All of the below strategies should be considered as what to try if standard Capybara expectations
and matcher waiting isn’t sufficient. These will add some overhead to lock in consistent test suite
results but rely on strategic workarounds.</p>

<blockquote>
  <p>A consistent test suite is a confident test suite</p>
</blockquote>

<h3 id="animations-with-duration-are-flaky">Animations with duration are flaky</h3>

<p>Timing is everything for feature tests. Animations notoriously are plaqued by flakes. Most
of the time using standard Capybara waiting techniques as mentioned above is the best approach. One 
solution I’ve found helpful is to instrument the animation lifecycle.</p>

<p>Instrumentation can be done by adding event handlers to events like: <code class="language-plaintext highlighter-rouge">transitionend</code> and <code class="language-plaintext highlighter-rouge">transitionstart</code>.
These in turn set the current state of animation which you can rely on for expectations.</p>

<div class="language-javascript highlighter-rouge"><div class="highlight"><pre class="highlight"><code><span class="nf">connect</span><span class="p">()</span> <span class="p">{</span>
  <span class="k">this</span><span class="p">.</span><span class="nx">containerTarget</span><span class="p">.</span><span class="nf">addEventListener</span><span class="p">(</span>
    <span class="dl">"</span><span class="s2">transitionend</span><span class="dl">"</span><span class="p">,</span>
    <span class="k">this</span><span class="p">.</span><span class="nx">onTransitionEnd</span><span class="p">,</span>
  <span class="p">);</span>
  <span class="k">this</span><span class="p">.</span><span class="nx">containerTarget</span><span class="p">.</span><span class="nf">addEventListener</span><span class="p">(</span>
    <span class="dl">"</span><span class="s2">transitionstart</span><span class="dl">"</span><span class="p">,</span>
    <span class="k">this</span><span class="p">.</span><span class="nx">onTransitionStart</span><span class="p">,</span>
  <span class="p">);</span> 
<span class="p">}</span>

<span class="nx">onTransitionStart</span> <span class="o">=</span> <span class="p">(</span><span class="nx">event</span><span class="p">)</span> <span class="o">=&gt;</span> <span class="p">{</span>
  <span class="k">if </span><span class="p">(</span><span class="nx">event</span><span class="p">.</span><span class="nx">propertyName</span> <span class="o">===</span> <span class="dl">"</span><span class="s2">translate</span><span class="dl">"</span><span class="p">)</span> <span class="p">{</span>
    <span class="k">this</span><span class="p">.</span><span class="nx">transitionStateValue</span> <span class="o">=</span> <span class="dl">"</span><span class="s2">transitioning</span><span class="dl">"</span><span class="p">;</span> <span class="c1">// Indicates state of change</span>
  <span class="p">}</span>
<span class="p">};</span>

<span class="nx">onTransitionEnd</span> <span class="o">=</span> <span class="p">(</span><span class="nx">event</span><span class="p">)</span> <span class="o">=&gt;</span> <span class="p">{</span>
  <span class="k">if </span><span class="p">(</span><span class="nx">event</span><span class="p">.</span><span class="nx">propertyName</span> <span class="o">===</span> <span class="dl">"</span><span class="s2">translate</span><span class="dl">"</span><span class="p">)</span> <span class="p">{</span>
    <span class="k">this</span><span class="p">.</span><span class="nx">transitionStateValue</span> <span class="o">=</span> <span class="dl">"</span><span class="s2">idle</span><span class="dl">"</span><span class="p">;</span> <span class="c1">// Indicates stability</span>
  <span class="p">}</span>
<span class="p">};</span>

<span class="nf">disconnect</span><span class="p">()</span> <span class="p">{</span>
  <span class="k">this</span><span class="p">.</span><span class="nx">containerTarget</span><span class="p">.</span><span class="nf">removeEventListener</span><span class="p">(</span>
  <span class="dl">"</span><span class="s2">transitionend</span><span class="dl">"</span><span class="p">,</span>
  <span class="k">this</span><span class="p">.</span><span class="nx">onTransitionEnd</span><span class="p">,</span>
<span class="p">);</span>
<span class="k">this</span><span class="p">.</span><span class="nx">containerTarget</span><span class="p">.</span><span class="nf">removeEventListener</span><span class="p">(</span>
  <span class="dl">"</span><span class="s2">transitionstart</span><span class="dl">"</span><span class="p">,</span>
  <span class="k">this</span><span class="p">.</span><span class="nx">onTransitionStart</span><span class="p">,</span>
<span class="p">);</span> 
<span class="p">}</span>
</code></pre></div></div>

<p>The above gives a Stimulus.js example of setting a state of <code class="language-plaintext highlighter-rouge">idle</code> or <code class="language-plaintext highlighter-rouge">transitioning</code> to the current
DOM element. From this you can expect an animation heavy element using such a technique to be done
transitioning when its state reaches <code class="language-plaintext highlighter-rouge">idle</code></p>

<div class="language-ruby highlighter-rouge"><div class="highlight"><pre class="highlight"><code><span class="n">expect</span><span class="p">(</span><span class="n">page</span><span class="p">).</span><span class="nf">to</span> <span class="n">have_selector</span><span class="p">(</span><span class="s2">"[data-transition-state-value='idle']"</span><span class="p">)</span>
</code></pre></div></div>

<h3 id="element-clicking-based-on-position-is-flaky">Element clicking based on position is flaky</h3>

<p>Much like the animation timing example, sometimes elements are hidden, overlaid, or in the background.
This can make them unclickable until a request has finished or something like a popup has closed. This
is because the calculated location to click at changes or is invalid for the final element’s location.</p>

<p>This example is for the Cuprite headless browser. A clickable link which is non-deterministically
hidden behind other elements based on page timing could fall victim to returning a flaky result.</p>

<div class="language-ruby highlighter-rouge"><div class="highlight"><pre class="highlight"><code><span class="k">module</span> <span class="nn">CupriteHelpers</span>
  <span class="k">def</span> <span class="nf">click_with_cuprite_fallback</span><span class="p">(</span><span class="n">text</span><span class="p">)</span>
    <span class="n">link</span> <span class="o">=</span> <span class="n">find</span><span class="p">(</span><span class="s2">"a"</span><span class="p">,</span> <span class="ss">text: </span><span class="n">text</span><span class="p">,</span> <span class="ss">exact_text: </span><span class="kp">true</span><span class="p">)</span>
    <span class="n">link</span><span class="p">.</span><span class="nf">click</span>
  <span class="k">rescue</span> <span class="no">Capybara</span><span class="o">::</span><span class="no">Cuprite</span><span class="o">::</span><span class="no">MouseEventFailed</span> <span class="o">=&gt;</span> <span class="n">e</span>
    <span class="nb">puts</span> <span class="s2">"Capybara::Cuprite::MouseEventFailed: Error clicking on link: </span><span class="si">#{</span><span class="n">text</span><span class="si">}</span><span class="s2">. Falling back to "</span> <span class="p">\</span>
         <span class="s2">"trigger('click'). Error: </span><span class="si">#{</span><span class="n">e</span><span class="p">.</span><span class="nf">message</span><span class="si">}</span><span class="s2">"</span>
    <span class="n">link</span><span class="p">.</span><span class="nf">trigger</span><span class="p">(</span><span class="s2">"click"</span><span class="p">)</span>
  <span class="k">end</span>
<span class="k">end</span>

<span class="c1"># Some test</span>
<span class="n">click_with_cuprite_fallback</span><span class="p">(</span><span class="s2">"Call to action link"</span><span class="p">)</span>
</code></pre></div></div>

<p>What the above does is attempt the standard link click by default. If there is a failure, it then
falls back to using <code class="language-plaintext highlighter-rouge">.trigger(click)</code>. Now be aware that this method isn’t available in all 
headless browsers. The difference between <code class="language-plaintext highlighter-rouge">link.click</code> and <code class="language-plaintext highlighter-rouge">link.trigger("click")</code> is that <code class="language-plaintext highlighter-rouge">link.click</code>
scrolls the browser and interacts with the page closer to how the end-user would. <code class="language-plaintext highlighter-rouge">link.trigger("click")</code>
is akin to executing JavaScript to directly click the element.</p>

<h2 id="fresh-and-clean">Fresh and clean</h2>

<p><img src="/img/2026/capybara-clean.gif" alt="Capybara Clean" /></p>

<p>With that we’ve guarded against some of the worst offenders: sleep, retry, and wait. We’ve also
provided necessary workarounds for animations and element click positioning when other strategies
aren’t sufficient.</p>

<p>Got another technique or strategy you use? Drop me a comment below.</p>]]></content><author><name>Josh Frankel (@joshmfrankel)</name><uri>http://joshfrankel.me/</uri></author><category term="articles" /><category term="ruby" /><category term="rubocop" /><category term="testing" /><summary type="html"><![CDATA[There’s nothing more frustrating than waiting for that last test or CI pipeline to finish, only for it to flake out. This decreases confidence in your test suite, increases spend on CI pipeline runtime, and decreases engineering happiness. Feature tests are especially prone to flakiness, as they rely on directly interacting with the application UI and browser. Adding JavaScript into the mix only increases failure likelihood. I’ve recently refactored a test suite to combat several known flaky patterns which I’ve outlined below.]]></summary></entry><entry><title type="html">Ruby Enumerable Gonna Show You How It’s Done, Done, Done</title><link href="http://joshfrankel.me/blog/ruby-enumerable-gonna-show-you-how-its-done-done-done/" rel="alternate" type="text/html" title="Ruby Enumerable Gonna Show You How It’s Done, Done, Done" /><published>2026-03-25T00:00:00+00:00</published><updated>2026-03-25T00:00:00+00:00</updated><id>http://joshfrankel.me/blog/ruby-enumerable-gonna-show-you-how-its-done-done-done</id><content type="html" xml:base="http://joshfrankel.me/blog/ruby-enumerable-gonna-show-you-how-its-done-done-done/"><![CDATA[<p>I’ve been using Ruby for over 11 years now and along the way I’ve discovered many favorite methods that I keep coming back to. Many of my favorites come from the Enumerable module. I love the simplicity of finding a standard method that does the exact data manipulation. Being able to share these methods with other engineers is fun in of itself. So without further ado, here’s some excellent Ruby Enumerable methods to show you how it’s done, done, done.</p>

<!--excerpt-->

<p><img src="/img/2026/how-its-done-done-done.png" alt="How it's done, done, done" title="Property of KPop Demon hunters" /></p>

<h2 id="table-of-contents">Table of Contents</h2>

<ul>
  <li><a href="#partition">partition</a></li>
  <li><a href="#group_by">group_by</a></li>
  <li><a href="#detect--find">detect / find</a></li>
  <li><a href="#tally">tally</a></li>
  <li><a href="#max_by">max_by</a></li>
  <li><a href="#zip">zip</a></li>
  <li><a href="#all-any-one-none">all-any-one-none</a></li>
  <li><a href="#filter_map">filter_map</a></li>
  <li><a href="#to_h">to_h</a></li>
</ul>

<h2 id="partition">partition</h2>

<p><a href="https://docs.ruby-lang.org/en/4.0/Enumerable.html#method-i-partition">Documentation</a></p>

<p><strong>What is it</strong>
Splits a collection in two parts</p>

<p><strong>When to use it</strong>
You need to perform different operations on a collection’s subsets.</p>

<div class="language-ruby highlighter-rouge"><div class="highlight"><pre class="highlight"><code><span class="no">User</span> <span class="o">=</span> <span class="no">Struct</span><span class="p">.</span><span class="nf">new</span><span class="p">(</span><span class="ss">:name</span><span class="p">,</span> <span class="ss">:signed_up_at</span><span class="p">)</span>
<span class="n">collection</span> <span class="o">=</span> <span class="p">[</span>
  <span class="no">User</span><span class="p">.</span><span class="nf">new</span><span class="p">(</span><span class="ss">name: </span><span class="s2">"Rumi"</span><span class="p">,</span> <span class="ss">signed_up_at: </span><span class="no">Time</span><span class="p">.</span><span class="nf">now</span><span class="p">),</span>
  <span class="no">User</span><span class="p">.</span><span class="nf">new</span><span class="p">(</span><span class="ss">name: </span><span class="s2">"Mira"</span><span class="p">),</span>
  <span class="no">User</span><span class="p">.</span><span class="nf">new</span><span class="p">(</span><span class="ss">name: </span><span class="s2">"Zoey"</span><span class="p">,</span> <span class="ss">signed_up_at: </span><span class="mi">1</span><span class="p">.</span><span class="nf">day</span><span class="p">.</span><span class="nf">ago</span><span class="p">),</span>
  <span class="no">User</span><span class="p">.</span><span class="nf">new</span><span class="p">(</span><span class="ss">name: </span><span class="s2">"Jinu"</span><span class="p">,</span> <span class="ss">signed_up_at: </span><span class="no">Time</span><span class="p">.</span><span class="nf">now</span><span class="p">),</span>
  <span class="no">User</span><span class="p">.</span><span class="nf">new</span><span class="p">(</span><span class="ss">name: </span><span class="s2">"Mystery Saja"</span><span class="p">)</span>
<span class="p">]</span>
<span class="n">signed_up_users</span><span class="p">,</span> <span class="n">not_signed_up_users</span> <span class="o">=</span> <span class="n">collection</span><span class="p">.</span><span class="nf">partition</span> <span class="k">do</span> <span class="o">|</span><span class="n">user</span><span class="o">|</span>
  <span class="n">user</span><span class="p">.</span><span class="nf">signed_up_at</span><span class="p">.</span><span class="nf">present?</span>
<span class="k">end</span>

<span class="n">signed_up_users</span>
<span class="c1">#=&gt; [#&lt;struct User name="Rumi", signed_up_at=2025-10-09 11:55:38.009997 -0400&gt;, #&lt;struct User name="Zoey", signed_up_at=2025-10-08 15:55:38.010126000 UTC +00:00&gt;, #&lt;struct User name="Jinu", signed_up_at=2025-10-09 11:55:38.010603 -0400&gt;]</span>

<span class="n">not_signed_up_users</span>
<span class="c1">#=&gt; [#&lt;struct User name="Mira", signed_up_at=nil&gt;, #&lt;struct User name="Mystery Saja", signed_up_at=nil&gt;]</span>
</code></pre></div></div>

<h2 id="group_by">group_by</h2>

<p><a href="https://docs.ruby-lang.org/en/4.0/Enumerable.html#method-i-group_by">Documentation</a></p>

<p><strong>What is it</strong>
Reorganizes a collection based on result.</p>

<p><strong>When to use it</strong>
You need to separate many different records into distinct groups</p>

<div class="language-ruby highlighter-rouge"><div class="highlight"><pre class="highlight"><code><span class="n">collection</span> <span class="o">=</span> <span class="p">[</span>
  <span class="p">{</span> <span class="ss">name: </span><span class="s2">"Rumi"</span><span class="p">,</span> <span class="ss">demon: :maybe</span> <span class="p">},</span>
  <span class="p">{</span> <span class="ss">name: </span><span class="s2">"Mira"</span><span class="p">,</span> <span class="ss">demon: :no</span> <span class="p">},</span>
  <span class="p">{</span> <span class="ss">name: </span><span class="s2">"Zoey"</span><span class="p">,</span> <span class="ss">demon: :no</span> <span class="p">},</span>
  <span class="p">{</span> <span class="ss">name: </span><span class="s2">"Jinu"</span><span class="p">,</span> <span class="ss">demon: :yes</span> <span class="p">},</span>
  <span class="p">{</span> <span class="ss">name: </span><span class="s2">"Gwi-ma"</span><span class="p">,</span> <span class="ss">demon: :yes</span> <span class="p">},</span>
  <span class="p">{</span> <span class="ss">name: </span><span class="s2">"Mystery Saja"</span><span class="p">,</span> <span class="ss">demon: :yes</span> <span class="p">},</span>
  <span class="p">{</span> <span class="ss">name: </span><span class="s2">"Bobby"</span><span class="p">,</span> <span class="ss">demon: :no</span> <span class="p">},</span>
<span class="p">]</span>

<span class="n">collection</span><span class="p">.</span><span class="nf">group_by</span> <span class="p">{</span> <span class="o">|</span><span class="n">item</span><span class="o">|</span> <span class="n">item</span><span class="p">[</span><span class="ss">:demon</span><span class="p">]</span> <span class="p">}</span>
<span class="c1">#=&gt; {</span>
<span class="c1">#     maybe: [{ name: "Rumi", demon: :maybe }],</span>
<span class="c1">#     no: [{ name: "Mira", demon: :no }, { name: "Zoey", demon: :no }, { name: "Bobby", demon: :no }],</span>
<span class="c1">#     yes: [{ name: "Jinu", demon: :yes }, { name: "Gwi-ma", demon: :yes }, { name: "Mystery Saja", demon: :yes }],</span>
<span class="c1">#    }</span>
</code></pre></div></div>

<blockquote>
  <p>Not a core Ruby Enumerable and there is also the Rails <strong>Enumerable#index_by</strong>. Unlike <strong>group_by</strong> it will only associate a single value to each key, so if you need an array associated to each key use group_by. Otherwise a 1-to-1 key value association can work well for <strong>index_by</strong>.</p>

  <p><a href="https://api.rubyonrails.org/classes/Enumerable.html#method-i-index_by">Enumerable#index_by</a></p>
</blockquote>

<h2 id="detect--find">detect / find</h2>

<p><a href="https://docs.ruby-lang.org/en/4.0/Enumerable.html#method-i-detect">Documentation</a></p>

<p><strong>What is it</strong>
Finds the first match in a collection</p>

<p><strong>When to use it</strong>
You need to return a record from a collection as soon as it is found</p>

<div class="language-ruby highlighter-rouge"><div class="highlight"><pre class="highlight"><code><span class="n">collection</span> <span class="o">=</span> <span class="p">[</span>
  <span class="p">{</span> <span class="ss">name: </span><span class="s2">"Rumi"</span><span class="p">,</span> <span class="ss">demon: :maybe</span> <span class="p">},</span>
  <span class="p">{</span> <span class="ss">name: </span><span class="s2">"Mira"</span><span class="p">,</span> <span class="ss">demon: :no</span> <span class="p">},</span>
  <span class="p">{</span> <span class="ss">name: </span><span class="s2">"Zoey"</span><span class="p">,</span> <span class="ss">demon: :no</span> <span class="p">},</span>
  <span class="p">{</span> <span class="ss">name: </span><span class="s2">"Jinu"</span><span class="p">,</span> <span class="ss">demon: :yes</span> <span class="p">},</span>
  <span class="p">{</span> <span class="ss">name: </span><span class="s2">"Gwi-ma"</span><span class="p">,</span> <span class="ss">demon: :yes</span> <span class="p">},</span>
  <span class="p">{</span> <span class="ss">name: </span><span class="s2">"Mystery Saja"</span><span class="p">,</span> <span class="ss">demon: :yes</span> <span class="p">},</span>
  <span class="p">{</span> <span class="ss">name: </span><span class="s2">"Bobby"</span><span class="p">,</span> <span class="ss">demon: :no</span> <span class="p">},</span>
<span class="p">]</span>

<span class="n">collection</span><span class="p">.</span><span class="nf">detect</span> <span class="p">{</span> <span class="o">|</span><span class="n">item</span><span class="o">|</span> <span class="n">item</span><span class="p">[</span><span class="ss">:demon</span><span class="p">]</span> <span class="o">==</span> <span class="ss">:maybe</span> <span class="p">}</span>
<span class="c1"># =&gt; {name: "Rumi", demon: :maybe}</span>
</code></pre></div></div>

<h2 id="tally">tally</h2>

<p><a href="https://docs.ruby-lang.org/en/4.0/Enumerable.html#method-i-tally">Documentation</a></p>

<p><strong>What is it</strong>
Counts the total occurrences of each value. Akin to a frequency distribution of the available results.</p>

<p><strong>When to use it</strong>
You need to count the unique occurrences for each value in a collection.</p>

<div class="language-ruby highlighter-rouge"><div class="highlight"><pre class="highlight"><code><span class="n">character_ages</span> <span class="o">=</span> <span class="p">[</span><span class="mi">40</span><span class="p">,</span> <span class="mi">12</span><span class="p">,</span> <span class="mi">32</span><span class="p">,</span> <span class="mi">63</span><span class="p">,</span> <span class="mi">32</span><span class="p">,</span> <span class="mi">32</span><span class="p">,</span> <span class="mi">11</span><span class="p">,</span> <span class="mi">20</span><span class="p">,</span> <span class="mi">12</span><span class="p">]</span>
<span class="c1">#=&gt; [40, 12, 32, 63, 32, 32, 11, 20, 12]</span>
<span class="n">character_ages</span><span class="p">.</span><span class="nf">tally</span>
<span class="c1">#=&gt; {40 =&gt; 1, 12 =&gt; 2, 32 =&gt; 3, 63 =&gt; 1, 11 =&gt; 1, 20 =&gt; 1}</span>
</code></pre></div></div>

<h2 id="max_by">max_by</h2>

<p><a href="https://docs.ruby-lang.org/en/4.0/Enumerable.html#method-i-max_by">Documentation</a></p>

<p><strong>What is it</strong>
Returns the object which is the greatest value in the collection</p>

<p><strong>When to use it</strong>
You have a numerical value associated to a record where you want the top value</p>

<div class="language-ruby highlighter-rouge"><div class="highlight"><pre class="highlight"><code><span class="n">collection</span> <span class="o">=</span> <span class="p">[</span>
  <span class="p">{</span> <span class="ss">name: </span><span class="s2">"Rumi"</span><span class="p">,</span> <span class="ss">demon: :maybe</span><span class="p">,</span> <span class="ss">height: </span><span class="mi">62</span> <span class="p">},</span>
  <span class="p">{</span> <span class="ss">name: </span><span class="s2">"Mira"</span><span class="p">,</span> <span class="ss">demon: :no</span><span class="p">,</span> <span class="ss">height: </span><span class="mi">70</span> <span class="p">},</span>
  <span class="p">{</span> <span class="ss">name: </span><span class="s2">"Zoey"</span><span class="p">,</span> <span class="ss">demon: :no</span><span class="p">,</span> <span class="ss">height: </span><span class="mi">63</span> <span class="p">},</span>
  <span class="p">{</span> <span class="ss">name: </span><span class="s2">"Jinu"</span><span class="p">,</span> <span class="ss">demon: :yes</span><span class="p">,</span> <span class="ss">height: </span><span class="mi">73</span> <span class="p">},</span>
  <span class="p">{</span> <span class="ss">name: </span><span class="s2">"Gwi-ma"</span><span class="p">,</span> <span class="ss">demon: :yes</span><span class="p">,</span> <span class="ss">height: </span><span class="mi">240</span> <span class="p">},</span>
  <span class="p">{</span> <span class="ss">name: </span><span class="s2">"Mystery Saja"</span><span class="p">,</span> <span class="ss">demon: :yes</span><span class="p">,</span> <span class="ss">height: </span><span class="mi">72</span> <span class="p">},</span>
  <span class="p">{</span> <span class="ss">name: </span><span class="s2">"Bobby"</span><span class="p">,</span> <span class="ss">demon: :no</span><span class="p">,</span> <span class="ss">height: </span><span class="mi">65</span> <span class="p">},</span>
<span class="p">]</span>

<span class="n">collection</span><span class="p">.</span><span class="nf">max_by</span> <span class="p">{</span> <span class="o">|</span><span class="n">item</span><span class="o">|</span> <span class="n">item</span><span class="p">[</span><span class="ss">:height</span><span class="p">]</span> <span class="p">}</span>
<span class="c1"># =&gt; {name: "Gwi-ma", demon: :yes, height: 240}</span>

<span class="c1"># With parameter `2` for 2 results</span>
<span class="n">collection</span><span class="p">.</span><span class="nf">max_by</span><span class="p">(</span><span class="mi">2</span><span class="p">)</span> <span class="p">{</span> <span class="o">|</span><span class="n">item</span><span class="o">|</span> <span class="n">item</span><span class="p">[</span><span class="ss">:height</span><span class="p">]</span> <span class="p">}</span>
<span class="c1">#=&gt; [{name: "Gwi-ma", demon: :yes, height: 240}, {name: "Jinu", demon: :yes, height: 73}]</span>
</code></pre></div></div>

<h2 id="zip">zip</h2>

<p><a href="https://docs.ruby-lang.org/en/4.0/Enumerable.html#method-i-zip">Documentation</a></p>

<p><strong>What is it</strong>
Merges two or more collections into a single collection which is zippered together</p>

<p><strong>When to use it</strong>
You have multiple datasets which need to be combined in a staggered style. Very useful for database imports.</p>

<div class="language-ruby highlighter-rouge"><div class="highlight"><pre class="highlight"><code><span class="n">names</span> <span class="o">=</span> <span class="p">[</span><span class="s2">"Rumi"</span><span class="p">,</span> <span class="s2">"Mira"</span><span class="p">,</span> <span class="s2">"Zoey"</span><span class="p">]</span>
<span class="n">demon_status</span> <span class="o">=</span> <span class="p">[</span><span class="ss">:maybe</span><span class="p">,</span> <span class="ss">:no</span><span class="p">,</span> <span class="ss">:no</span><span class="p">]</span>
<span class="n">heights</span> <span class="o">=</span> <span class="p">[</span><span class="mi">62</span><span class="p">,</span> <span class="mi">70</span><span class="p">,</span> <span class="mi">63</span><span class="p">]</span>

<span class="n">names</span><span class="p">.</span><span class="nf">zip</span><span class="p">(</span><span class="n">demon_status</span><span class="p">,</span> <span class="n">heights</span><span class="p">)</span>
<span class="c1">#=&gt; [["Rumi", :maybe, 62], ["Mira", :no, 70], ["Zoey", :no, 63]]</span>
</code></pre></div></div>

<h2 id="all-any-one-none">all?, any?, one?, none?</h2>

<p><a href="https://docs.ruby-lang.org/en/4.0/Enumerable.html#method-i-all-3F">all?</a><br />
<a href="https://docs.ruby-lang.org/en/4.0/Enumerable.html#method-i-any-3F">any?</a><br />
<a href="https://docs.ruby-lang.org/en/4.0/Enumerable.html#method-i-none-3F">none?</a><br />
<a href="https://docs.ruby-lang.org/en/4.0/Enumerable.html#method-i-one-3F">one?</a></p>

<p><strong>What is it</strong>
Detects when the block condition returns true for the element and returns boolean</p>

<p><strong>When to use it</strong></p>

<ul>
  <li><strong>all?</strong> Should be used when you MUST check every single element in the collection (will iterate all elements)</li>
  <li><strong>any?</strong> Should be used when you want to return as early as the FIRST element that matches (will early return)</li>
  <li><strong>one?</strong> Should be used when you MUST ensure that 1 and only 1 element matches the block (will iterate all elements)</li>
  <li><strong>none?</strong> Should be used when you MUST check every single element in the collection to ensure it never matches (will iterate all elements)</li>
</ul>

<div class="language-ruby highlighter-rouge"><div class="highlight"><pre class="highlight"><code><span class="n">collection</span> <span class="o">=</span> <span class="p">[</span>
  <span class="p">{</span> <span class="ss">name: </span><span class="s2">"Rumi"</span><span class="p">,</span> <span class="ss">demon: :maybe</span><span class="p">,</span> <span class="ss">height: </span><span class="mi">62</span> <span class="p">},</span>
  <span class="p">{</span> <span class="ss">name: </span><span class="s2">"Mira"</span><span class="p">,</span> <span class="ss">demon: :no</span><span class="p">,</span> <span class="ss">height: </span><span class="mi">70</span> <span class="p">},</span>
  <span class="p">{</span> <span class="ss">name: </span><span class="s2">"Zoey"</span><span class="p">,</span> <span class="ss">demon: :no</span><span class="p">,</span> <span class="ss">height: </span><span class="mi">63</span> <span class="p">},</span>
  <span class="p">{</span> <span class="ss">name: </span><span class="s2">"Jinu"</span><span class="p">,</span> <span class="ss">demon: :yes</span><span class="p">,</span> <span class="ss">height: </span><span class="mi">73</span> <span class="p">},</span>
  <span class="p">{</span> <span class="ss">name: </span><span class="s2">"Gwi-ma"</span><span class="p">,</span> <span class="ss">demon: :yes</span><span class="p">,</span> <span class="ss">height: </span><span class="mi">240</span> <span class="p">},</span>
  <span class="p">{</span> <span class="ss">name: </span><span class="s2">"Mystery Saja"</span><span class="p">,</span> <span class="ss">demon: :yes</span><span class="p">,</span> <span class="ss">height: </span><span class="mi">72</span> <span class="p">},</span>
  <span class="p">{</span> <span class="ss">name: </span><span class="s2">"Bobby"</span><span class="p">,</span> <span class="ss">demon: :no</span><span class="p">,</span> <span class="ss">height: </span><span class="mi">65</span> <span class="p">},</span>
<span class="p">]</span>

<span class="n">collection</span><span class="p">.</span><span class="nf">all?</span> <span class="p">{</span> <span class="o">|</span><span class="n">item</span><span class="o">|</span> <span class="n">item</span><span class="p">[</span><span class="ss">:demon</span><span class="p">]</span> <span class="o">==</span> <span class="ss">:maybe</span> <span class="p">}</span>
<span class="c1"># =&gt; false</span>
<span class="c1"># Conclusion:</span>
<span class="c1"># False! All results must have a key :demon that is equivalent to :maybe</span>
<span class="c1"># Returns early on FAILURE, otherwise must check all items</span>

<span class="n">collection</span><span class="p">.</span><span class="nf">any?</span> <span class="p">{</span> <span class="o">|</span><span class="n">item</span><span class="o">|</span> <span class="n">item</span><span class="p">[</span><span class="ss">:height</span><span class="p">]</span> <span class="o">==</span> <span class="mi">240</span> <span class="p">}</span>
<span class="c1"># =&gt; true</span>
<span class="c1"># Conclusion:</span>
<span class="c1"># True! There must be at least 1 result with a height of 240</span>
<span class="c1"># Returns early on TRUTHY; otherwise must check all items</span>

<span class="n">collection</span><span class="p">.</span><span class="nf">one?</span> <span class="p">{</span> <span class="o">|</span><span class="n">item</span><span class="o">|</span> <span class="n">item</span><span class="p">[</span><span class="ss">:demon</span><span class="p">]</span> <span class="o">==</span> <span class="ss">:maybe</span> <span class="p">}</span>
<span class="c1"># =&gt; true</span>
<span class="c1"># Conclusion:</span>
<span class="c1"># True! There must ONLY be a single result with a demon status of :maybe</span>
<span class="c1"># Returns early on FAILURE; otherwise must check all items</span>

<span class="n">collection</span><span class="p">.</span><span class="nf">none?</span> <span class="p">{</span> <span class="o">|</span><span class="n">item</span><span class="o">|</span> <span class="n">item</span><span class="p">[</span><span class="ss">:height</span><span class="p">]</span> <span class="o">==</span> <span class="mi">100</span> <span class="p">}</span>
<span class="c1"># =&gt; true</span>
<span class="c1"># Conclusion:</span>
<span class="c1"># True! There must not be a single height that is equal to 100</span>
<span class="c1"># Returns early on FAILURE; otherwise must check all items</span>
</code></pre></div></div>

<h2 id="filter_map">filter_map</h2>

<p><a href="https://docs.ruby-lang.org/en/4.0/Enumerable.html#method-i-filter_map">Documentation</a></p>

<p><strong>What is it</strong>
Maps and returns truthy elements</p>

<p><strong>When to use it</strong>
You need a subset of a collection without any nil items.</p>

<p>This is syntactical sugar for <code class="language-plaintext highlighter-rouge">collection.map(&amp;:method).compact</code></p>

<div class="language-ruby highlighter-rouge"><div class="highlight"><pre class="highlight"><code><span class="n">collection</span> <span class="o">=</span> <span class="p">[</span>
  <span class="p">{</span> <span class="ss">name: </span><span class="s2">"Rumi"</span><span class="p">,</span> <span class="ss">demon: :maybe</span><span class="p">,</span> <span class="ss">height: </span><span class="mi">62</span> <span class="p">},</span>
  <span class="p">{</span> <span class="ss">name: </span><span class="s2">"Mira"</span><span class="p">,</span> <span class="ss">demon: :no</span><span class="p">,</span> <span class="ss">height: </span><span class="mi">70</span> <span class="p">},</span>
  <span class="p">{</span> <span class="ss">name: </span><span class="s2">"Zoey"</span><span class="p">,</span> <span class="ss">demon: :no</span><span class="p">,</span> <span class="ss">height: </span><span class="mi">63</span> <span class="p">},</span>
  <span class="p">{</span> <span class="ss">name: </span><span class="s2">"Jinu"</span><span class="p">,</span> <span class="ss">demon: :yes</span><span class="p">,</span> <span class="ss">height: </span><span class="mi">73</span> <span class="p">},</span>
  <span class="p">{</span> <span class="ss">name: </span><span class="s2">"Gwi-ma"</span><span class="p">,</span> <span class="ss">demon: :yes</span><span class="p">,</span> <span class="ss">height: </span><span class="mi">240</span> <span class="p">},</span>
  <span class="p">{</span> <span class="ss">name: </span><span class="s2">"Mystery Saja"</span><span class="p">,</span> <span class="ss">demon: :yes</span><span class="p">,</span> <span class="ss">height: </span><span class="mi">72</span> <span class="p">},</span>
  <span class="p">{</span> <span class="ss">name: </span><span class="s2">"Bobby"</span><span class="p">,</span> <span class="ss">demon: :no</span><span class="p">,</span> <span class="ss">height: </span><span class="mi">65</span> <span class="p">},</span>
<span class="p">]</span>

<span class="n">collection</span><span class="p">.</span><span class="nf">filter_map</span> <span class="p">{</span> <span class="o">|</span><span class="n">item</span><span class="o">|</span> <span class="n">item</span> <span class="k">if</span> <span class="n">item</span><span class="p">[</span><span class="ss">:demon</span><span class="p">]</span> <span class="o">==</span> <span class="ss">:yes</span> <span class="p">}</span>
<span class="c1">#=&gt; [{name: "Jinu", demon: :yes, height: 73}, {name: "Gwi-ma", demon: :yes, height: 240}, {name: "Mystery Saja", demon: :yes, height: 72}]</span>

<span class="c1"># Example of just using .map</span>
<span class="n">collection</span><span class="p">.</span><span class="nf">map</span> <span class="p">{</span> <span class="o">|</span><span class="n">item</span><span class="o">|</span> <span class="n">item</span> <span class="k">if</span> <span class="n">item</span><span class="p">[</span><span class="ss">:demon</span><span class="p">]</span> <span class="o">==</span> <span class="ss">:yes</span> <span class="p">}</span>
<span class="c1">#=&gt; [nil, nil, nil, {name: "Jinu", demon: :yes, height: 73}, {name: "Gwi-ma", demon: :yes, height: 240}, {name: "Mystery Saja", demon: :yes, height: 72}, nil]</span>
</code></pre></div></div>

<h2 id="to_h">to_h</h2>

<p><a href="https://docs.ruby-lang.org/en/4.0/Enumerable.html#method-i-to_h">Documentation</a></p>

<p><strong>What is it</strong>
Interprets the collection as a Hash</p>

<p><strong>When to use it</strong>
You need to associate value pairs into key-value configuration</p>

<div class="language-ruby highlighter-rouge"><div class="highlight"><pre class="highlight"><code><span class="n">collection</span> <span class="o">=</span> <span class="p">[</span>
  <span class="p">[</span><span class="s2">"Rumi"</span><span class="p">,</span> <span class="p">{</span> <span class="ss">demon: :maybe</span><span class="p">,</span> <span class="ss">height: </span><span class="mi">62</span> <span class="p">}],</span>
  <span class="p">[</span><span class="s2">"Mira"</span><span class="p">,</span> <span class="p">{</span> <span class="ss">demon: :no</span><span class="p">,</span> <span class="ss">height: </span><span class="mi">70</span> <span class="p">}],</span>
  <span class="p">[</span><span class="s2">"Zoey"</span><span class="p">,</span> <span class="p">{</span> <span class="ss">demon: :no</span><span class="p">,</span> <span class="ss">height: </span><span class="mi">63</span> <span class="p">}],</span>
  <span class="p">[</span><span class="s2">"Jinu"</span><span class="p">,</span> <span class="p">{</span> <span class="ss">demon: :yes</span><span class="p">,</span> <span class="ss">height: </span><span class="mi">73</span> <span class="p">}],</span>
  <span class="p">[</span><span class="s2">"Gwi-ma"</span><span class="p">,</span> <span class="p">{</span> <span class="ss">demon: :yes</span><span class="p">,</span> <span class="ss">height: </span><span class="mi">240</span> <span class="p">}],</span>
  <span class="p">[</span><span class="s2">"Mystery Saja"</span><span class="p">,</span> <span class="p">{</span> <span class="ss">demon: :yes</span><span class="p">,</span> <span class="ss">height: </span><span class="mi">72</span> <span class="p">}],</span>
  <span class="p">[</span><span class="s2">"Bobby"</span><span class="p">,</span> <span class="p">{</span> <span class="ss">demon: :no</span><span class="p">,</span> <span class="ss">height: </span><span class="mi">65</span> <span class="p">}],</span>
<span class="p">]</span>

<span class="n">collection</span><span class="p">.</span><span class="nf">to_h</span>
<span class="c1"># =&gt;</span>
<span class="c1"># {</span>
<span class="c1">#   "Rumi" =&gt; { demon: :maybe, height: 62 },</span>
<span class="c1">#   "Mira" =&gt; { demon: :no, height: 70 },</span>
<span class="c1">#   "Zoey" =&gt; { demon: :no, height: 63 },</span>
<span class="c1">#   "Jinu" =&gt; { demon: :yes, height: 73 },</span>
<span class="c1">#   "Gwi-ma" =&gt; { demon: :yes, height: 240 },</span>
<span class="c1">#   "Mystery Saja" =&gt; { demon: :yes, height: 72 },</span>
<span class="c1">#   "Bobby" =&gt; { demon: :no, height: 65 },</span>
<span class="c1"># }</span>
</code></pre></div></div>

<p><em>Find, zip, to_h, partitionnnn,</em><br />
<em>Fit check for my Enumerable era</em></p>

<p><img src="/img/2026/celebrate-ramen.png" alt="Celebration &amp; Ramen" title="Property of KPop Demon hunters" /></p>]]></content><author><name>Josh Frankel (@joshmfrankel)</name><uri>http://joshfrankel.me/</uri></author><category term="article" /><category term="ruby" /><summary type="html"><![CDATA[I’ve been using Ruby for over 11 years now and along the way I’ve discovered many favorite methods that I keep coming back to. Many of my favorites come from the Enumerable module. I love the simplicity of finding a standard method that does the exact data manipulation. Being able to share these methods with other engineers is fun in of itself. So without further ado, here’s some excellent Ruby Enumerable methods to show you how it’s done, done, done.]]></summary></entry><entry><title type="html">Find or Create Records with Preset Attributes using create_with</title><link href="http://joshfrankel.me/blog/find-or-create-records-with-preset-attributes-using-create-with/" rel="alternate" type="text/html" title="Find or Create Records with Preset Attributes using create_with" /><published>2026-01-12T00:00:00+00:00</published><updated>2026-01-12T00:00:00+00:00</updated><id>http://joshfrankel.me/blog/find-or-create-records-with-preset-attributes-using-create-with</id><content type="html" xml:base="http://joshfrankel.me/blog/find-or-create-records-with-preset-attributes-using-create-with/"><![CDATA[<p>I’ve been working heavily with <a href="https://www.rabbitmq.com">RabbitMQ message broker</a> infrastructure recently to coordinate events between two Rails applications. The event work involves maintaining synchronized data between specific shared data. In the past, I’ve implemented a <code class="language-plaintext highlighter-rouge">find_or_create_by</code> style of idempotent backfilling required associations. Today I learned about a separate syntax via <code class="language-plaintext highlighter-rouge">create_with</code> for presetting record creation attributes.</p>

<!--excerpt-->

<p>Below we have a simplified variation of the problem I encountered. This uses the <a href="https://github.com/ruby-amqp/kicks">kicks gem</a> to process published RabbitMQ messages.</p>

<div class="language-ruby highlighter-rouge"><div class="highlight"><pre class="highlight"><code><span class="k">class</span> <span class="nc">GroupCreateEventProcessor</span>
  <span class="kp">include</span> <span class="no">Sneakers</span><span class="o">::</span><span class="no">Worker</span>

  <span class="n">from_queue</span> <span class="s2">"group.create"</span>

  <span class="k">def</span> <span class="nf">work</span><span class="p">(</span><span class="n">message</span><span class="p">)</span>
    <span class="n">parsed_message</span> <span class="o">=</span> <span class="no">JSON</span><span class="p">.</span><span class="nf">parse</span><span class="p">(</span><span class="n">message</span><span class="p">)</span>

    <span class="n">creator</span> <span class="o">=</span> <span class="n">retrieve_creator</span><span class="p">(</span>
      <span class="ss">external_id: </span><span class="n">parsed_message</span><span class="p">[</span><span class="ss">:external_creator_id</span><span class="p">]</span>
    <span class="p">)</span>
    <span class="n">group</span> <span class="o">=</span> <span class="no">Group</span><span class="p">.</span><span class="nf">create</span><span class="p">(</span>
      <span class="ss">external_id: </span><span class="n">parsed_message</span><span class="p">[</span><span class="ss">:external_id</span><span class="p">],</span>
      <span class="ss">name: </span><span class="n">parsed_message</span><span class="p">[</span><span class="ss">:name</span><span class="p">]</span>
      <span class="ss">creator_id: </span><span class="n">creator</span><span class="p">.</span><span class="nf">id</span>
    <span class="p">)</span>

    <span class="n">ack!</span>
  <span class="k">end</span>

  <span class="kp">private</span>

  <span class="k">def</span> <span class="nf">retrieve_creator</span><span class="p">(</span><span class="n">external_id</span><span class="p">:)</span>
    <span class="no">User</span><span class="p">.</span><span class="nf">find_by</span><span class="p">(</span><span class="n">external_id</span><span class="p">:)</span>
  <span class="k">end</span>
<span class="k">end</span>

<span class="c1"># app/models/user.rb</span>
<span class="k">class</span> <span class="nc">User</span> <span class="o">&lt;</span> <span class="no">ApplicationRecord</span>
  <span class="n">has_many</span> <span class="ss">:created_groups</span>

  <span class="c1"># Additionally, email and external_id have a database level constraints of NOT NULL</span>
  <span class="n">validates</span> <span class="ss">:email</span><span class="p">,</span> <span class="ss">presence: </span><span class="kp">true</span>
  <span class="n">validates</span> <span class="ss">:external_id</span><span class="p">,</span> <span class="ss">presence: </span><span class="kp">true</span>
<span class="k">end</span>

<span class="k">class</span> <span class="nc">Group</span> <span class="o">&lt;</span> <span class="no">ApplicationRecord</span>
  <span class="n">belongs_to</span> <span class="ss">:creator</span><span class="p">,</span> <span class="ss">class_name: :User</span><span class="p">,</span> <span class="ss">foreign_key: :creator_id</span>
<span class="k">end</span>
</code></pre></div></div>

<p>What happens when we go to create a new Group, but the Creator (User) doesn’t yet exist?</p>

<p>You’ll end up with a validation error here since each Group above must reference a Creator. Our
<strong>#retrieve_creator</strong> method can reasonably return nil in the above case. To fix this we can use
<strong>find_or_create_by</strong> to adjust the method along with the required <strong>email</strong> field for the User
model validations.</p>

<div class="language-ruby highlighter-rouge"><div class="highlight"><pre class="highlight"><code><span class="k">class</span> <span class="nc">GroupCreateEventProcessor</span>
  <span class="kp">include</span> <span class="no">Sneakers</span><span class="o">::</span><span class="no">Worker</span>

  <span class="n">from_queue</span> <span class="s2">"group.create"</span>

  <span class="k">def</span> <span class="nf">work</span><span class="p">(</span><span class="n">message</span><span class="p">)</span>
    <span class="n">parsed_message</span> <span class="o">=</span> <span class="no">JSON</span><span class="p">.</span><span class="nf">parse</span><span class="p">(</span><span class="n">message</span><span class="p">)</span>

    <span class="n">creator</span> <span class="o">=</span> <span class="n">retrieve_creator</span><span class="p">(</span>
      <span class="ss">external_id: </span><span class="n">parsed_message</span><span class="p">[</span><span class="ss">:external_creator_id</span><span class="p">]</span>
      <span class="ss">email: </span><span class="n">parsed_message</span><span class="p">[</span><span class="ss">:user_email</span><span class="p">]</span> <span class="c1"># Add additional message data from queue</span>
    <span class="p">)</span>
    <span class="n">group</span> <span class="o">=</span> <span class="no">Group</span><span class="p">.</span><span class="nf">create</span><span class="p">(</span>
      <span class="ss">external_id: </span><span class="n">parsed_message</span><span class="p">[</span><span class="ss">:external_id</span><span class="p">],</span>
      <span class="ss">name: </span><span class="n">parsed_message</span><span class="p">[</span><span class="ss">:name</span><span class="p">]</span>
      <span class="ss">creator_id: </span><span class="n">creator</span><span class="p">.</span><span class="nf">id</span>
    <span class="p">)</span>

    <span class="n">ack!</span>
  <span class="k">end</span>

  <span class="kp">private</span>

  <span class="c1"># Ensure we create missing User records with `email` to satisfy the Model validations</span>
  <span class="k">def</span> <span class="nf">retrieve_creator</span><span class="p">(</span><span class="n">external_id</span><span class="p">:,</span> <span class="n">user_email</span><span class="p">:)</span>
    <span class="no">User</span><span class="p">.</span><span class="nf">find_or_create_by</span><span class="p">(</span><span class="n">external_id</span><span class="p">:)</span> <span class="k">do</span> <span class="o">|</span><span class="n">user</span><span class="o">|</span>
      <span class="n">user</span><span class="p">.</span><span class="nf">email</span> <span class="o">=</span> <span class="n">user_email</span>
    <span class="k">end</span>
  <span class="k">end</span>
<span class="k">end</span>
</code></pre></div></div>

<p>The above now functions as a self-healing flow for missing records that are required for newly
created Groups. Now I knew about the block syntax for <strong>find_or_create_by</strong> which allows you to
specify the creation attributes but what I learned about today was the <strong>create_with</strong> syntax.</p>

<h2 id="create_with">Create_with</h2>

<p>The <strong>create_with</strong> method allows for preemptively setting attributes for future created records.
With this knowledge we can update our <strong>#retrieve_creator</strong> method signature to read a bit cleaner:</p>

<div class="language-ruby highlighter-rouge"><div class="highlight"><pre class="highlight"><code>  <span class="k">def</span> <span class="nf">retrieve_creator</span><span class="p">(</span><span class="n">external_id</span><span class="p">:,</span> <span class="n">user_email</span><span class="p">:)</span>
    <span class="no">User</span>
      <span class="p">.</span><span class="nf">create_with</span><span class="p">(</span><span class="ss">email: </span><span class="n">user_email</span><span class="p">)</span>
      <span class="p">.</span><span class="nf">find_or_create_by</span><span class="p">(</span><span class="n">external_id</span><span class="p">:)</span>
  <span class="k">end</span>
</code></pre></div></div>

<p>This preserves the record finding specificity to only query for <strong>external_id</strong> while instructing
record creation to use the <strong>user_email</strong> coming from the RabbitMQ message. Now there are certainly
arguments stylistically for the block syntax vs create_with syntax but one thing the block style syntax
allows for is custom logic for generating values. Create_with does not provide as clean as a location
for custom logic within a block.</p>

<p>If you want to learn more here is the documentation entry for <a href="https://api.rubyonrails.org/classes/ActiveRecord/QueryMethods.html#method-i-create_with">ActiveRecord::QueryMethods#create_with</a></p>]]></content><author><name>Josh Frankel (@joshmfrankel)</name><uri>http://joshfrankel.me/</uri></author><category term="today-i-learned" /><category term="ruby on rails" /><category term="RabbitMQ" /><summary type="html"><![CDATA[I’ve been working heavily with RabbitMQ message broker infrastructure recently to coordinate events between two Rails applications. The event work involves maintaining synchronized data between specific shared data. In the past, I’ve implemented a find_or_create_by style of idempotent backfilling required associations. Today I learned about a separate syntax via create_with for presetting record creation attributes.]]></summary></entry><entry><title type="html">Use ActiveModel::Api for a Bare Bones Action Model interface</title><link href="http://joshfrankel.me/blog/use-activemodel-api-for-a-bare-bones-active-model-interface/" rel="alternate" type="text/html" title="Use ActiveModel::Api for a Bare Bones Action Model interface" /><published>2025-11-12T00:00:00+00:00</published><updated>2025-11-12T00:00:00+00:00</updated><id>http://joshfrankel.me/blog/use-activemodel-api-for-a-bare-bones-active-model-interface</id><content type="html" xml:base="http://joshfrankel.me/blog/use-activemodel-api-for-a-bare-bones-active-model-interface/"><![CDATA[<p>Today, I learned that <strong>ActiveModel::Api</strong> is the minimal implementation for an object to act like a model. <strong>ActiveModel::Model</strong> was the standard prior to Rails 7. You can still use it but it implies additional model-esque functionality where as API is the bare bones interface.</p>

<!--excerpt-->

<blockquote>
  <p>Includes the required interface for an object to interact with Action Pack and Action View, using different Active Model modules. It includes model name introspections, conversions, translations, and validations. Besides that, it allows you to initialize the object with a hash of attributes, pretty much like Active Record does.</p>

  <ul>
    <li><a href="https://api.rubyonrails.org/classes/ActiveModel/API.html">api.rubyonrails.org</a></li>
  </ul>
</blockquote>

<p>I dug in a bit further and looked at the <a href="https://github.com/rails/rails/blob/9f466dd9d4672d7dc6c49a7861d9e30eff69c163/activemodel/lib/active_model/model.rb#L45">current implementation</a> for <strong>ActiveModel::Model</strong> and it looks like the only current difference is the addition of the <strong>ActiveModel::Access</strong> module. For more information see the <a href="https://api.rubyonrails.org/classes/ActiveModel/API.html">full documentation</a> or the <a href="https://github.com/rails/rails/pull/43223">implementing pull request</a>.</p>]]></content><author><name>Josh Frankel (@joshmfrankel)</name><uri>http://joshfrankel.me/</uri></author><category term="today-i-learned" /><category term="ruby on rails" /><summary type="html"><![CDATA[Today, I learned that ActiveModel::Api is the minimal implementation for an object to act like a model. ActiveModel::Model was the standard prior to Rails 7. You can still use it but it implies additional model-esque functionality where as API is the bare bones interface.]]></summary></entry><entry><title type="html">A Perfect terminal with Zsh, Antidote, Oh My Zsh, Powerlevel10k, and Mise.</title><link href="http://joshfrankel.me/blog/a-perfect-terminal-with-zsh-antidote-on-my-zsh-powerlevel10k-mise/" rel="alternate" type="text/html" title="A Perfect terminal with Zsh, Antidote, Oh My Zsh, Powerlevel10k, and Mise." /><published>2025-11-06T00:00:00+00:00</published><updated>2025-11-06T00:00:00+00:00</updated><id>http://joshfrankel.me/blog/a-perfect-terminal-with-zsh-antidote-on-my-zsh-powerlevel10k-mise</id><content type="html" xml:base="http://joshfrankel.me/blog/a-perfect-terminal-with-zsh-antidote-on-my-zsh-powerlevel10k-mise/"><![CDATA[<p>I love to customize my development environment. Between operating system, editor, and terminal, I’m always reading through the configuration options to improve my workflow. Getting it to look pretty is also great since
I spend so much time working with these tools. This article details my current setup for crafting a perfect terminal with Zsh, Antidote, Oh My Zsh, Powerlevel10k, and Mise.</p>

<!--excerpt-->

<h2 id="zsh---an-enhanced-shell">ZSH - An Enhanced Shell</h2>

<p><img src="/img/2025/perfect-terminal/zsh.png" alt="Zsh" title="Image source https://www.zsh.org" /></p>

<p>First off, we’ll want to configure the base shell that our terminal will utilize. A lot of plugin ecosystems have strong integrations with Zsh so we’ll use that.</p>

<p>If you’re on Mac, congrats! Zsh is installed by default.</p>

<p>For Linux, you’ll need to <a href="https://github.com/ohmyzsh/ohmyzsh/wiki/Installing-ZSH#ubuntu-debian--derivatives-windows-10-wsl--native-linux-kernel-with-windows-10-build-1903">install it, depending upon your distribution</a>. Here are two popular distribution installation commands:</p>

<ul>
  <li>Fedora - <code class="language-plaintext highlighter-rouge">dnf install zsh</code></li>
  <li>Debian - <code class="language-plaintext highlighter-rouge">apt install zsh</code></li>
</ul>

<p>Once installed, configure your terminal to use ZSH as its shell with: <code class="language-plaintext highlighter-rouge">chsh -s /bin/zsh</code>. You can double check this is correctly setup by typing <code class="language-plaintext highlighter-rouge">echo $SHELL</code> to print the current shell environment.</p>

<p><img src="/img/2025/perfect-terminal/zsh-shell.png" alt="Zsh shell example" /></p>

<p>Alright, we’ve got the foundation set for adding additional functionality in the form of plugins.</p>

<h2 id="antidote---a-zsh-plugin-manager">Antidote - A Zsh plugin manager</h2>

<p><img src="/img/2025/perfect-terminal/antidote.png" alt="Antidote" title="Image source https://antidote.sh" /></p>

<p><a href="https://antidote.sh/">Antidote</a> is a Zsh plugin manager designed to be efficient and minimal. It is the latest evolution of the <strong>Antigen -&gt; Antibody -&gt; Antidote</strong> ecosystem. Antigen was the original, but is no longer under active development. Antibody is written in Go and has been deprecated. Antidote is a return to form, being written in Zsh.</p>

<p>So first things first, let’s install it.</p>

<div class="language-zsh highlighter-rouge"><div class="highlight"><pre class="highlight"><code>git clone <span class="nt">--depth</span><span class="o">=</span>1 https://github.com/mattmc3/antidote.git <span class="k">${</span><span class="nv">ZDOTDIR</span><span class="k">:-</span><span class="p">~</span><span class="k">}</span>/.antidote
</code></pre></div></div>

<p>You’ll now have an <strong>.antidote</strong> folder within your Home directory. This is where Antidote functionality will live. We need to inform our shell where this is located. Add the following to the <strong>TOP</strong> of your <strong>.zshrc</strong> file. It is generally recommended to keep this at the top or near the top of your shell to ensure it loads plugins first and efficiently.</p>

<div class="language-zsh highlighter-rouge"><div class="highlight"><pre class="highlight"><code><span class="c"># source antidote</span>
<span class="nb">source</span> ~/.antidote/antidote.zsh

<span class="c"># initialize plugins statically with ${ZDOTDIR:-~}/.zsh_plugins.txt</span>
antidote load
</code></pre></div></div>

<p>Antidote also utilizes a plugins file in order to determine which plugins and libraries to load. To prepare for the next section, let’s go ahead and create our plugins file:</p>

<div class="language-zsh highlighter-rouge"><div class="highlight"><pre class="highlight"><code><span class="nb">touch</span> ~/.zsh_plugins.txt
</code></pre></div></div>

<p>Before we move on try running <code class="language-plaintext highlighter-rouge">antidote --version</code> to ensure it is installed correctly.</p>

<div class="language-zsh highlighter-rouge"><div class="highlight"><pre class="highlight"><code>❯ antidote <span class="nt">--version</span>
antidote version 1.9.7 <span class="o">(</span>9be3256<span class="o">)</span>
</code></pre></div></div>

<p>Time to add some fancy plugins.</p>

<h2 id="zsh-plugins">Zsh Plugins</h2>

<p><img src="/img/2025/perfect-terminal/zsh-plugins.png" alt="Zsh plugins" title="Image source https://github.com/zsh-users/" /></p>

<p>First up, we’ll introduce several core Zsh plugins. Autosuggest, syntax highlighting, and completions. Our <strong>.zsh_plugins.txt</strong> file will accept references to the related repository for the plugin, so the following is all that is needed within the file.</p>

<div class="language-zsh highlighter-rouge"><div class="highlight"><pre class="highlight"><code><span class="c"># .zsh_plugins.txt</span>
zsh-users/zsh-autosuggestions
zsh-users/zsh-syntax-highlighting
zsh-users/zsh-completions
</code></pre></div></div>

<p>After saving this, if you reload your terminal with <code class="language-plaintext highlighter-rouge">source ~/.zshrc</code> you’ll see Antidote load the new plugins. This is courtesy of the <code class="language-plaintext highlighter-rouge">antidote load</code> line. You can test these are working by testing the following:</p>

<ul>
  <li>Typing an invalid command should highlight in red</li>
  <li>Typing a valid command should highlight in green</li>
  <li>Type a command. Try starting to type it again, and you should see a grayed out suggest for you to choose.</li>
</ul>

<p><img src="/img/2025/perfect-terminal/zsh-autocorrect.png" alt="Zsh autocorrect plugin example" /></p>

<p>Something I like to add at this point are a couple useful aliases. These can be added to your <strong>.zshrc</strong> file inline or sourced from a separate file. Personally I like to have these in a separate directory <strong>~/.config/zsh/</strong>.</p>

<div class="language-zsh highlighter-rouge"><div class="highlight"><pre class="highlight"><code><span class="c"># source antidote</span>
<span class="nb">source</span> /path/to/antidote/antidote.zsh

<span class="c"># initialize plugins statically with ${ZDOTDIR:-~}/.zsh_plugins.txt</span>
antidote load

<span class="c">##################</span>
<span class="c"># Configurations #</span>
<span class="c">##################</span>

<span class="nb">source</span> ~/.config/zsh/zshrc_aliases
</code></pre></div></div>

<p>And to ensure the file exists run <code class="language-plaintext highlighter-rouge">touch ~/.config/zsh/zshrc_aliases</code> and add the following:</p>

<div class="language-zsh highlighter-rouge"><div class="highlight"><pre class="highlight"><code><span class="c"># Aliases</span>
<span class="nb">alias </span><span class="nv">reload</span><span class="o">=</span><span class="s2">"exec zsh"</span>
<span class="nb">alias </span><span class="nv">config</span><span class="o">=</span><span class="s2">"vim ~/.zshrc"</span>
<span class="nb">alias </span><span class="nv">plugins</span><span class="o">=</span><span class="s2">"vim ~/.zsh_plugins.txt"</span>
</code></pre></div></div>

<p>Resource your terminal again, and now you can simply type <code class="language-plaintext highlighter-rouge">reload</code> to source the terminal. <code class="language-plaintext highlighter-rouge">config</code> and <code class="language-plaintext highlighter-rouge">plugins</code> allow for easy editing of the <strong>.zshrc</strong> and <strong>.zsh_plugins.txt</strong> files, respectively.</p>

<h2 id="oh-my-zsh---a-zsh-framework">Oh My Zsh - A Zsh framework</h2>

<p><img src="/img/2025/perfect-terminal/ohmyzsh-logo.png" alt="Oh My Zsh" title="Image source https://ohmyz.sh" /></p>

<p>The most important benefit of using Antidote is being able to pick and choose which plugins you want to install. <a href="https://ohmyz.sh/">Oh My Zsh</a> is a popular framework with a ton of functionality and plugins. However, many of the plugins you’ll never end up using. I much prefer having a simple, minimal configuration, which is where Antidote shines.</p>

<blockquote>
  <p>Oh My Zsh is a delightful, open source, community-driven framework for managing your Zsh configuration.</p>

  <p><a href="https://ohmyz.sh">Oh My Zsh</a></p>
</blockquote>

<p>Now, in order to cherry-pick specific plugins from other frameworks (Antidote can also grab plugins from Pretzo), you need to also include any related dependencies that those plugins require. This can add complexity, which we want to avoid. Thankfully, there is a recommended plugin which handles these dependencies called <strong>use-omz</strong>. Let’s start by adding that to our <strong>.zsh_plugins.txt</strong> file.</p>

<div class="language-zsh highlighter-rouge"><div class="highlight"><pre class="highlight"><code><span class="c"># .zsh_plugins.txt</span>
zsh-users/zsh-autosuggestions
zsh-users/zsh-syntax-highlighting
zsh-users/zsh-completions

<span class="c"># Oh-my-zsh dependency management</span>
getantidote/use-omz
</code></pre></div></div>

<p>This will ensure we don’t have to install separate dependencies for Oh My Zsh plugins. Now I really like several Oh My Zsh plugins such as: rails, git, and bundler along with their common library functions, but feel free to pick your own from the <a href="https://github.com/ohmyzsh/ohmyzsh/wiki/Plugins">plugins page</a>.</p>

<div class="language-zsh highlighter-rouge"><div class="highlight"><pre class="highlight"><code><span class="c"># .zsh_plugins.txt</span>
zsh-users/zsh-autosuggestions
zsh-users/zsh-syntax-highlighting
zsh-users/zsh-completions

<span class="c"># Oh-my-zsh dependency management</span>
getantidote/use-omz

<span class="c"># Make Zsh more featureful</span>
<span class="c"># Git status is faster</span>
<span class="c"># History and other enhancements</span>
<span class="c"># See: https://github.com/ohmyzsh/ohmyzsh/tree/master/lib</span>
ohmyzsh/ohmyzsh path:lib

<span class="c"># Oh-my-zsh plugins</span>
ohmyzsh/ohmyzsh path:plugins/rails
ohmyzsh/ohmyzsh path:plugins/git
ohmyzsh/ohmyzsh path:plugins/bundler
</code></pre></div></div>

<p>Run <code class="language-plaintext highlighter-rouge">reload</code> to resource your terminal and watch the new plugins become installed.</p>

<p>You might be thinking, “Why didn’t we install any themes?”. We’ll superpower our terminal with powerlevel10k which has an amazing theme including additional functionality.</p>

<h2 id="powerlevel10k---a-theme-for-zsh">Powerlevel10k - A theme for Zsh</h2>

<p><img src="/img/2025/perfect-terminal/over-9000.gif" alt="Vegeta over 9000!" title="Image source https://tenor.com" /></p>

<p>At first glance, Powerlevel10k is just a theme for Zsh. However, boiling it down to a simple theme doesn’t give it proper credit. It is so much more with several prominent features including:</p>

<ul>
  <li>No prompt lag - Entering command immediately loads next prompt (<a href="https://github.com/romkatv/powerlevel10k?tab=readme-ov-file#uncompromising-performance">documentation</a>)</li>
  <li>Instant prompt - First prompt uses minimal (<a href="https://github.com/romkatv/zsh-bench#instant-prompt">benchmarks</a>)</li>
  <li>Prompt Segments - Notably the git <strong>vcs</strong> segment is incredibly useful</li>
</ul>

<p><img src="/img/2025/perfect-terminal/powerlevel10k-git.png" alt="Powerlevel10k example" /></p>

<ul>
  <li>Transient Prompt - Trims prompt extras to make previous commands easier to copy-paste and read.</li>
</ul>

<p><img src="/img/2025/perfect-terminal/powerlevel10k-transient-prompt.png" alt="Powerlevel10k transient prompt example" /></p>

<ul>
  <li>Font Glyphs - Technically this is separate from Powerlevel10k but is highly recommended in the installation instructions.</li>
</ul>

<p>Convinced? If so, let’s install it.</p>

<p>Start off by adding to our plugins file for Antidote.</p>

<div class="language-zsh highlighter-rouge"><div class="highlight"><pre class="highlight"><code><span class="c"># .zsh_plugins.txt</span>
romkatv/powerlevel10k
</code></pre></div></div>

<p>Install the recommended font to enable glyphs. You’ll need to download each of the four listed fonts and install them for your OS. Make sure to set your terminal application to utilize the newly installed font by setting “MesloLGS NF” as the default. If you’re unsure how to do this with your terminal, <a href="https://github.com/romkatv/powerlevel10k?tab=readme-ov-file#manual-font-installation">refer to the multitude of guides</a> on the Powerlevel10k repository.</p>

<p>Now, reload your shell source with our <code class="language-plaintext highlighter-rouge">reload</code> alias.</p>

<p>Powerlevel10k comes prebaked with its own configuration utility. Run <code class="language-plaintext highlighter-rouge">p10k configure</code> to kick off the process. This will walk you through the different configuration options. Here are the ones I use:</p>

<ul>
  <li>Prompt Style - Rainbow</li>
  <li>Character Set - Unicode</li>
  <li>Prompt Separator - Angled</li>
  <li>Prompt Head - Angled</li>
  <li>Prompt Height - One Line</li>
  <li>Prompt Spacing - Sparse</li>
  <li>Icons - Many Icons</li>
  <li>Prompt Flow - Concise</li>
  <li>Transient Prompt - Yes</li>
  <li>Instant Prompt Mode - Verbose</li>
</ul>

<p>One manual change, I always do with Powerlevel10k, is to remove the truncation logic around git branch name. By default, the git branch displayed in the prompt segment gets truncated down to 32 characters. I often need to know the entire branch name and at times copy it, so removing this limitation is important.</p>

<p>We can adjust this by editing the underlying <strong>.p10k.zsh</strong> file. Run <code class="language-plaintext highlighter-rouge">vim ~/.p10k.zsh</code> and look for the following lines:</p>

<div class="language-zsh highlighter-rouge"><div class="highlight"><pre class="highlight"><code><span class="c"># Tip: To always show local branch name in full without truncation, delete the next line.</span>
<span class="o">((</span> <span class="nv">$#branch</span> <span class="o">&gt;</span> 32 <span class="o">))</span> <span class="o">&amp;&amp;</span> branch[13,-13]<span class="o">=</span><span class="s2">"…"</span>  <span class="c"># &lt;-- this line</span>
</code></pre></div></div>

<p>Following along with the suggestion, remove or comment the line out in order to return the fully qualified git branch name.</p>

<p>Now we have a supercharged terminal. Let’s take it one more step to use the excellent <strong>asdf</strong> version manager for dependency management.</p>

<h2 id="one-version-manager-to-rule-them-all">One Version Manager to rule them all</h2>

<p>Managing each tool’s version can be tiresome. Having a version manager specific to each tool’s version can be annoying. Having a single version manager to manage all your tool versions is excellent!</p>

<p>Mise and Asdf work as a version management framework for every programming language. Gone are the days of having to manage npm, rbenv, rvm, etc where as these will handle all languages. We can install the binary files and add them to our path to start adding programming languages.</p>

<blockquote>
  <p><strong>Note</strong>: I’ve layed out both options <strong>mise</strong> and <strong>asdf</strong>. Until recently I was only using <strong>asdf</strong> but I’ve found <strong>mise</strong> to be superior in terms of UX and ease-of-use.</p>
</blockquote>

<h3 id="mise---the-front-end-to-your-dev-env">Mise - The front-end to your dev env</h3>

<p><img src="/img/2025/perfect-terminal/mise.svg" alt="Mise VM" /></p>

<p>For Mac, you can use Homebrew to install Mise</p>

<div class="language-zsh highlighter-rouge"><div class="highlight"><pre class="highlight"><code>brew <span class="nb">install </span>mise
</code></pre></div></div>

<p>If you are using Linux, the following will install and activate <strong>Mise</strong> for ZSH.</p>

<div class="language-zsh highlighter-rouge"><div class="highlight"><pre class="highlight"><code>curl https://mise.run/zsh | sh
</code></pre></div></div>

<p>Mise actually has many different <a href="https://mise.jdx.dev/installing-mise.html#installing-mise">installation guides</a> available which is quite nice for the various architectures.</p>

<p>Once installed, you can use the <code class="language-plaintext highlighter-rouge">mise use ruby@3.4.2</code> style command to install both the Ruby plugin as well as the specific version. Mise makes this operation happen at the same time unlike <strong>asdf</strong> which you’ll see shortly.</p>

<blockquote>
  <p>The .tool-versions file is asdf’s config file and it can be used in mise just like mise.toml. It isn’t as flexible so it’s recommended to use mise.toml instead.</p>

  <ul>
    <li><a href="https://mise.jdx.dev/configuration.html#tool-versions">Mise .tool-versions documentation</a></li>
  </ul>
</blockquote>

<p>Alternatively, you can craft a <strong>mise.toml</strong> file which is much akin to ASDF’s <strong>.tool-versions</strong> file, and run <code class="language-plaintext highlighter-rouge">mise install</code> within the same directory to install all specified tools. Here’s my mise.toml file in my home directory:</p>

<div class="language-zsh highlighter-rouge"><div class="highlight"><pre class="highlight"><code><span class="o">[</span>tools]
ruby <span class="o">=</span> <span class="s1">'3.4.2'</span>
python <span class="o">=</span> <span class="s1">'3.13.2'</span>
node <span class="o">=</span> <span class="s1">'22.13.1'</span>
</code></pre></div></div>

<p>Helpfully, Mise has great UX with commands that are intuitive and just make sense. If you ever need to check which version of a tool you are running and from which directory it is being set from you can run the <code class="language-plaintext highlighter-rouge">mise ls</code> command to return all available versions. Here’s an example:</p>

<div class="language-zsh highlighter-rouge"><div class="highlight"><pre class="highlight"><code>❯ mise <span class="nb">ls
</span>Tool    Version  Source        Requested
node    20.16.0
node    22.13.1  ~/.mise.toml  22.13.1
node    22.15.0
python  3.13.2   ~/.mise.toml  3.13.2
ruby    3.4.2    ~/.mise.toml  3.4.2
</code></pre></div></div>

<p>There are many other helpful commands that Mise provides which can be <a href="https://mise.jdx.dev/walkthrough.html#common-commands">found here</a>.</p>

<h3 id="asdf---the-multiple-runtime-version-manager">Asdf - The Multiple Runtime Version Manager</h3>

<p>First off, if you’re on Mac then Homebrew is your goto installation delivery system.</p>

<div class="language-zsh highlighter-rouge"><div class="highlight"><pre class="highlight"><code>brew <span class="nb">install </span>asdf
</code></pre></div></div>

<p>Otherwise, we’ll need to download the precompiled binary. Note that this is only one way of installing <strong>asdf</strong> <a href="https://asdf-vm.com/guide/getting-started.html#_1-install-asdf">there are several others</a> but I’ve found this to be the most reliable. So find the binary based on your current OS from the GitHub releases page: https://github.com/asdf-vm/asdf/releases.</p>

<p>Next, create a new directory called <strong>.asdf</strong> and place the downloaded binary within the directory.</p>

<p>Finally, add the shims to the PATH environment variable</p>

<div class="language-zsh highlighter-rouge"><div class="highlight"><pre class="highlight"><code><span class="nb">export </span><span class="nv">PATH</span><span class="o">=</span><span class="s2">"</span><span class="k">${</span><span class="nv">ASDF_DATA_DIR</span><span class="k">:-</span><span class="nv">$HOME</span><span class="p">/.asdf</span><span class="k">}</span><span class="s2">/shims:</span><span class="nv">$PATH</span><span class="s2">"</span>
</code></pre></div></div>

<p>Reload your shell with the <code class="language-plaintext highlighter-rouge">reload</code> alias and type <code class="language-plaintext highlighter-rouge">asdf list</code>. This should be empty since we haven’t added any plugins yet.</p>

<p>If <code class="language-plaintext highlighter-rouge">asdf list</code> doesn’t work or returns a command not found, you might need to add the <strong>asdf</strong> binary to your path.</p>

<div class="language-zsh highlighter-rouge"><div class="highlight"><pre class="highlight"><code><span class="nb">export </span><span class="nv">PATH</span><span class="o">=</span><span class="s2">"</span><span class="k">${</span><span class="nv">ASDF_DATA_DIR</span><span class="k">:-</span><span class="nv">$HOME</span><span class="p">/.asdf</span><span class="k">}</span><span class="s2">:</span><span class="nv">$PATH</span><span class="s2">"</span>
</code></pre></div></div>

<p>Now obviously this next part depends on the programming languages that you use but for me I primarily use Ruby and Node.</p>

<div class="language-zsh highlighter-rouge"><div class="highlight"><pre class="highlight"><code>asdf plugin add ruby
asdf plugin add nodejs
</code></pre></div></div>

<p>Eventually, the <code class="language-plaintext highlighter-rouge">asdf list</code> command might look something like below. This showcases the currently active version with an asterisk, along with all locally installed versions.</p>

<p><img src="/img/2025/perfect-terminal/asdf-list.png" alt="Asdf list example" /></p>

<p>Now within your projects you can specify a <code class="language-plaintext highlighter-rouge">.tool-versions</code> file that contains a plugin name followed by its version (e.g. <code class="language-plaintext highlighter-rouge">ruby 3.4.2</code>). This tells <strong>asdf</strong> which version to focus the directory on. We can run <code class="language-plaintext highlighter-rouge">asdf install</code> to install all specified versions from the identified <strong>.tool-versions</strong> file, assuming the asdf plugin is also installed.</p>

<p>You can also directly install versions by typing something like: <code class="language-plaintext highlighter-rouge">asdf install ruby 3.4.2</code>. Don’t know which version to install? Asdf can list all available versions by running: <code class="language-plaintext highlighter-rouge">asdf list all ruby</code>. When installing / updating dependencies, it can be helpful to ensure the shimmed commands stay up-to-date. A shimmed command, is literally just a wrapper for an executable. Periodically these will need to be reshimmed when you update them. This can be done with the <code class="language-plaintext highlighter-rouge">asdf reshim &lt;name&gt; &lt;version&gt;</code> command.</p>

<p>Lastly, if you need to set a global fallback version for a programming language you can use the 0.16.x updated <code class="language-plaintext highlighter-rouge">asdf set</code> command. For example, to set the base level Ruby version we can run <code class="language-plaintext highlighter-rouge">asdf set ruby 3.4.2</code> which will create a tool-versions file within our home directory.</p>

<p>Now we have version management configured as well!</p>

<h2 id="terminal-emulator">Terminal Emulator</h2>

<p>For me there are several important features that make for a good terminal emulator:</p>

<ol>
  <li>Quick access</li>
  <li>Tiling</li>
  <li>Tabs</li>
  <li>Theming</li>
</ol>

<table>
  <thead>
    <tr>
      <th> </th>
      <th>Fedora (Wayland)</th>
      <th>Mac OSX</th>
      <th>Notes</th>
      <th> </th>
    </tr>
  </thead>
  <tbody>
    <tr>
      <td>Kitty</td>
      <td>⛔️ No quick access support in gnome</td>
      <td>✅</td>
      <td>+ Cross-platform<br /> + Highly customizable<br /> + Performant<br /> + Easy to backup config<br /> + Themes<br /> - Quick access drop-down no support for Wayland</td>
      <td> </td>
    </tr>
    <tr>
      <td>Ddterm</td>
      <td>✅</td>
      <td>⛔️ Gnome only</td>
      <td>+ Built for gnome<br /> + Customizable<br /> + Performant<br /> - Not as easy to backup config</td>
      <td> </td>
    </tr>
    <tr>
      <td>Tabby</td>
      <td>✅</td>
      <td>⚠️ Some performance issues on latest version, Slower</td>
      <td>+ Excellent theming<br /> + Customizable<br /> - Slower startup<br /> - Less performant (especially OSX)</td>
      <td> </td>
    </tr>
    <tr>
      <td>iTerm2</td>
      <td>⛔️ OSX only</td>
      <td>✅</td>
      <td>+ Built for OSX<br /> + Customizable<br /> - Many options you likely won’t use<br /> - Clunky interface<br /> feels dated</td>
      <td> </td>
    </tr>
  </tbody>
</table>

<p>From the above, there are two winners with similiar characteristics. Those are <strong>Kitty</strong> for Mac OSX and <strong>Ddterm</strong> for Fedora Workstation. Ideally I would love to use Kitty on both archictectures but the inability to use the quick access dropdown in Wayland makes it a no-go for my Linx machine.</p>

<h3 id="ddterm---another-drop-down-terminal-extension-for-gnome-shell">ddterm - Another drop down terminal extension for GNOME Shell</h3>

<p><img src="/img/2025/perfect-terminal/ddterm.png" alt="Ddterm" title="Image source https://github.com/ddterm/gnome-shell-extension-ddterm" /></p>

<p>For Gnome, there is the lovely Gnome Shell Extensions ecosystem along with the <a href="https://github.com/ddterm/gnome-shell-extension-ddterm">ddterm extension</a>. The Shell Extensions page has hundreds of modifications you can
install and further tweak. <strong>ddterm</strong> was built with Gnome and Wayland in mind, and as such works well. These can be directly installed from the Gnome Shell Extensions search page.</p>

<p>In order to configure the quick access hotkey, all that needs to be done is to set the <strong>Toggle Terminal Window</strong> within the <strong>Keyboard Shortcuts</strong> setting pane.</p>

<p><img src="/img/2025/perfect-terminal/ddterm-hotkey.png" alt="Ddterm hotkey" /></p>

<h3 id="kitty---the-fast-feature-rich-gpu-based-terminal-emulator">Kitty - The fast, feature-rich, GPU based terminal emulator</h3>

<p><img src="/img/2025/perfect-terminal/kitty.svg" alt="Kitty" title="Image source https://sw.kovidgoyal.net/kitty/" /></p>

<p><a href="https://sw.kovidgoyal.net/kitty/">Kitty</a> is my preferred terminal emulator. It has so many options which are controllable with configuration files making it easy to backup. It also looks great from a UI perspective.</p>

<p><img src="/img/2025/perfect-terminal/kitty-example.png" alt="Kitty Example" /></p>

<p>It has tabs, panes, extendable plugins called kittens, and is performant. To install Kitty you need
only run the following command:</p>

<div class="language-zsh highlighter-rouge"><div class="highlight"><pre class="highlight"><code>curl <span class="nt">-L</span> https://sw.kovidgoyal.net/kitty/installer.sh | sh /dev/stdin
</code></pre></div></div>

<p>For Quick Access, there is a kitten called <code class="language-plaintext highlighter-rouge">quick-access-terminal</code> which is <a href="https://sw.kovidgoyal.net/kitty/kittens/quick-access-terminal/">documented here</a>. Linux and Mac OSX both
require you to specify a window manager hotkey for Kitty.</p>

<blockquote>
  <p><strong>Linux</strong>: “Simply bind the above command to some key press in your window manager”<br /> <strong>Mac OSX</strong>: “…go to System Preferences-&gt;Keyboard-&gt;Keyboard Shortcuts-&gt;Services-&gt;General and set a shortcut for the Quick access to kitty entry.”</p>
</blockquote>

<h2 id="conclusion">Conclusion</h2>

<p>We now have a system configured with all the following tools:</p>

<ul>
  <li>Shell - ZSH</li>
  <li>Plugin Manager - Antidote</li>
  <li>Version Manager - Mise</li>
  <li>Terminal Emulator - Kitty</li>
</ul>

<p>What could be better than a perfect terminal? An automated one! I’m in the process of writing a
follow-up post that disects two dotfile managers called RCM and Doot. They both help streamline nearly
all of the above process.</p>

<p>More on those soon! Thanks for reading.</p>]]></content><author><name>Josh Frankel (@joshmfrankel)</name><uri>http://joshfrankel.me/</uri></author><category term="tutorials" /><category term="zsh" /><category term="terminal" /><category term="linux" /><category term="mac osx" /><category term="version managers" /><summary type="html"><![CDATA[I love to customize my development environment. Between operating system, editor, and terminal, I’m always reading through the configuration options to improve my workflow. Getting it to look pretty is also great since I spend so much time working with these tools. This article details my current setup for crafting a perfect terminal with Zsh, Antidote, Oh My Zsh, Powerlevel10k, and Mise.]]></summary></entry><entry><title type="html">Expecting Perfection from ActionController::Parameters</title><link href="http://joshfrankel.me/blog/expecting-perfection-from-action-controller-parameters/" rel="alternate" type="text/html" title="Expecting Perfection from ActionController::Parameters" /><published>2025-10-08T00:00:00+00:00</published><updated>2025-10-08T00:00:00+00:00</updated><id>http://joshfrankel.me/blog/expecting-perfection-from-action-controller-parameters</id><content type="html" xml:base="http://joshfrankel.me/blog/expecting-perfection-from-action-controller-parameters/"><![CDATA[<p>Today, I learned that Rails 8 introduced a new <strong>ActionController::Parameters</strong> method called <code class="language-plaintext highlighter-rouge">expect</code>. This allows for cleaner and safer parameter permission and requiring. I must have just missed this in the documentation, but what a nice quality-of-life feature to add.</p>

<!--excerpt-->

<p><strong>Before Rails 8</strong></p>

<p>Previously, you would have to require the top level key <strong>:user</strong> in this case and then permit its
keys with a secondary method call.</p>

<div class="language-ruby highlighter-rouge"><div class="highlight"><pre class="highlight"><code><span class="n">params</span><span class="p">.</span><span class="nf">require</span><span class="p">(</span><span class="ss">:user</span><span class="p">).</span><span class="nf">permit</span><span class="p">(</span><span class="ss">:name</span><span class="p">)</span>
</code></pre></div></div>

<p><strong>After Rails 8</strong></p>

<p>With Rails 8+, you can now use a simpler syntax to achieve the same results.</p>

<blockquote>
  <p>expect is the preferred way to require and permit parameters. It is safer than the previous recommendation to call permit and require in sequence, which could allow user triggered 500 errors.
expect is more strict with types to avoid a number of potential pitfalls that may be encountered with the .require.permit pattern.</p>

  <ul>
    <li><a href="https://api.rubyonrails.org/classes/ActionController/Parameters.html#method-i-expect">ActionController::Parameters#expect </a></li>
  </ul>
</blockquote>

<p>The above <strong>require</strong> to <strong>permit</strong> are now contained within a single method call with well-structured
arguments.</p>

<div class="language-ruby highlighter-rouge"><div class="highlight"><pre class="highlight"><code><span class="n">params</span><span class="p">.</span><span class="nf">expect</span><span class="p">(</span><span class="ss">user: </span><span class="p">[</span><span class="ss">:name</span><span class="p">])</span>
</code></pre></div></div>]]></content><author><name>Josh Frankel (@joshmfrankel)</name><uri>http://joshfrankel.me/</uri></author><category term="today-i-learned" /><category term="ruby on rails" /><summary type="html"><![CDATA[Today, I learned that Rails 8 introduced a new ActionController::Parameters method called expect. This allows for cleaner and safer parameter permission and requiring. I must have just missed this in the documentation, but what a nice quality-of-life feature to add.]]></summary></entry><entry><title type="html">Using Database Functions in Ruby on Rails Migrations</title><link href="http://joshfrankel.me/blog/using-database-functions-in-ruby-on-rails-migrations/" rel="alternate" type="text/html" title="Using Database Functions in Ruby on Rails Migrations" /><published>2025-08-14T00:00:00+00:00</published><updated>2025-08-14T00:00:00+00:00</updated><id>http://joshfrankel.me/blog/using-database-functions-in-ruby-on-rails-migrations</id><content type="html" xml:base="http://joshfrankel.me/blog/using-database-functions-in-ruby-on-rails-migrations/"><![CDATA[<p>Today I learned you can specify PostgreSQL functions within a Ruby on Rails migrations. I found this particularly useful for setting a random default value for a database column. Let’s dig into a simple
example of this concept.</p>

<!--excerpt-->

<div class="language-ruby highlighter-rouge"><div class="highlight"><pre class="highlight"><code><span class="n">add_column</span> <span class="ss">:table</span><span class="p">,</span> <span class="ss">:column</span><span class="p">,</span> <span class="ss">:text</span><span class="p">,</span> <span class="ss">default: </span><span class="o">-&gt;</span> <span class="p">{</span> <span class="s2">"('prefix-' || md5(random()::text) || 'suffix')"</span> <span class="p">},</span> <span class="ss">null: </span><span class="kp">false</span><span class="p">,</span> <span class="ss">if_not_exists: </span><span class="kp">true</span>
</code></pre></div></div>

<p>The default uses block syntax and string interpolation in order to add a prefix and suffix to a random string. The <strong>md5</strong> and <strong>random</strong> functions come from PostgreSQL.</p>

<p>Know of any other tricks using functions within migrations? I’d love to learn about them in the comments below.</p>

<p>Thanks for reading!</p>]]></content><author><name>Josh Frankel (@joshmfrankel)</name><uri>http://joshfrankel.me/</uri></author><category term="today-i-learned" /><category term="postgresql" /><category term="ruby on rails" /><summary type="html"><![CDATA[Today I learned you can specify PostgreSQL functions within a Ruby on Rails migrations. I found this particularly useful for setting a random default value for a database column. Let’s dig into a simple example of this concept.]]></summary></entry><entry><title type="html">Simple Background Jobs with After in Next.js</title><link href="http://joshfrankel.me/blog/simple-background-jobs-with-after-in-next-js/" rel="alternate" type="text/html" title="Simple Background Jobs with After in Next.js" /><published>2025-07-10T00:00:00+00:00</published><updated>2025-07-10T00:00:00+00:00</updated><id>http://joshfrankel.me/blog/simple-background-jobs-with-after-in-next-js</id><content type="html" xml:base="http://joshfrankel.me/blog/simple-background-jobs-with-after-in-next-js/"><![CDATA[<p>Today I learned about the <code class="language-plaintext highlighter-rouge">after</code> function for scheduling side effects which avoid blocking execution. Think of it as a simple background job scheduler. These are much lighter than a database or Redis backed queueing infrastructure. That being said, I’m still learning what the benefits vs. costs might be for this Next.js version 15 update.</p>

<!--excerpt-->

<blockquote>
  <p>after allows you to schedule work to be executed after a response (or prerender) is finished. This is useful for tasks and other side effects that should not block the response, such as logging and analytics.</p>

  <ul>
    <li><a href="https://nextjs.org/docs/app/api-reference/functions/after">Next.js documentation</a></li>
  </ul>
</blockquote>

<p><code class="language-plaintext highlighter-rouge">after</code> runs after all other logic including when there is failure case. This means you can rely on it for
things like tracking.</p>

<div class="language-js highlighter-rouge"><div class="highlight"><pre class="highlight"><code><span class="k">import</span> <span class="p">{</span> <span class="nx">generateMatches</span> <span class="p">}</span> <span class="k">from</span> <span class="dl">"</span><span class="s2">@/services/generate-matches-service</span><span class="dl">"</span><span class="p">;</span>

<span class="k">export</span> <span class="k">async</span> <span class="kd">function</span> <span class="nf">handleSubmit</span><span class="p">(</span>
  <span class="nx">prevState</span><span class="p">:</span> <span class="nx">any</span><span class="p">,</span>
  <span class="nx">formData</span><span class="p">:</span> <span class="nx">FormData</span>
<span class="p">):</span> <span class="nb">Promise</span><span class="o">&lt;</span><span class="nx">SubmissionResponse</span><span class="o">&gt;</span> <span class="p">{</span>
  <span class="k">try</span> <span class="p">{</span>
    <span class="kd">const</span> <span class="nx">createdSearch</span> <span class="o">=</span> <span class="k">await</span> <span class="nx">prisma</span><span class="p">.</span><span class="nx">search</span><span class="p">.</span><span class="nf">create</span><span class="p">({</span> <span class="na">data</span><span class="p">:</span> <span class="p">{</span> <span class="p">...</span><span class="nx">formData</span> <span class="p">}</span> <span class="p">});</span>

    <span class="c1">// Runs after all other logic including the redirect below</span>
    <span class="nf">after</span><span class="p">(()</span> <span class="o">=&gt;</span> <span class="p">{</span>
      <span class="nf">generateMatches</span><span class="p">(</span><span class="nx">createdSearch</span><span class="p">)</span>
        <span class="p">.</span><span class="nf">then</span><span class="p">((</span><span class="nx">matches</span><span class="p">)</span> <span class="o">=&gt;</span> <span class="p">{</span>
          <span class="nx">console</span><span class="p">.</span><span class="nf">log</span><span class="p">(</span><span class="dl">"</span><span class="s2">Matches generated</span><span class="dl">"</span><span class="p">,</span> <span class="nx">matches</span><span class="p">);</span>
        <span class="p">})</span>
        <span class="p">.</span><span class="k">catch</span><span class="p">((</span><span class="nx">error</span><span class="p">)</span> <span class="o">=&gt;</span> <span class="p">{</span>
          <span class="nx">console</span><span class="p">.</span><span class="nf">error</span><span class="p">(</span><span class="dl">"</span><span class="s2">Error generating matches</span><span class="dl">"</span><span class="p">,</span> <span class="nx">error</span><span class="p">);</span>
        <span class="p">});</span>
    <span class="p">});</span>

    <span class="nf">redirect</span><span class="p">(</span><span class="s2">`/searches/</span><span class="p">${</span><span class="nx">createdSearch</span><span class="p">.</span><span class="nx">id</span><span class="p">}</span><span class="s2">`</span><span class="p">);</span>
  <span class="p">}</span> <span class="k">catch </span><span class="p">(</span><span class="nx">error</span><span class="p">)</span> <span class="p">{</span>
    <span class="nx">console</span><span class="p">.</span><span class="nf">log</span><span class="p">(</span><span class="nx">error</span><span class="p">);</span>
  <span class="p">}</span>
<span class="p">}</span>
</code></pre></div></div>

<p>Have you used <code class="language-plaintext highlighter-rouge">after()</code> yet? What has gone well when using it? What could be improved? Start the conversation below.</p>]]></content><author><name>Josh Frankel (@joshmfrankel)</name><uri>http://joshfrankel.me/</uri></author><category term="today-i-learned" /><category term="nextjs" /><category term="javascript" /><summary type="html"><![CDATA[Today I learned about the after function for scheduling side effects which avoid blocking execution. Think of it as a simple background job scheduler. These are much lighter than a database or Redis backed queueing infrastructure. That being said, I’m still learning what the benefits vs. costs might be for this Next.js version 15 update.]]></summary></entry><entry><title type="html">Custom Naming for Database Tables, Columns, and Associations in Prisma ORM</title><link href="http://joshfrankel.me/blog/custom-naming-for-database-tables-columns-and-associations-in-prisma-orm/" rel="alternate" type="text/html" title="Custom Naming for Database Tables, Columns, and Associations in Prisma ORM" /><published>2025-05-23T00:00:00+00:00</published><updated>2025-05-23T00:00:00+00:00</updated><id>http://joshfrankel.me/blog/custom-naming-for-database-tables-columns-and-associations-in-prisma-orm</id><content type="html" xml:base="http://joshfrankel.me/blog/custom-naming-for-database-tables-columns-and-associations-in-prisma-orm/"><![CDATA[<p>I’ve been working with Prisma as an object-relational mapping tool for my projects. Coming from a background of using raw SQL along with ActiveRecord, I’ve noticed that default Prisma caters to JavaScript over other established standards. Ensuring database table columns are snake_case along with creating associations that are lowercase and plural doesn’t come for free but Prisma does provide a way to configure these within your schema.</p>

<!--excerpt-->

<h2 id="prisma-schema">Prisma Schema</h2>

<p><a href="https://www.prisma.io/">Prisma</a> provides a schema to help define the model and database layers of your application. By definition it is mapping the concept of a Model to a database table. Now out-of-the-box if you were to create a new table your schema may look something like this. We’ll use an example of a blog application where a User can have many Posts.</p>

<div class="language-js highlighter-rouge"><div class="highlight"><pre class="highlight"><code><span class="nx">model</span> <span class="nx">User</span> <span class="p">{</span>
  <span class="nx">id</span>            <span class="nb">String</span>    <span class="p">@</span><span class="nd">id</span> <span class="p">@</span><span class="nd">default</span><span class="p">(</span><span class="nf">uuid</span><span class="p">())</span>
  <span class="nx">email</span>         <span class="nb">String</span>    <span class="p">@</span><span class="nd">unique</span>
  <span class="nx">emailVerified</span> <span class="nx">DateTime</span><span class="p">?</span>
  <span class="nx">name</span>          <span class="nb">String</span><span class="p">?</span>
  <span class="nx">createdAt</span>     <span class="nx">DateTime</span>  <span class="p">@</span><span class="nd">default</span><span class="p">(</span><span class="nf">now</span><span class="p">())</span>
  <span class="nx">updatedAt</span>     <span class="nx">DateTime</span>  <span class="p">@</span><span class="nd">updatedAt</span>
<span class="p">}</span>

<span class="nx">model</span> <span class="nx">Posts</span> <span class="p">{</span>
  <span class="nx">id</span>        <span class="nb">String</span>   <span class="p">@</span><span class="nd">id</span> <span class="p">@</span><span class="nd">default</span><span class="p">(</span><span class="nf">uuid</span><span class="p">())</span>
  <span class="nx">title</span>     <span class="nb">String</span>
  <span class="nx">content</span>   <span class="nb">String</span><span class="p">?</span>
  <span class="nx">publishedAt</span> <span class="nx">DateTime</span><span class="p">?</span>
  <span class="nx">authorId</span>  <span class="nb">String</span>
  <span class="nx">author</span>    <span class="nx">User</span>     <span class="p">@</span><span class="nd">relation</span><span class="p">(</span><span class="nx">fields</span><span class="p">:</span> <span class="p">[</span><span class="nx">authorId</span><span class="p">],</span> <span class="nx">references</span><span class="p">:</span> <span class="p">[</span><span class="nx">id</span><span class="p">])</span>
<span class="p">}</span>
</code></pre></div></div>

<p>Now migrating this schema you’d end up with a <strong>Users</strong> and <strong>Posts</strong> table with that casing. Generally this isn’t an issue but the general best practice is to use plural snake_case conventions for table names. Additionally, several of the columns like <strong>publishedAt</strong>, <strong>authorId</strong>, and <strong>emailVerified</strong> follow camelCase conventions which typically isn’t found at the database level.</p>

<h2 id="the-map-and-map-directives">The @map and @@map directives</h2>

<p>Prisma provides two Schema directives that allow you to control the naming conventions of your table names along with column names. We can use the <code class="language-plaintext highlighter-rouge">@map</code> directive to control the column names to adhere to snake_case conventions.</p>

<blockquote class="Info Info--full">
  

  <p>
    <i class="fas fa-quote-left"></i>
    @map: Maps a field name or enum value from the Prisma schema to a column or document field with a different name in the database. @@map: Maps the Prisma schema model name to a table (relational databases) or collection (MongoDB) with a different name.
  </p>

  
    <a href="https://www.prisma.io/docs/orm/reference/prisma-schema-reference#map">Prisma Documentation</a>
  
</blockquote>

<div class="language-js highlighter-rouge"><div class="highlight"><pre class="highlight"><code><span class="nx">model</span> <span class="nx">User</span> <span class="p">{</span>
  <span class="nx">id</span>            <span class="nb">String</span>    <span class="p">@</span><span class="nd">id</span> <span class="p">@</span><span class="nd">default</span><span class="p">(</span><span class="nf">uuid</span><span class="p">())</span>
  <span class="nx">email</span>         <span class="nb">String</span>    <span class="p">@</span><span class="nd">unique</span>
  <span class="nx">emailVerified</span> <span class="nx">DateTime</span><span class="p">?</span> <span class="p">@</span><span class="nd">map</span><span class="p">(</span><span class="dl">"</span><span class="s2">email_verified</span><span class="dl">"</span><span class="p">)</span>
  <span class="nx">name</span>          <span class="nb">String</span><span class="p">?</span>
  <span class="nx">createdAt</span>     <span class="nx">DateTime</span>  <span class="p">@</span><span class="nd">default</span><span class="p">(</span><span class="nf">now</span><span class="p">())</span> <span class="p">@</span><span class="nd">map</span><span class="p">(</span><span class="dl">"</span><span class="s2">created_at</span><span class="dl">"</span><span class="p">)</span>
  <span class="nx">updatedAt</span>     <span class="nx">DateTime</span>  <span class="p">@</span><span class="nd">updatedAt</span> <span class="p">@</span><span class="nd">map</span><span class="p">(</span><span class="dl">"</span><span class="s2">updated_at</span><span class="dl">"</span><span class="p">)</span>
<span class="p">}</span>

<span class="nx">model</span> <span class="nx">Posts</span> <span class="p">{</span>
  <span class="nx">id</span>        <span class="nb">String</span>   <span class="p">@</span><span class="nd">id</span> <span class="p">@</span><span class="nd">default</span><span class="p">(</span><span class="nf">uuid</span><span class="p">())</span> <span class="p">@</span><span class="nd">map</span><span class="p">(</span><span class="dl">"</span><span class="s2">id</span><span class="dl">"</span><span class="p">)</span>
  <span class="nx">title</span>     <span class="nb">String</span>
  <span class="nx">content</span>   <span class="nb">String</span><span class="p">?</span>
  <span class="nx">publishedAt</span> <span class="nx">DateTime</span><span class="p">?</span> <span class="p">@</span><span class="nd">map</span><span class="p">(</span><span class="dl">"</span><span class="s2">published_at</span><span class="dl">"</span><span class="p">)</span>
  <span class="nx">authorId</span>  <span class="nb">String</span> <span class="p">@</span><span class="nd">map</span><span class="p">(</span><span class="dl">"</span><span class="s2">author_id</span><span class="dl">"</span><span class="p">)</span>
  <span class="nx">author</span>    <span class="nx">User</span>     <span class="p">@</span><span class="nd">relation</span><span class="p">(</span><span class="nx">fields</span><span class="p">:</span> <span class="p">[</span><span class="nx">authorId</span><span class="p">],</span> <span class="nx">references</span><span class="p">:</span> <span class="p">[</span><span class="nx">id</span><span class="p">])</span>
<span class="p">}</span>
</code></pre></div></div>

<p>This has the benefit of connecting the model to the database table while preserving the correct naming conventions in both use-cases. The model can still utilize camelCase to interact at the JavaScript layer, while the database table uses the more commonly found snake_case equivlent.</p>

<p>For table naming, the <code class="language-plaintext highlighter-rouge">@@map</code> directive can be used in much the same way. We’ll use it to ensure that our database tables are named <strong>users</strong> and <strong>posts</strong> respectively.</p>

<div class="language-js highlighter-rouge"><div class="highlight"><pre class="highlight"><code><span class="nx">model</span> <span class="nx">User</span> <span class="p">{</span>
  <span class="nx">id</span>            <span class="nb">String</span>    <span class="p">@</span><span class="nd">id</span> <span class="p">@</span><span class="nd">default</span><span class="p">(</span><span class="nf">uuid</span><span class="p">())</span>

  <span class="p">@@</span><span class="nd">map</span><span class="p">(</span><span class="dl">"</span><span class="s2">users</span><span class="dl">"</span><span class="p">)</span>
<span class="p">}</span>

<span class="nx">model</span> <span class="nx">Posts</span> <span class="p">{</span>
  <span class="nx">id</span>        <span class="nb">String</span>   <span class="p">@</span><span class="nd">id</span> <span class="p">@</span><span class="nd">default</span><span class="p">(</span><span class="nf">uuid</span><span class="p">())</span>

  <span class="p">@@</span><span class="nd">map</span><span class="p">(</span><span class="dl">"</span><span class="s2">posts</span><span class="dl">"</span><span class="p">)</span>
<span class="p">}</span>
</code></pre></div></div>

<p>We now have SQL that uses database naming conventions while the Prisma models use camelCase conventions to better integrate with the JavaScript language.</p>

<h2 id="associations">Associations</h2>

<p>This same approach can also be used for associations. For example, if there were a join table between Users and Posts, you could name the association with camelCase conventions. In this case, @map and @@map are not needed since Prisma provides a built-in mechanism to define the relationship. This relationship is virtual and does not exist in the database layer.</p>

<div class="language-js highlighter-rouge"><div class="highlight"><pre class="highlight"><code><span class="nx">model</span> <span class="nx">User</span> <span class="p">{</span>
  <span class="nx">id</span>            <span class="nb">String</span>    <span class="p">@</span><span class="nd">id</span> <span class="p">@</span><span class="nd">default</span><span class="p">(</span><span class="nf">uuid</span><span class="p">())</span>

  <span class="nx">userPosts</span>     <span class="nx">Post</span><span class="p">[]</span>
<span class="p">}</span>

<span class="c1">// Prisma used elsewhere in the codebase</span>
<span class="c1">// Collection of Posts associated with the User</span>
<span class="nx">user</span><span class="p">.</span><span class="nx">userPosts</span>
</code></pre></div></div>

<h2 id="conclusion">Conclusion</h2>

<p>And with all of that you can keep both the Database and JavaScript layers focused on their own conventions.</p>

<p>Know about a trick with Prisma? Let me know in the comments below!</p>]]></content><author><name>Josh Frankel (@joshmfrankel)</name><uri>http://joshfrankel.me/</uri></author><category term="articles" /><category term="prisma" /><category term="databases" /><category term="javascript" /><summary type="html"><![CDATA[I’ve been working with Prisma as an object-relational mapping tool for my projects. Coming from a background of using raw SQL along with ActiveRecord, I’ve noticed that default Prisma caters to JavaScript over other established standards. Ensuring database table columns are snake_case along with creating associations that are lowercase and plural doesn’t come for free but Prisma does provide a way to configure these within your schema.]]></summary></entry><entry><title type="html">ViewComponents, the Missing View Layer for Rails</title><link href="http://joshfrankel.me/blog/viewcomponents-the-missing-view-layer-for-rails/" rel="alternate" type="text/html" title="ViewComponents, the Missing View Layer for Rails" /><published>2025-05-14T00:00:00+00:00</published><updated>2025-05-14T00:00:00+00:00</updated><id>http://joshfrankel.me/blog/viewcomponents-the-missing-view-layer-for-rails</id><content type="html" xml:base="http://joshfrankel.me/blog/viewcomponents-the-missing-view-layer-for-rails/"><![CDATA[<p>If you’ve worked with Rails for any measure of time, then you know that Rails’ Views can quickly get out of hand. Between Helpers, instance variables, and inline logic, they quickly become bloated and tightly coupled to other view specific logic. Pushing these concerns into the Controller layer, or even a Presenter helps, but still lands the View in a place where it contains multiple responsibilities. If only there was a better way… Enter ViewComponents or as I like to call them, “The Missing View Layer for Rails”.</p>

<!--excerpt-->

<h2 id="our-example">Our Example</h2>

<p>First, let’s take a look at an example of a User listing page with pagination and actions. I find this example to be a great illustration of the power of ViewComponents while staying grounded in a real-world feature.</p>

<blockquote class="Info Info--full">
  

  <p>
    <i class="fas fa-quote-left"></i>
    You don't need to be familiar with the Pagy gem. Just know that it allows us to paginate a collection of objects.
  </p>

  
    <a href="https://github.com/ddnexus/pagy">Pagy gem documentation</a>
  
</blockquote>

<div class="language-ruby highlighter-rouge"><div class="highlight"><pre class="highlight"><code><span class="c1"># users_controller.rb</span>
<span class="k">class</span> <span class="nc">UsersController</span> <span class="o">&lt;</span> <span class="no">ApplicationController</span>
  <span class="no">USERS_PER_PAGE</span> <span class="o">=</span> <span class="mi">30</span>

  <span class="k">def</span> <span class="nf">index</span>
    <span class="vi">@filters</span> <span class="o">=</span> <span class="p">{</span>
      <span class="ss">role: </span><span class="no">Role</span><span class="p">.</span><span class="nf">all</span><span class="p">.</span><span class="nf">select</span><span class="p">(</span><span class="ss">:name</span><span class="p">)</span>
    <span class="p">}</span>

    <span class="vi">@pagy</span><span class="p">,</span> <span class="n">users</span> <span class="o">=</span> <span class="n">pagy</span><span class="p">(</span><span class="n">available_users</span><span class="p">,</span> <span class="ss">limit: </span><span class="no">USERS_PER_PAGE</span><span class="p">,</span> <span class="ss">page: </span><span class="n">params</span><span class="p">[</span><span class="ss">:page</span><span class="p">])</span>

    <span class="vi">@users</span> <span class="o">=</span> <span class="n">users</span><span class="p">.</span><span class="nf">map</span> <span class="p">{</span> <span class="o">|</span><span class="n">user</span><span class="o">|</span> <span class="no">UserPresenter</span><span class="p">.</span><span class="nf">new</span><span class="p">(</span><span class="n">user</span><span class="p">)</span> <span class="p">}</span>
  <span class="k">end</span>

  <span class="kp">private</span>

  <span class="k">def</span> <span class="nf">filter_params</span>
    <span class="n">params</span><span class="p">.</span><span class="nf">permit</span><span class="p">(</span><span class="ss">filters: :role</span><span class="p">)</span>
  <span class="k">end</span>

  <span class="k">def</span> <span class="nf">available_users</span>
    <span class="k">if</span> <span class="n">filter_params</span><span class="p">.</span><span class="nf">present?</span>
      <span class="no">User</span><span class="p">.</span><span class="nf">where</span><span class="p">(</span><span class="ss">role: </span><span class="n">filter_params</span><span class="p">)</span>
    <span class="k">else</span>
      <span class="no">User</span><span class="p">.</span><span class="nf">all</span>
    <span class="k">end</span>
  <span class="k">end</span>
<span class="k">end</span>

<span class="c1"># user_presenter.rb</span>
<span class="k">class</span> <span class="nc">UserPresenter</span> <span class="o">&lt;</span> <span class="no">SimpleDelegator</span>
  <span class="k">def</span> <span class="nf">current_roles</span>
    <span class="n">roles</span><span class="p">.</span><span class="nf">map</span><span class="p">(</span><span class="o">&amp;</span><span class="ss">:name</span><span class="p">).</span><span class="nf">to_sentence</span>
  <span class="k">end</span>

  <span class="k">def</span> <span class="nf">dropdown_actions</span>
    <span class="p">[</span><span class="ss">:edit</span><span class="p">,</span> <span class="ss">:destroy</span><span class="p">]</span>
  <span class="k">end</span>
<span class="k">end</span>
</code></pre></div></div>

<div class="language-html highlighter-rouge"><div class="highlight"><pre class="highlight"><code><span class="c">&lt;!-- index.html.erb --&gt;</span>
<span class="nt">&lt;</span><span class="err">%=</span> <span class="na">render</span> <span class="na">partial:</span> <span class="err">"</span><span class="na">filters</span><span class="err">",</span> <span class="na">locals:</span> <span class="err">{</span> <span class="na">available_filters:</span> <span class="err">@</span><span class="na">filters</span> <span class="err">}</span> <span class="err">%</span><span class="nt">&gt;</span>

<span class="nt">&lt;table</span> <span class="na">class=</span><span class="s">"bg-gray-300 p-4"</span><span class="nt">&gt;</span>
  <span class="nt">&lt;thead&gt;</span>
    <span class="nt">&lt;tr&gt;</span>
      <span class="nt">&lt;th&gt;</span>Name<span class="nt">&lt;/th&gt;</span>
      <span class="nt">&lt;th&gt;</span>Roles<span class="nt">&lt;/th&gt;</span>
      <span class="nt">&lt;th&gt;</span>Actions<span class="nt">&lt;/th&gt;</span>
    <span class="nt">&lt;/tr&gt;</span>
  <span class="nt">&lt;/thead&gt;</span>

  <span class="nt">&lt;tbody&gt;</span>
    <span class="nt">&lt;</span><span class="err">%</span> <span class="err">@</span><span class="na">users.each</span> <span class="na">do</span> <span class="err">|</span><span class="na">user</span><span class="err">|</span> <span class="err">%</span><span class="nt">&gt;</span>
    <span class="nt">&lt;tr&gt;</span>
      <span class="nt">&lt;td&gt;&lt;</span><span class="err">%=</span> <span class="na">user.name</span> <span class="err">%</span><span class="nt">&gt;&lt;/td&gt;</span>
      <span class="nt">&lt;td&gt;&lt;</span><span class="err">%=</span> <span class="na">user.current_roles</span> <span class="err">%</span><span class="nt">&gt;&lt;/td&gt;</span>
      <span class="nt">&lt;td&gt;</span>
        <span class="nt">&lt;</span><span class="err">%=</span> <span class="na">render</span> <span class="na">partial:</span> <span class="err">"</span><span class="na">dropdown</span><span class="err">",</span> <span class="na">locals:</span> <span class="err">{</span> <span class="na">resource:</span> <span class="na">user</span><span class="err">,</span> <span class="na">actions:</span>
        <span class="na">user.dropdown_actions</span> <span class="err">}</span> <span class="err">%</span><span class="nt">&gt;</span>
      <span class="nt">&lt;/td&gt;</span>
    <span class="nt">&lt;/tr&gt;</span>
    <span class="nt">&lt;</span><span class="err">%</span> <span class="na">end</span> <span class="err">%</span><span class="nt">&gt;</span>
  <span class="nt">&lt;/tbody&gt;</span>

  <span class="nt">&lt;tfoot&gt;</span>
    <span class="nt">&lt;tr&gt;</span>
      <span class="nt">&lt;td</span> <span class="na">colspan=</span><span class="s">"3"</span><span class="nt">&gt;</span>
        <span class="nt">&lt;p&gt;&lt;strong&gt;</span>Pagination<span class="nt">&lt;/strong&gt;&lt;/p&gt;</span>
        <span class="nt">&lt;</span><span class="err">%=</span> <span class="na">pagy_nav</span><span class="err">(@</span><span class="na">pagy</span><span class="err">)</span> <span class="err">%</span><span class="nt">&gt;</span>
      <span class="nt">&lt;/td&gt;</span>
    <span class="nt">&lt;/tr&gt;</span>
  <span class="nt">&lt;/tfoot&gt;</span>
<span class="nt">&lt;/table&gt;</span>
</code></pre></div></div>

<p>How many responsibilities can you find spread between the Controller, Presenter, and View for this single page? Here’s the ones I quickly identified.</p>

<ol>
  <li><strong>(Controller)</strong> Must understand how to set filters for the View</li>
  <li><strong>(Controller)</strong> Wraps every User within a UserPresenter for additional functionality outside standard Model.</li>
  <li><strong>(Controller)</strong> Must configure pagination values to prepare for View output</li>
  <li><strong>(View)</strong> Needs to understand the Filter partials interface to send the correct data</li>
  <li><strong>(View)</strong> Must know which table headers correspond to the User resource</li>
  <li><strong>(View)</strong> Must know how to render each individual User</li>
  <li><strong>(View)</strong> Must know which values to send to the actions’ dropdown, so has to understand the interface</li>
  <li><strong>(View)</strong> Must utilize the proper DSL from the Pagy gem in the table footer</li>
  <li><strong>(Presenter)</strong> Must know which dropdown actions to show for each User</li>
  <li><strong>(Presenter)</strong> Must convert a User’s roles into a human readable string</li>
</ol>

<p>Now imagine a new feature requirement is requested to build a similar but slightly different page for a given User’s blog posts. You’d end up copying and pasting much of the above or creating additional partials to help abstract common functionality. ViewComponents offer a cleaner, isolated way of containing related View concerns in a single location. This includes building UI libraries with consistent CSS styling, reusable components, better testability, and more.</p>

<h2 id="viewcomponents-make-the-view-layer-awesome">ViewComponents make the View layer awesome</h2>

<p>ViewComponents have a number of advantages. From proper separation of concerns, to preview-ability and testing. They really feel like a total application changer once you start using them. Co-location is a great benefit of using them as it allows for a ViewComponent object to be related to specific component rendering view code. This helps to keep your UI components focusing on single concerns. Generally this would mean you’d have a <code class="language-plaintext highlighter-rouge">my_component.rb</code> and <code class="language-plaintext highlighter-rouge">my_component.html.erb</code> file, where the <code class="language-plaintext highlighter-rouge">my_component.rb</code> automatically renders the <code class="language-plaintext highlighter-rouge">my_component.html.erb</code> file.</p>

<blockquote class="Info Info--full">
  

  <p>
    <i class="fas fa-quote-left"></i>
    A framework for creating reusable, testable &amp; encapsulated view components, built to integrate seamlessly with Ruby on Rails.
  </p>

  
    <a href="https://viewcomponent.org/">https://viewcomponent.org/</a>
  
</blockquote>

<p>Looking at the previous example let’s inject some ViewComponent goodness.</p>

<h3 id="filters-component">Filters Component</h3>

<p>The least coupled concept are the Filters. For this example, we can assume that a filter allows the user to exclude records by enum columns to keep it simple. This means you might end up with a URL like: <strong>my-site.com/users?filters[role]=admin</strong> which would only return users with the <strong>admin</strong> role. Akin to executing the following SQL:</p>

<div class="language-sql highlighter-rouge"><div class="highlight"><pre class="highlight"><code><span class="k">SELECT</span> <span class="o">*</span>
<span class="k">FROM</span> <span class="n">users</span>
<span class="k">INNER</span> <span class="k">JOIN</span> <span class="n">user_roles</span> <span class="k">ON</span> <span class="n">user_roles</span><span class="p">.</span><span class="n">user_id</span> <span class="o">=</span> <span class="n">users</span><span class="p">.</span><span class="n">id</span>
<span class="k">INNER</span> <span class="k">JOIN</span> <span class="n">roles</span> <span class="k">ON</span> <span class="n">roles</span><span class="p">.</span><span class="n">id</span> <span class="o">=</span> <span class="n">user_roles</span><span class="p">.</span><span class="n">role_id</span>
<span class="k">WHERE</span> <span class="n">roles</span><span class="p">.</span><span class="n">name</span> <span class="o">=</span> <span class="s1">'admin'</span>
</code></pre></div></div>

<p>We have a need of an Application-specific as well as General-purpose component as it needs to know which columns to show for the filters and filters could be reusable. ViewComponent’s <a href="https://viewcomponent.org/best_practices.html#two-types-of-viewcomponents">best practices</a> recommend seperating responsibilities between generic and specific use cases.</p>

<blockquote class="Info Info--full">
  

  <p>
    <i class="fas fa-quote-left"></i>
    General-purpose ViewComponents implement common UI patterns, such as a button, form, or modal. Application-specific ViewComponents translate a domain object into one or more general-purpose components.
  </p>

  
    <a href="https://viewcomponent.org/best_practices.html#two-types-of-viewcomponents">https://viewcomponent.org/best_practices.html#two-types-of-viewcomponents</a>
  
</blockquote>

<p>For Filters, we can create a component for each of the use cases allowing us to resuse the common logic for future Filter related features.</p>

<h3 id="application-specific">Application-specific</h3>

<p>We’ll start by creating a UsersFilterComponent to dictate how filters are built for this specific use case.</p>

<div class="language-ruby highlighter-rouge"><div class="highlight"><pre class="highlight"><code><span class="c1"># Application-specific</span>
<span class="c1"># users_filter_component.rb</span>
<span class="k">class</span> <span class="nc">UsersFilterComponent</span> <span class="o">&lt;</span> <span class="no">ViewComponent</span><span class="o">::</span><span class="no">Base</span>

  <span class="c1"># You could also use dependency injection for more complex use cases with available roles</span>
  <span class="k">def</span> <span class="nf">filters</span>
    <span class="p">{</span>
      <span class="ss">role: </span><span class="no">Role</span><span class="p">.</span><span class="nf">all</span><span class="p">.</span><span class="nf">select</span><span class="p">(</span><span class="ss">:name</span><span class="p">)</span>
    <span class="p">}</span>
  <span class="k">end</span>
<span class="k">end</span>
</code></pre></div></div>

<p>Notice how the corresponding component view for UsersFilterComponent actually is using the General-purpose FilterComponent during its rendering.</p>

<div class="language-html highlighter-rouge"><div class="highlight"><pre class="highlight"><code><span class="c">&lt;!-- users_filter_component.html.erb --&gt;</span>
<span class="nt">&lt;</span><span class="err">%=</span> <span class="na">render</span> <span class="na">FilterComponent.new</span><span class="err">(</span><span class="na">available_filters:</span> <span class="na">filters</span><span class="err">)</span> <span class="err">%</span><span class="nt">&gt;</span>
</code></pre></div></div>

<h3 id="general-purpose">General-purpose</h3>

<p>Since our Application-specific component utilizes the General-purpose component, we can have the FilterComponent accept a generic <code class="language-plaintext highlighter-rouge">available_filters</code> argument. Some of this is psuedo code to illustrate the concept of taking a collection of filters from a Hash and rendering them iteratively in the View.</p>

<div class="language-ruby highlighter-rouge"><div class="highlight"><pre class="highlight"><code><span class="c1"># General-purpose</span>
<span class="c1"># filter_component.rb</span>
<span class="k">class</span> <span class="nc">FilterComponent</span> <span class="o">&lt;</span> <span class="no">ViewComponent</span><span class="o">::</span><span class="no">Base</span>
  <span class="nb">attr_reader</span> <span class="ss">:available_filters</span>

  <span class="k">def</span> <span class="nf">initialize</span><span class="p">(</span><span class="n">available_filters</span><span class="p">:)</span>
    <span class="vi">@available_filters</span> <span class="o">=</span> <span class="n">available_filters</span>
  <span class="k">end</span>
<span class="k">end</span>
</code></pre></div></div>

<div class="language-html highlighter-rouge"><div class="highlight"><pre class="highlight"><code><span class="c">&lt;!-- Psuedo code to build links like: ?filters[role]=admin --&gt;</span>
<span class="c">&lt;!-- filter_component.html.erb --&gt;</span>
<span class="nt">&lt;div&gt;</span>
  <span class="nt">&lt;</span><span class="err">%</span> <span class="na">available_filters.keys.each</span> <span class="na">do</span> <span class="err">|</span><span class="na">filter_key</span><span class="err">|</span> <span class="err">%</span><span class="nt">&gt;</span> 
    <span class="nt">&lt;</span><span class="err">%</span> <span class="na">available_filters</span><span class="err">[</span><span class="na">filter_key</span><span class="err">].</span><span class="na">each</span> <span class="na">do</span> <span class="err">|</span><span class="na">filter</span><span class="err">|</span> <span class="err">%</span><span class="nt">&gt;</span> 
      <span class="nt">&lt;</span><span class="err">%=</span> <span class="na">link_to</span> <span class="na">filter.name</span><span class="err">,</span> <span class="na">params.merge</span><span class="err">(</span><span class="na">filter_key:</span> <span class="na">filter.name</span><span class="err">)</span> <span class="err">%</span><span class="nt">&gt;</span> 
    <span class="nt">&lt;</span><span class="err">%</span> <span class="na">end</span> <span class="err">%</span><span class="nt">&gt;</span> 
  <span class="nt">&lt;</span><span class="err">%</span> <span class="na">end</span> <span class="err">%</span><span class="nt">&gt;</span>
<span class="nt">&lt;/div&gt;</span>
</code></pre></div></div>

<p>We now gain some nice cleanup in our Controller and View layers:</p>

<div class="language-ruby highlighter-rouge"><div class="highlight"><pre class="highlight"><code><span class="c1"># users_controller.rb</span>
<span class="k">class</span> <span class="nc">UsersController</span> <span class="o">&lt;</span> <span class="no">ApplicationController</span>
  <span class="no">USERS_PER_PAGE</span> <span class="o">=</span> <span class="mi">30</span>

  <span class="k">def</span> <span class="nf">index</span>
    <span class="c1"># - REMOVED -</span>
    <span class="c1"># @filters = {</span>
    <span class="c1">#  role: Role.all.select(:name)</span>
    <span class="c1"># }</span>

    <span class="vi">@pagy</span><span class="p">,</span> <span class="n">users</span> <span class="o">=</span> <span class="n">pagy</span><span class="p">(</span><span class="n">available_users</span><span class="p">,</span> <span class="ss">limit: </span><span class="no">USERS_PER_PAGE</span><span class="p">,</span> <span class="ss">page: </span><span class="n">params</span><span class="p">[</span><span class="ss">:page</span><span class="p">])</span>

    <span class="vi">@users</span> <span class="o">=</span> <span class="n">users</span><span class="p">.</span><span class="nf">map</span> <span class="p">{</span> <span class="o">|</span><span class="n">user</span><span class="o">|</span> <span class="no">UserPresenter</span><span class="p">.</span><span class="nf">new</span><span class="p">(</span><span class="n">user</span><span class="p">)</span> <span class="p">}</span>
  <span class="k">end</span>

 <span class="c1"># ... Rest of Controller</span>
</code></pre></div></div>

<div class="language-html highlighter-rouge"><div class="highlight"><pre class="highlight"><code><span class="c">&lt;!-- index.html.erb --&gt;</span>
<span class="c">&lt;!-- Removed &lt;%= render partial: "filters", locals: { available_filters: @filters } %&gt; --&gt;</span>
<span class="nt">&lt;</span><span class="err">%=</span> <span class="na">render</span> <span class="na">UsersFilterComponent.new</span> <span class="err">%</span><span class="nt">&gt;</span>

<span class="nt">&lt;table</span> <span class="na">class=</span><span class="s">"bg-gray-300 p-4"</span><span class="nt">&gt;</span>
  <span class="nt">&lt;thead&gt;</span>
</code></pre></div></div>

<p>We now have a User specific filters component and a general-purpose filters component to utilize on other pages. Next let’s dig into rendering the current User in the collection.</p>

<h2 id="usercomponent">UserComponent</h2>

<p>The primary section we are abstracting is the render loop from within the table body. I’ve added comments to show the section we’re looking at componentizing.</p>

<div class="language-html highlighter-rouge"><div class="highlight"><pre class="highlight"><code>  <span class="nt">&lt;tbody&gt;</span>
    <span class="nt">&lt;</span><span class="err">%</span> <span class="err">@</span><span class="na">users.each</span> <span class="na">do</span> <span class="err">|</span><span class="na">user</span><span class="err">|</span> <span class="err">%</span><span class="nt">&gt;</span>
      <span class="c">&lt;!-- UserComponent --&gt;</span>
      <span class="nt">&lt;tr&gt;</span>
        <span class="nt">&lt;td&gt;&lt;</span><span class="err">%=</span> <span class="na">user.name</span> <span class="err">%</span><span class="nt">&gt;&lt;/td&gt;</span>
        <span class="nt">&lt;td&gt;&lt;</span><span class="err">%=</span> <span class="na">user.current_roles</span> <span class="err">%</span><span class="nt">&gt;&lt;/td&gt;</span>
        <span class="nt">&lt;td&gt;&lt;</span><span class="err">%=</span> <span class="na">render</span> <span class="na">partial:</span> <span class="err">"</span><span class="na">dropdown</span><span class="err">",</span> <span class="na">locals:</span> <span class="err">{</span> <span class="na">resource:</span> <span class="na">user</span><span class="err">,</span> <span class="na">actions:</span> <span class="na">user.dropdown_actions</span> <span class="err">}</span> <span class="err">%</span><span class="nt">&gt;&lt;/td&gt;</span>
      <span class="nt">&lt;/tr&gt;</span>
      <span class="c">&lt;!-- End UserComponent --&gt;</span>
    <span class="nt">&lt;</span><span class="err">%</span> <span class="na">end</span> <span class="err">%</span><span class="nt">&gt;</span>
  <span class="nt">&lt;/tbody&gt;</span>
</code></pre></div></div>

<p>We’ll be pulling in our Presenter logic, as it now can completely live within our new UserComponent definition. With the upcoming change below, <strong>UserPresenter</strong> can be removed and our Controller slimmed down.</p>

<h3 id="updated-controller">Updated Controller</h3>
<div class="language-ruby highlighter-rouge"><div class="highlight"><pre class="highlight"><code><span class="c1"># users_controller.rb</span>
<span class="k">class</span> <span class="nc">UsersController</span> <span class="o">&lt;</span> <span class="no">ApplicationController</span>
  <span class="no">USERS_PER_PAGE</span> <span class="o">=</span> <span class="mi">30</span>

  <span class="k">def</span> <span class="nf">index</span>
    <span class="vi">@pagy</span><span class="p">,</span> <span class="vi">@users</span> <span class="o">=</span> <span class="n">pagy</span><span class="p">(</span><span class="n">available_users</span><span class="p">,</span> <span class="ss">limit: </span><span class="no">USERS_PER_PAGE</span><span class="p">,</span> <span class="ss">page: </span><span class="n">params</span><span class="p">[</span><span class="ss">:page</span><span class="p">])</span>

    <span class="c1"># - REMOVED -</span>
    <span class="c1"># @users = users.map { |user| UserPresenter.new(user) }</span>
  <span class="k">end</span>

<span class="c1"># Also deleted the UserPresenter</span>
</code></pre></div></div>

<h3 id="updated-view-indexhtmlerb">Updated View index.html.erb</h3>
<div class="language-html highlighter-rouge"><div class="highlight"><pre class="highlight"><code><span class="c">&lt;!-- index.html.erb --&gt;</span>
  <span class="nt">&lt;tbody&gt;</span>
    <span class="nt">&lt;</span><span class="err">%</span> <span class="err">@</span><span class="na">users.each</span> <span class="na">do</span> <span class="err">|</span><span class="na">user</span><span class="err">|</span> <span class="err">%</span><span class="nt">&gt;</span>
      <span class="nt">&lt;</span><span class="err">%=</span> <span class="na">render</span> <span class="na">UserComponent.new</span><span class="err">(</span><span class="na">user:</span><span class="err">)</span> <span class="err">%</span><span class="nt">&gt;</span>
    <span class="nt">&lt;</span><span class="err">%</span> <span class="na">end</span> <span class="err">%</span><span class="nt">&gt;</span>
  <span class="nt">&lt;/tbody&gt;</span>
</code></pre></div></div>

<h3 id="new-usercomponent">New UserComponent</h3>
<div class="language-ruby highlighter-rouge"><div class="highlight"><pre class="highlight"><code><span class="c1"># New component</span>
<span class="c1"># user_component.rb</span>
<span class="k">class</span> <span class="nc">UserComponent</span> <span class="o">&lt;</span> <span class="no">ViewComponent</span><span class="o">::</span><span class="no">Base</span>
  <span class="nb">attr_reader</span> <span class="ss">:user</span>

  <span class="k">def</span> <span class="nf">initialize</span><span class="p">(</span><span class="n">user</span><span class="p">:)</span>
    <span class="vi">@user</span> <span class="o">=</span> <span class="n">user</span>
  <span class="k">end</span>

  <span class="c1"># Pulled directly from Presenter</span>
  <span class="k">def</span> <span class="nf">current_roles</span>
    <span class="n">user</span><span class="p">.</span><span class="nf">roles</span><span class="p">.</span><span class="nf">map</span><span class="p">(</span><span class="o">&amp;</span><span class="ss">:name</span><span class="p">).</span><span class="nf">to_sentence</span>
  <span class="k">end</span>

  <span class="c1"># Pulled directly from Presenter</span>
  <span class="k">def</span> <span class="nf">dropdown_actions</span>
    <span class="p">[</span><span class="ss">:edit</span><span class="p">,</span> <span class="ss">:destroy</span><span class="p">]</span>
  <span class="k">end</span>
<span class="k">end</span>
</code></pre></div></div>

<h3 id="new-usercomponent-view">New UserComponent View</h3>
<div class="language-html highlighter-rouge"><div class="highlight"><pre class="highlight"><code><span class="c">&lt;!-- user_component.html.erb --&gt;</span>
      <span class="nt">&lt;tr&gt;</span>
        <span class="nt">&lt;td&gt;&lt;</span><span class="err">%=</span> <span class="na">user.name</span> <span class="err">%</span><span class="nt">&gt;&lt;/td&gt;</span>
        <span class="nt">&lt;td&gt;&lt;</span><span class="err">%=</span> <span class="na">user.current_roles</span> <span class="err">%</span><span class="nt">&gt;&lt;/td&gt;</span>
        <span class="nt">&lt;td&gt;&lt;</span><span class="err">%=</span> <span class="na">render</span> <span class="na">partial:</span> <span class="err">"</span><span class="na">dropdown</span><span class="err">",</span> <span class="na">locals:</span> <span class="err">{</span> <span class="na">resource:</span> <span class="na">user</span><span class="err">,</span> <span class="na">actions:</span> <span class="na">user.dropdown_actions</span> <span class="err">}</span> <span class="err">%</span><span class="nt">&gt;&lt;/td&gt;</span>
      <span class="nt">&lt;/tr&gt;</span>
</code></pre></div></div>

<p>Now depending on how far you want to isolate the different View responsibilities there are a few additional improvements you could take:</p>

<ol>
  <li>Create General-purpose components for Table, TableHeader, TableBody, TableCell</li>
  <li>Refactor the “dropdown” partial to become the DropdownComponent. Great example of a General-purpose abstraction as dropdowns are common.</li>
  <li>Further abstract Application-specific parts of the table for Users listing.</li>
</ol>

<p>I’m going to skip 2, to focus on 1 and 3.</p>

<h2 id="slots-and-the-userstablecomponent">Slots and the UsersTableComponent</h2>

<p>Following the abstraction to its next logical step, we can pull in several more View specific responsibilities into the ViewComponent layer. First we’ll start by moving the entire <strong>table</strong> tag into our new component. From here we can abstract the table headers into a ViewComponent method. Lastly, since we iterate over a collection of Users we can lean on ViewComponent’s <a href="https://viewcomponent.org/guide/slots.html#component-slots">slots</a>.</p>

<blockquote class="Info Info--full">
  

  <p>
    <i class="fas fa-quote-left"></i>
    Think of slots as a way to render multiple blocks of content, including other components.
  </p>

  
    <a href="https://viewcomponent.org/guide/slots.html">https://viewcomponent.org/guide/slots.html</a>
  
</blockquote>

<h3 id="new-userstablecomponent">New UsersTableComponent</h3>

<p>Since our UsersTableComponent will render an Application-specific component for User collections, we want each of the available users in the collection to be rendered by the singular UserComponent. We implement this by using the <code class="language-plaintext highlighter-rouge">render_many</code> slot to define a new collection called <code class="language-plaintext highlighter-rouge">:users</code> that renders with the UserComponent.</p>

<div class="language-ruby highlighter-rouge"><div class="highlight"><pre class="highlight"><code><span class="c1"># users_table_component.rb</span>
<span class="k">class</span> <span class="nc">UsersTableComponent</span> <span class="o">&lt;</span> <span class="no">ViewComponent</span><span class="o">::</span><span class="no">Base</span>
  <span class="n">renders_many</span> <span class="ss">:users</span><span class="p">,</span> <span class="no">UserComponent</span>

  <span class="k">def</span> <span class="nf">initialize</span><span class="p">(</span><span class="n">pagy</span><span class="p">:)</span>
    <span class="vi">@pagy</span> <span class="o">=</span> <span class="n">pagy</span>
  <span class="k">end</span>

  <span class="k">def</span> <span class="nf">headers</span>
    <span class="p">[</span><span class="s2">"name"</span><span class="p">,</span> <span class="s2">"roles"</span><span class="p">,</span> <span class="s2">"actions"</span><span class="p">]</span>
  <span class="k">end</span>
<span class="k">end</span>
</code></pre></div></div>

<p><strong>renders_many :users, UserComponent</strong> will give us a mechanism to define a collection of Users to render with the UserComponent.</p>

<h3 id="new-userstablecomponent-view">New UsersTableComponent View</h3>
<div class="language-html highlighter-rouge"><div class="highlight"><pre class="highlight"><code><span class="c">&lt;!-- users_table_component.html.erb --&gt;</span>
<span class="nt">&lt;table</span> <span class="na">class=</span><span class="s">"bg-gray-300 p-4"</span><span class="nt">&gt;</span>
  <span class="nt">&lt;thead&gt;</span>
    <span class="nt">&lt;tr&gt;</span>
      <span class="nt">&lt;</span><span class="err">%</span> <span class="na">headers.each</span> <span class="na">do</span> <span class="err">|</span><span class="na">header</span><span class="err">|</span> <span class="err">%</span><span class="nt">&gt;</span>
        <span class="nt">&lt;th&gt;&lt;</span><span class="err">%=</span> <span class="na">header</span> <span class="err">%</span><span class="nt">&gt;&lt;/th&gt;</span>
      <span class="nt">&lt;</span><span class="err">%</span> <span class="na">end</span> <span class="err">%</span><span class="nt">&gt;</span>
    <span class="nt">&lt;/tr&gt;</span>
  <span class="nt">&lt;/thead&gt;</span>

  <span class="nt">&lt;tbody&gt;</span>
    <span class="nt">&lt;</span><span class="err">%</span> <span class="na">users.each</span> <span class="na">do</span> <span class="err">|</span><span class="na">user</span><span class="err">|</span> <span class="err">%</span><span class="nt">&gt;</span>
      <span class="nt">&lt;</span><span class="err">%=</span> <span class="na">user</span> <span class="err">%</span><span class="nt">&gt;</span> <span class="c">&lt;!-- Will render with the UserComponent --&gt;</span>
    <span class="nt">&lt;</span><span class="err">%</span> <span class="na">end</span> <span class="err">%</span><span class="nt">&gt;</span>
  <span class="nt">&lt;/tbody&gt;</span>

  <span class="nt">&lt;tfoot&gt;</span>
    <span class="nt">&lt;tr&gt;</span>
      <span class="nt">&lt;td</span> <span class="na">colspan=</span><span class="s">"3"</span><span class="nt">&gt;</span>
        <span class="nt">&lt;p&gt;&lt;strong&gt;</span>Pagination<span class="nt">&lt;/strong&gt;&lt;/p&gt;</span>
        <span class="nt">&lt;</span><span class="err">%=</span> <span class="na">pagy_nav</span><span class="err">(@</span><span class="na">pagy</span><span class="err">)</span> <span class="err">%</span><span class="nt">&gt;</span>
      <span class="nt">&lt;/td&gt;</span>
    <span class="nt">&lt;/tr&gt;</span>
  <span class="nt">&lt;/tfoot&gt;</span>
<span class="nt">&lt;/table&gt;</span>
</code></pre></div></div>

<h3 id="updated-view-indexhtmlerb-1">Updated View index.html.erb</h3>
<p>We’ll need to adjust our primary Controller view, to define the incoming collection of Users. Slots accomplish this with the DSL <code class="language-plaintext highlighter-rouge">with_slot_name</code> so for our case <code class="language-plaintext highlighter-rouge">with_users</code>. The <code class="language-plaintext highlighter-rouge">with_users</code> method call behaves exactly like the UserComponent class meaning that it can take the same arguments as the initializer. Think of <code class="language-plaintext highlighter-rouge">with_users</code> as equivalent to <code class="language-plaintext highlighter-rouge">UserComponent.new</code>.</p>

<div class="language-html highlighter-rouge"><div class="highlight"><pre class="highlight"><code><span class="c">&lt;!-- Updated index.html.erb --&gt;</span>
<span class="nt">&lt;</span><span class="err">%=</span> <span class="na">render</span> <span class="na">UsersFilterComponent.new</span> <span class="err">%</span><span class="nt">&gt;</span>
<span class="nt">&lt;</span><span class="err">%=</span> <span class="na">render</span> <span class="na">UsersTableComponent.new</span><span class="err">(</span><span class="na">pagy:</span> <span class="err">@</span><span class="na">pagy</span><span class="err">)</span> <span class="na">do</span> <span class="err">|</span><span class="na">users_table_component</span><span class="err">|</span> <span class="err">%</span><span class="nt">&gt;</span>
  <span class="nt">&lt;</span><span class="err">%</span> <span class="err">@</span><span class="na">users.each</span> <span class="na">do</span> <span class="err">|</span><span class="na">user</span><span class="err">|</span> <span class="err">%</span><span class="nt">&gt;</span>
    <span class="nt">&lt;</span><span class="err">%</span> <span class="na">users_table_component.with_users</span><span class="err">(</span><span class="na">user:</span><span class="err">)</span> <span class="err">%</span><span class="nt">&gt;</span>
  <span class="nt">&lt;</span><span class="err">%</span> <span class="na">end</span> <span class="err">%</span><span class="nt">&gt;</span>
<span class="nt">&lt;</span><span class="err">%</span> <span class="na">end</span> <span class="err">%</span><span class="nt">&gt;</span>
</code></pre></div></div>

<p>Our cleanup is really coming along nicely now. One thing we haven’t touched on is standardizing render styles. I added a Tailwind CSS class to the <strong>&lt;table&gt;</strong> tag which would be nice to have all our tables utilize. Obviously, this would be most benficial once we have more than a single use case but we’ll abstract this to illustrate the point.</p>

<h2 id="tablecomponent">TableComponent</h2>

<p>Since we render <code class="language-plaintext highlighter-rouge">&lt;table class="bg-gray-300 p-4"&gt;</code> along with a header, body, and footer portion of the table we can start to abstract these in order to ensure consistent output style. Slots are a natural way of separating a Table into discrete pieces. Note that slots automatically create predicate methods in order to check if the slot contains data. This can be seen below with the <code class="language-plaintext highlighter-rouge">if footer?</code> conditional check, since not all Tables will have footers.</p>

<blockquote class="Info Info--full">
  

  <p>
    <i class="fas fa-quote-left"></i>
    To test whether a slot has been passed to the component, use the provided #{slot_name}? method.
  </p>

  
    <a href="https://viewcomponent.org/guide/slots.html#predicate-methods">https://viewcomponent.org/guide/slots.html#predicate-methods</a>
  
</blockquote>

<h3 id="new-tablecomponent">New TableComponent</h3>
<div class="language-ruby highlighter-rouge"><div class="highlight"><pre class="highlight"><code><span class="c1"># table_component.rb</span>
<span class="k">class</span> <span class="nc">TableComponent</span> <span class="o">&lt;</span> <span class="no">ViewComponent</span><span class="o">::</span><span class="no">Base</span>
  <span class="n">renders_one</span> <span class="ss">:header</span>
  <span class="n">renders_one</span> <span class="ss">:body</span>
  <span class="n">renders_one</span> <span class="ss">:footer</span>
<span class="k">end</span>
</code></pre></div></div>

<h3 id="new-tablecomponent-view">New TableComponent View</h3>
<div class="language-html highlighter-rouge"><div class="highlight"><pre class="highlight"><code><span class="c">&lt;!-- table_component.html.erb --&gt;</span>
<span class="nt">&lt;table</span> <span class="na">class=</span><span class="s">"bg-gray-300 p-4"</span><span class="nt">&gt;</span>
  <span class="nt">&lt;thead&gt;</span>
    <span class="nt">&lt;tr&gt;</span>
      <span class="nt">&lt;</span><span class="err">%=</span> <span class="na">header</span> <span class="err">%</span><span class="nt">&gt;</span>
    <span class="nt">&lt;/tr&gt;</span>
  <span class="nt">&lt;/thead&gt;</span>
  <span class="nt">&lt;tbody&gt;&lt;</span><span class="err">%=</span> <span class="na">body</span> <span class="err">%</span><span class="nt">&gt;&lt;/tbody&gt;</span>

  <span class="nt">&lt;</span><span class="err">%</span> <span class="na">if</span> <span class="na">footer</span><span class="err">?</span> <span class="err">%</span><span class="nt">&gt;</span>
    <span class="nt">&lt;tfoot&gt;&lt;</span><span class="err">%=</span> <span class="na">footer</span> <span class="err">%</span><span class="nt">&gt;&lt;/tfoot&gt;</span>
  <span class="nt">&lt;</span><span class="err">%</span> <span class="na">end</span> <span class="err">%</span><span class="nt">&gt;</span>
<span class="nt">&lt;/table&gt;</span>
</code></pre></div></div>

<p>Notice how we split the generic sections of a standard table into the new TableComponent. The concerns are separated based on the thead, tbody, and optional tfoot sections. Implementors for this component can now supply what they want to render and have it appear in the appropriate section based on the slot.</p>

<p>We can now adjust our users_table_component to utilize the general-purpose TableComponent. This ensure that all of our table follow the same styling from our UI library.</p>

<h3 id="updated-userstablecomponent">Updated UsersTableComponent</h3>
<div class="language-html highlighter-rouge"><div class="highlight"><pre class="highlight"><code><span class="c">&lt;!-- users_table_component.html.erb --&gt;</span>
<span class="nt">&lt;</span><span class="err">%=</span> <span class="na">render</span> <span class="na">TableComponent.new</span> <span class="na">do</span> <span class="err">|</span><span class="na">table_component</span><span class="err">|</span> <span class="err">%</span><span class="nt">&gt;</span>
  <span class="nt">&lt;</span><span class="err">%</span> <span class="na">table_component.with_header</span> <span class="na">do</span> <span class="err">%</span><span class="nt">&gt;</span>
    <span class="nt">&lt;</span><span class="err">%</span> <span class="na">headers.each</span> <span class="na">do</span> <span class="err">|</span><span class="na">header</span><span class="err">|</span> <span class="err">%</span><span class="nt">&gt;</span>
      <span class="nt">&lt;th&gt;&lt;</span><span class="err">%=</span> <span class="na">header</span> <span class="err">%</span><span class="nt">&gt;&lt;/th&gt;</span>
    <span class="nt">&lt;</span><span class="err">%</span> <span class="na">end</span> <span class="err">%</span><span class="nt">&gt;</span>
  <span class="nt">&lt;</span><span class="err">%</span> <span class="na">end</span> <span class="err">%</span><span class="nt">&gt;</span>

  <span class="nt">&lt;</span><span class="err">%</span> <span class="na">table_component.with_body</span> <span class="na">do</span> <span class="err">%</span><span class="nt">&gt;</span>
    <span class="nt">&lt;</span><span class="err">%</span> <span class="na">users.each</span> <span class="na">do</span> <span class="err">|</span><span class="na">user</span><span class="err">|</span> <span class="err">%</span><span class="nt">&gt;</span>
      <span class="nt">&lt;</span><span class="err">%=</span> <span class="na">user</span> <span class="err">%</span><span class="nt">&gt;</span> <span class="c">&lt;!-- Will render with the UserComponent --&gt;</span>
    <span class="nt">&lt;</span><span class="err">%</span> <span class="na">end</span> <span class="err">%</span><span class="nt">&gt;</span>
  <span class="nt">&lt;</span><span class="err">%</span> <span class="na">end</span> <span class="err">%</span><span class="nt">&gt;</span>

  <span class="nt">&lt;</span><span class="err">%</span> <span class="na">table_component.with_footer</span> <span class="na">do</span> <span class="err">%</span><span class="nt">&gt;</span>
    <span class="nt">&lt;tr&gt;</span>
      <span class="nt">&lt;td</span> <span class="na">colspan=</span><span class="s">"3"</span><span class="nt">&gt;</span>
        <span class="nt">&lt;p&gt;&lt;strong&gt;</span>Pagination<span class="nt">&lt;/strong&gt;&lt;/p&gt;</span>
        <span class="nt">&lt;</span><span class="err">%=</span> <span class="na">pagy_nav</span><span class="err">(@</span><span class="na">pagy</span><span class="err">)</span> <span class="err">%</span><span class="nt">&gt;</span>
      <span class="nt">&lt;/td&gt;</span>
    <span class="nt">&lt;/tr&gt;</span>
  <span class="nt">&lt;</span><span class="err">%</span> <span class="na">end</span> <span class="err">%</span><span class="nt">&gt;</span>
<span class="nt">&lt;</span><span class="err">%</span> <span class="na">end</span> <span class="err">%</span><span class="nt">&gt;</span>
</code></pre></div></div>

<h2 id="customizing-css-classes">Customizing CSS Classes</h2>

<p>One thing I like to add to components is a parameter to accept CSS classes for their top level element. This keeps the component opinionated but flexible enough to allow for customization when needed.</p>

<div class="language-ruby highlighter-rouge"><div class="highlight"><pre class="highlight"><code><span class="c1"># table_component.rb</span>
<span class="k">class</span> <span class="nc">TableComponent</span> <span class="o">&lt;</span> <span class="no">ViewComponent</span><span class="o">::</span><span class="no">Base</span>
  <span class="n">renders_one</span> <span class="ss">:header</span>
  <span class="n">renders_one</span> <span class="ss">:body</span>
  <span class="n">renders_one</span> <span class="ss">:footer</span>

  <span class="nb">attr_reader</span> <span class="ss">:classes</span>

  <span class="k">def</span> <span class="nf">initialize</span><span class="p">(</span><span class="ss">classes: </span><span class="s2">""</span><span class="p">)</span>
    <span class="vi">@classes</span> <span class="o">=</span> <span class="n">classes</span>
  <span class="k">end</span>

  <span class="k">def</span> <span class="nf">component_classes</span>
    <span class="s2">"bg-gray-300 p-4 </span><span class="si">#{</span><span class="n">classes</span><span class="si">}</span><span class="s2">"</span>
  <span class="k">end</span>
<span class="k">end</span>
</code></pre></div></div>

<div class="language-html highlighter-rouge"><div class="highlight"><pre class="highlight"><code><span class="c">&lt;!-- table_component.html.erb --&gt;</span>
<span class="nt">&lt;table</span> <span class="na">class=</span><span class="s">"&lt;%= component_classes %&gt;"</span><span class="nt">&gt;</span>
  <span class="nt">&lt;thead&gt;</span>
    <span class="nt">&lt;tr&gt;</span>
      <span class="nt">&lt;</span><span class="err">%=</span> <span class="na">header</span> <span class="err">%</span><span class="nt">&gt;</span>
    <span class="nt">&lt;/tr&gt;</span>
  <span class="nt">&lt;/thead&gt;</span>
  <span class="nt">&lt;tbody&gt;&lt;</span><span class="err">%=</span> <span class="na">body</span> <span class="err">%</span><span class="nt">&gt;&lt;/tbody&gt;</span>
  <span class="nt">&lt;tfoot&gt;&lt;</span><span class="err">%=</span> <span class="na">footer</span> <span class="err">%</span><span class="nt">&gt;&lt;/tfoot&gt;</span>
<span class="nt">&lt;/table&gt;</span>

<span class="c">&lt;!-- Could be used with --&gt;</span>
<span class="nt">&lt;</span><span class="err">%=</span> <span class="na">render</span> <span class="na">TableComponent.new</span><span class="err">(</span><span class="na">classes:</span> <span class="err">"</span><span class="na">flex</span> <span class="na">bg-red-400</span><span class="err">")</span> <span class="err">%</span><span class="nt">&gt;</span>

<span class="c">&lt;!-- Which would render: --&gt;</span>
<span class="nt">&lt;table</span> <span class="na">class=</span><span class="s">"bg-gray-300 p-4 flex bg-red-400"</span><span class="nt">&gt;</span>
  <span class="nt">&lt;thead&gt;</span>
    <span class="nt">&lt;tr&gt;</span>
      <span class="nt">&lt;</span><span class="err">%=</span> <span class="na">header</span> <span class="err">%</span><span class="nt">&gt;</span>
    <span class="nt">&lt;/tr&gt;</span>
  <span class="nt">&lt;/thead&gt;</span>
<span class="nt">&lt;/table&gt;</span>
</code></pre></div></div>

<p>The <a href="https://api.rubyonrails.org/classes/ActionView/Helpers/TagHelper.html#method-i-class_names">class_names TagHelper</a> comes in handy here to conditionally toggle classes based on boolean values. With it we can more easily toggle the duplicate bg Tailwind classes.</p>

<div class="language-ruby highlighter-rouge"><div class="highlight"><pre class="highlight"><code><span class="c1"># table_component.rb</span>
<span class="k">class</span> <span class="nc">TableComponent</span> <span class="o">&lt;</span> <span class="no">ViewComponent</span><span class="o">::</span><span class="no">Base</span>
  <span class="n">renders_one</span> <span class="ss">:header</span>
  <span class="n">renders_one</span> <span class="ss">:body</span>
  <span class="n">renders_one</span> <span class="ss">:footer</span> 

  <span class="nb">attr_reader</span> <span class="ss">:classes</span>

  <span class="k">def</span> <span class="nf">initialize</span><span class="p">(</span><span class="ss">classes: </span><span class="s2">""</span><span class="p">)</span>
    <span class="vi">@classes</span> <span class="o">=</span> <span class="n">classes</span>
  <span class="k">end</span>

  <span class="k">def</span> <span class="nf">component_classes</span>
    <span class="n">class_names</span><span class="p">({</span>
      <span class="s2">"bg-gray-300"</span> <span class="o">=&gt;</span> <span class="n">classes</span><span class="p">.</span><span class="nf">exclude?</span><span class="p">(</span><span class="s2">"bg-"</span><span class="p">),</span> <span class="c1"># Only use `bg-gray-300` if the `classes` argument does not include a Tailwind supported background color</span>
      <span class="s2">"p-4"</span> <span class="o">=&gt;</span> <span class="kp">true</span><span class="p">,</span>
      <span class="n">classes</span>
    <span class="p">})</span>
  <span class="k">end</span>
<span class="k">end</span>
</code></pre></div></div>

<p>There are additional concepts that can be added here such as variants which is a defined collection of styles based on a type. For example, a ButtonComponent could have a <code class="language-plaintext highlighter-rouge">:critical</code> variant to highlight the button in red. These are a great way to create different flavors of a component within a UI library ecosystem.</p>

<h2 id="applicationcomponent">ApplicationComponent</h2>

<p>You can even go one step further and create an ApplicationComponent that defines that each inheriting ViewComponent can pass CSS classes. I generally try to avoid this as it means that every subclass must properly call <code class="language-plaintext highlighter-rouge">super</code> to pass the classes argument to the ApplicationComponent. That’s additional information that could be surprising for implementors.</p>

<div class="language-ruby highlighter-rouge"><div class="highlight"><pre class="highlight"><code><span class="c1"># application_component.rb</span>
<span class="k">class</span> <span class="nc">ApplicationComponent</span> <span class="o">&lt;</span> <span class="no">ViewComponent</span><span class="o">::</span><span class="no">Base</span>
  <span class="nb">attr_reader</span> <span class="ss">:classes</span>

  <span class="k">def</span> <span class="nf">intialize</span><span class="p">(</span><span class="o">**</span><span class="n">keyword_arguments</span><span class="p">)</span>
    <span class="vi">@classes</span> <span class="o">=</span> <span class="n">keyword_arguments</span><span class="p">[</span><span class="ss">:classes</span><span class="p">]</span> <span class="k">if</span> <span class="n">keyword_arguments</span><span class="p">.</span><span class="nf">key?</span><span class="p">(</span><span class="ss">:classes</span><span class="p">)</span>

    <span class="k">super</span> <span class="c1"># Pass to ViewComponent::Base</span>
  <span class="k">end</span>
<span class="k">end</span>

<span class="c1"># table_component.rb</span>
<span class="k">class</span> <span class="nc">TableComponent</span> <span class="o">&lt;</span> <span class="no">ApplicationComponent</span>
  <span class="n">renders_one</span> <span class="ss">:header</span>
  <span class="n">renders_one</span> <span class="ss">:body</span>
  <span class="n">renders_one</span> <span class="ss">:footer</span>

  <span class="k">def</span> <span class="nf">initialize</span><span class="p">(</span><span class="o">**</span><span class="n">keyword_arguments</span><span class="p">,</span> <span class="ss">another_setting: </span><span class="s2">"test"</span><span class="p">)</span>
    <span class="vi">@another_setting</span> <span class="o">=</span> <span class="n">another_setting</span>

    <span class="k">super</span><span class="p">(</span><span class="o">**</span><span class="n">keyword_arguments</span><span class="p">)</span> <span class="c1"># Pass to ApplicationComponent</span>
  <span class="k">end</span>

  <span class="k">def</span> <span class="nf">component_classes</span>
    <span class="s2">"bg-gray-300 p-4 </span><span class="si">#{</span><span class="n">keyword_arguments</span><span class="p">[</span><span class="ss">:classes</span><span class="p">]</span><span class="si">}</span><span class="s2">"</span>
  <span class="k">end</span>
<span class="k">end</span>
</code></pre></div></div>

<p>This is a basic enhancement but gives you an idea for creating standard ViewComponent functionality.</p>

<h2 id="pagination">Pagination</h2>

<p>Lastly, we have several pagination related concerns that are currently burried within UsersTableComponent. Pagination is a common concern in regards to listing collections so abstracting this into a ViewComponent makes a lot of sense. This can give the added benefits of allowing more customized display logic around the previous / next buttons. Additionally, we will utilize <a href="https://viewcomponent.org/guide/conditional_rendering.html">conditional rendering</a> with then <code class="language-plaintext highlighter-rouge">#render?</code> method to only show Pagination when the object responds to the appropriate underlying method.</p>

<blockquote class="Info Info--full">
  

  <p>
    <i class="fas fa-quote-left"></i>
    Components can implement a #render? method to be called after initialization to determine if the component should render.
  </p>

  
    <a href="https://viewcomponent.org/guide/conditional_rendering.html">https://viewcomponent.org/guide/conditional_rendering.html</a>
  
</blockquote>

<div class="language-ruby highlighter-rouge"><div class="highlight"><pre class="highlight"><code><span class="k">class</span> <span class="nc">PaginationComponent</span> <span class="o">&lt;</span> <span class="no">ViewComponent</span><span class="o">::</span><span class="no">Base</span>
  <span class="k">def</span> <span class="nf">initialize</span><span class="p">(</span><span class="n">pagination</span><span class="p">:)</span>
    <span class="vi">@pagination</span> <span class="o">=</span> <span class="n">pagination</span>
  <span class="k">end</span>

  <span class="kp">private</span>

  <span class="c1"># Only render if the following returns true</span>
  <span class="k">def</span> <span class="nf">render?</span>
    <span class="vi">@pagination</span><span class="p">.</span><span class="nf">respond_to?</span><span class="p">(</span><span class="ss">:pages</span><span class="p">)</span>
  <span class="k">end</span>
<span class="k">end</span>

<span class="c1"># users_table_component.rb</span>
<span class="k">class</span> <span class="nc">UsersTableComponent</span> <span class="o">&lt;</span> <span class="no">ViewComponent</span><span class="o">::</span><span class="no">Base</span>
  <span class="n">renders_many</span> <span class="ss">:users</span><span class="p">,</span> <span class="no">UserComponent</span>
  <span class="n">renders_one</span> <span class="ss">:pagination</span><span class="p">,</span> <span class="no">PaginationComponent</span>

  <span class="c1"># ... rest of file</span>
</code></pre></div></div>

<div class="language-html highlighter-rouge"><div class="highlight"><pre class="highlight"><code><span class="c">&lt;!-- users_table_component.html.erb --&gt;</span>
<span class="nt">&lt;</span><span class="err">%=</span> <span class="na">render</span> <span class="na">TableComponent.new</span> <span class="na">do</span> <span class="err">|</span><span class="na">table_component</span><span class="err">|</span> <span class="err">%</span><span class="nt">&gt;</span>
  <span class="nt">&lt;</span><span class="err">%</span> <span class="na">table_component.with_header</span> <span class="na">do</span> <span class="err">%</span><span class="nt">&gt;</span>
    <span class="nt">&lt;</span><span class="err">%</span> <span class="na">headers.each</span> <span class="na">do</span> <span class="err">|</span><span class="na">header</span><span class="err">|</span> <span class="err">%</span><span class="nt">&gt;</span>
      <span class="nt">&lt;th&gt;&lt;</span><span class="err">%=</span> <span class="na">header</span> <span class="err">%</span><span class="nt">&gt;&lt;/th&gt;</span>
    <span class="nt">&lt;</span><span class="err">%</span> <span class="na">end</span> <span class="err">%</span><span class="nt">&gt;</span>
  <span class="nt">&lt;</span><span class="err">%</span> <span class="na">end</span> <span class="err">%</span><span class="nt">&gt;</span>

  <span class="nt">&lt;</span><span class="err">%</span> <span class="na">table_component.with_body</span> <span class="na">do</span> <span class="err">%</span><span class="nt">&gt;</span>
    <span class="nt">&lt;</span><span class="err">%</span> <span class="na">users.each</span> <span class="na">do</span> <span class="err">|</span><span class="na">user</span><span class="err">|</span> <span class="err">%</span><span class="nt">&gt;</span>
      <span class="nt">&lt;</span><span class="err">%=</span> <span class="na">user</span> <span class="err">%</span><span class="nt">&gt;</span> <span class="c">&lt;!-- Will render with the UserComponent --&gt;</span>
    <span class="nt">&lt;</span><span class="err">%</span> <span class="na">end</span> <span class="err">%</span><span class="nt">&gt;</span>
  <span class="nt">&lt;</span><span class="err">%</span> <span class="na">end</span> <span class="err">%</span><span class="nt">&gt;</span>

  <span class="nt">&lt;</span><span class="err">%</span> <span class="na">table_component.with_footer</span> <span class="na">do</span> <span class="err">%</span><span class="nt">&gt;</span>
    <span class="nt">&lt;tr&gt;</span>
      <span class="nt">&lt;td</span> <span class="na">colspan=</span><span class="s">"3"</span><span class="nt">&gt;</span>
        <span class="nt">&lt;</span><span class="err">%</span> <span class="na">if</span> <span class="na">pagination</span><span class="err">?</span> <span class="err">%</span><span class="nt">&gt;</span>
          <span class="nt">&lt;</span><span class="err">%=</span> <span class="na">pagination</span> <span class="err">%</span><span class="nt">&gt;</span>
        <span class="nt">&lt;</span><span class="err">%</span> <span class="na">end</span> <span class="err">%</span><span class="nt">&gt;</span>
      <span class="nt">&lt;/td&gt;</span>
    <span class="nt">&lt;/tr&gt;</span>
  <span class="nt">&lt;</span><span class="err">%</span> <span class="na">end</span> <span class="err">%</span><span class="nt">&gt;</span>
<span class="nt">&lt;</span><span class="err">%</span> <span class="na">end</span> <span class="err">%</span><span class="nt">&gt;</span>
</code></pre></div></div>

<h3 id="updated-indexhtmlerb">Updated index.html.erb</h3>
<div class="language-html highlighter-rouge"><div class="highlight"><pre class="highlight"><code><span class="c">&lt;!-- Updated index.html.erb --&gt;</span>
<span class="nt">&lt;</span><span class="err">%=</span> <span class="na">render</span> <span class="na">UsersFilterComponent.new</span> <span class="err">%</span><span class="nt">&gt;</span>
<span class="nt">&lt;</span><span class="err">%=</span> <span class="na">render</span> <span class="na">UsersTableComponent.new</span><span class="err">(</span><span class="na">users:</span> <span class="err">@</span><span class="na">users</span><span class="err">)</span> <span class="na">do</span> <span class="err">|</span><span class="na">users_table_component</span><span class="err">|</span> <span class="err">%</span><span class="nt">&gt;</span>
  <span class="nt">&lt;</span><span class="err">%</span> <span class="err">@</span><span class="na">users.each</span> <span class="na">do</span> <span class="err">|</span><span class="na">user</span><span class="err">|</span> <span class="err">%</span><span class="nt">&gt;</span>
    <span class="nt">&lt;</span><span class="err">%</span> <span class="na">users_table_component.with_users</span><span class="err">(</span><span class="na">user:</span><span class="err">)</span> <span class="err">%</span><span class="nt">&gt;</span>
  <span class="nt">&lt;</span><span class="err">%</span> <span class="na">end</span> <span class="err">%</span><span class="nt">&gt;</span>

  <span class="nt">&lt;</span><span class="err">%</span> <span class="na">users_table_component.with_pagination</span><span class="err">(</span><span class="na">pagination:</span> <span class="err">@</span><span class="na">pagy</span><span class="err">)</span> <span class="err">%</span><span class="nt">&gt;</span>
<span class="nt">&lt;</span><span class="err">%</span> <span class="na">end</span> <span class="err">%</span><span class="nt">&gt;</span>
</code></pre></div></div>

<p>You may have noticed above I allowed the Pagination component to accept a generic <code class="language-plaintext highlighter-rouge">pagination</code> argument. This was to allow for the potential for multiple pagination engines. On its own in an application this wouldn’t be very useful since most applications utilize a single mechanism to generate pagination. BUT if this were instead within a UI library you could make the rendered pagination output the expected data to the library by checking this parameter.</p>

<div class="language-ruby highlighter-rouge"><div class="highlight"><pre class="highlight"><code><span class="k">class</span> <span class="nc">PaginationComponent</span> <span class="o">&lt;</span> <span class="no">ViewComponent</span><span class="o">::</span><span class="no">Base</span>
  <span class="k">def</span> <span class="nf">initialize</span><span class="p">(</span><span class="n">pagination</span><span class="p">:)</span>
    <span class="vi">@pagination</span> <span class="o">=</span> <span class="n">pagination</span> <span class="c1"># Could be Pagy, Kaminari, something else...</span>
</code></pre></div></div>

<p>Also much like rendering a top-level component, ViewComponent slots allow you to pass arguments onto their underlying component definition when using Component slots.</p>

<div class="language-ruby highlighter-rouge"><div class="highlight"><pre class="highlight"><code><span class="c1"># users_table_component.rb</span>
<span class="k">class</span> <span class="nc">UsersTableComponent</span> <span class="o">&lt;</span> <span class="no">ViewComponent</span><span class="o">::</span><span class="no">Base</span>
  <span class="n">renders_many</span> <span class="ss">:users</span><span class="p">,</span> <span class="no">UserComponent</span>
  <span class="n">renders_one</span> <span class="ss">:pagination</span><span class="p">,</span> <span class="no">PaginationComponent</span>
</code></pre></div></div>

<div class="language-html highlighter-rouge"><div class="highlight"><pre class="highlight"><code><span class="c">&lt;!-- index.html.erb --&gt;</span>
<span class="nt">&lt;</span><span class="err">%=</span> <span class="na">render</span> <span class="na">UsersTableComponent.new</span><span class="err">(</span><span class="na">users:</span> <span class="err">@</span><span class="na">users</span><span class="err">)</span> <span class="na">do</span> <span class="err">|</span><span class="na">users_table_component</span><span class="err">|</span> <span class="err">%</span><span class="nt">&gt;</span>
  <span class="nt">&lt;</span><span class="err">%</span> <span class="err">@</span><span class="na">users.each</span> <span class="na">do</span> <span class="err">|</span><span class="na">user</span><span class="err">|</span> <span class="err">%</span><span class="nt">&gt;</span>
    <span class="nt">&lt;</span><span class="err">%</span> <span class="na">users_table_component.with_users</span><span class="err">(</span><span class="na">user:</span><span class="err">)</span> <span class="err">%</span><span class="nt">&gt;</span>
  <span class="nt">&lt;</span><span class="err">%</span> <span class="na">end</span> <span class="err">%</span><span class="nt">&gt;</span>

  <span class="nt">&lt;</span><span class="err">%</span> <span class="na">users_table_component.with_pagination</span><span class="err">(</span><span class="na">pagination:</span> <span class="err">@</span><span class="na">pagy</span><span class="err">)</span> <span class="err">%</span><span class="nt">&gt;</span>
<span class="nt">&lt;</span><span class="err">%</span> <span class="na">end</span> <span class="err">%</span><span class="nt">&gt;</span>
</code></pre></div></div>

<p>So the above will render the UsersTableComponent, with the Pagination slot, where the Pagination slot is defined by the PaginationComponent, and the PaginationComponent accepts the <code class="language-plaintext highlighter-rouge">pagination</code> argument.</p>

<p>We’ve now built upon several of the previous concepts leveraging: Generic slots, Component slots, Slot predicate methods, collection rendering, and conditionally rendered components. Two things we’ve yet to cover are Previewing and Testing. We’ll finish out the article with a brief summary of each.</p>

<h2 id="previewing">Previewing</h2>

<p>Like Rails Mailer previews, ViewComponents have preview functionality that works in much the same way. By creating a Preview file and visiting the appropriate route, you’ll have a playground to test out your component isolated from your application.</p>

<div class="language-ruby highlighter-rouge"><div class="highlight"><pre class="highlight"><code><span class="c1"># test/components/table_component_preview.rb</span>
<span class="k">class</span> <span class="nc">TableComponentPreview</span> <span class="o">&lt;</span> <span class="no">ViewComponent</span><span class="o">::</span><span class="no">Preview</span>
  <span class="c1"># Route: /rails/view_components/table_component/default</span>
  <span class="k">def</span> <span class="nf">default</span>
    <span class="n">render</span> <span class="no">TableComponent</span><span class="p">.</span><span class="nf">new</span> <span class="k">do</span> <span class="o">|</span><span class="n">table_component</span><span class="o">|</span>
      <span class="n">table_component</span><span class="p">.</span><span class="nf">with_header</span> <span class="k">do</span>
        <span class="n">tag</span><span class="p">.</span><span class="nf">th</span> <span class="k">do</span>
          <span class="s2">"My Header Content"</span>
        <span class="k">end</span>
      <span class="k">end</span>

      <span class="n">table_component</span><span class="p">.</span><span class="nf">with_body</span> <span class="k">do</span>
        <span class="n">tag</span><span class="p">.</span><span class="nf">td</span> <span class="k">do</span>
          <span class="s2">"My Body Content"</span>
        <span class="k">end</span>
      <span class="k">end</span>
    <span class="k">end</span>
  <span class="k">end</span>

  <span class="c1"># Route: /rails/view_components/table_component/with_footer</span>
  <span class="k">def</span> <span class="nf">with_footer</span>
    <span class="n">render</span> <span class="no">TableComponent</span><span class="p">.</span><span class="nf">new</span> <span class="k">do</span> <span class="o">|</span><span class="n">table_component</span><span class="o">|</span>
      <span class="n">table_component</span><span class="p">.</span><span class="nf">with_header</span> <span class="k">do</span>
        <span class="n">tag</span><span class="p">.</span><span class="nf">th</span> <span class="k">do</span>
          <span class="s2">"My Header Content"</span>
        <span class="k">end</span>
      <span class="k">end</span>

      <span class="n">table_component</span><span class="p">.</span><span class="nf">with_body</span> <span class="k">do</span>
        <span class="n">tag</span><span class="p">.</span><span class="nf">td</span> <span class="k">do</span>
          <span class="s2">"My Body Content"</span>
        <span class="k">end</span>
      <span class="k">end</span>

      <span class="n">table_component</span><span class="p">.</span><span class="nf">with_footer</span> <span class="k">do</span>
        <span class="n">tag</span><span class="p">.</span><span class="nf">td</span> <span class="k">do</span>
          <span class="s2">"My Footer Content"</span>
        <span class="k">end</span>
      <span class="k">end</span>
    <span class="k">end</span>
  <span class="k">end</span>
<span class="k">end</span>
</code></pre></div></div>

<div class="language-html highlighter-rouge"><div class="highlight"><pre class="highlight"><code><span class="c">&lt;!-- Default Preview --&gt;</span>
<span class="nt">&lt;table</span> <span class="na">class=</span><span class="s">"bg-gray-300 p-4"</span><span class="nt">&gt;</span>
  <span class="nt">&lt;thead&gt;</span>
    <span class="nt">&lt;tr&gt;</span>
      <span class="nt">&lt;th&gt;</span>My Header Content<span class="nt">&lt;/th&gt;</span>
    <span class="nt">&lt;/tr&gt;</span>
  <span class="nt">&lt;/thead&gt;</span>
  <span class="nt">&lt;tbody&gt;</span>
    <span class="nt">&lt;tr&gt;</span>
      <span class="nt">&lt;td&gt;</span>My Body Content<span class="nt">&lt;/td&gt;</span>
    <span class="nt">&lt;/tr&gt;</span>
  <span class="nt">&lt;/tbody&gt;</span>
<span class="nt">&lt;/table&gt;</span>

<span class="c">&lt;!-- With Footer Preview --&gt;</span>
<span class="nt">&lt;table</span> <span class="na">class=</span><span class="s">"bg-gray-300 p-4"</span><span class="nt">&gt;</span>
  <span class="nt">&lt;thead&gt;</span>
    <span class="nt">&lt;tr&gt;</span>
      <span class="nt">&lt;th&gt;</span>My Header Content<span class="nt">&lt;/th&gt;</span>
    <span class="nt">&lt;/tr&gt;</span>
  <span class="nt">&lt;/thead&gt;</span>
  <span class="nt">&lt;tbody&gt;</span>
    <span class="nt">&lt;tr&gt;</span>
      <span class="nt">&lt;td&gt;</span>My Body Content<span class="nt">&lt;/td&gt;</span>
    <span class="nt">&lt;/tr&gt;</span>
  <span class="nt">&lt;/tbody&gt;</span>
  <span class="nt">&lt;tfoot&gt;</span>
    <span class="nt">&lt;tr&gt;</span>
      <span class="nt">&lt;td&gt;</span>My Footer Content<span class="nt">&lt;/td&gt;</span>
    <span class="nt">&lt;/tr&gt;</span>
  <span class="nt">&lt;/tfoot&gt;</span>
<span class="nt">&lt;/table&gt;</span>
</code></pre></div></div>

<p>I highly recommend <strong>Lookbook</strong> as it provides additional functionality for changing the output of a component based on parameters.</p>

<blockquote class="Info Info--full">
  

  <p>
    <i class="fas fa-quote-left"></i>
    Lookbook is a UI development environment for Ruby on Rails applications.
  </p>

  
    <a href="https://lookbook.build/">https://lookbook.build/</a>
  
</blockquote>

<h2 id="testing">Testing</h2>

<p><a href="https://viewcomponent.org/guide/testing.html">Testing ViewComponents</a> is nearly as easy as testing a plain ole Ruby object. Generally there are two types of tests you’ll want to write: Unit and System. Our UserComponent defines several methods to be utilized within its corresponding View file. We can test these quite easily with either RSpec or Minitest.</p>

<h3 id="usercomponent-unit-test">UserComponent Unit Test</h3>

<p>For our Unit test, we’ll only focus on the defined methods that are part of the Component. Think of this as testing a Presenter’s methods as it is a similiar context.</p>

<div class="language-ruby highlighter-rouge"><div class="highlight"><pre class="highlight"><code><span class="c1"># spec/components/user_component_spec.rb</span>
<span class="n">describe</span> <span class="no">UserComponent</span><span class="p">,</span> <span class="ss">type: :component</span> <span class="k">do</span>
  <span class="n">let</span><span class="p">(</span><span class="ss">:user</span><span class="p">)</span> <span class="p">{</span> <span class="n">create</span><span class="p">(</span><span class="ss">:user</span><span class="p">)}</span>
  <span class="n">let</span><span class="p">(</span><span class="ss">:component</span><span class="p">)</span> <span class="p">{</span> <span class="n">described_class</span><span class="p">.</span><span class="nf">new</span><span class="p">(</span><span class="n">user</span><span class="p">:)</span> <span class="p">}</span>

  <span class="n">describe</span> <span class="s2">"#dropdown_actions"</span> <span class="k">do</span>
    <span class="n">it</span> <span class="s2">"returns the correct actions"</span> <span class="k">do</span>
      <span class="n">expect</span><span class="p">(</span><span class="n">component</span><span class="p">.</span><span class="nf">dropdown_actions</span><span class="p">).</span><span class="nf">to</span> <span class="n">eq</span><span class="p">([</span><span class="ss">:edit</span><span class="p">,</span> <span class="ss">:destroy</span><span class="p">])</span>
    <span class="k">end</span>
  <span class="k">end</span>

  <span class="n">describe</span> <span class="s2">"#current_roles"</span> <span class="k">do</span>
    <span class="n">it</span> <span class="s2">"returns the correct roles"</span> <span class="k">do</span>
      <span class="n">create</span><span class="p">(</span><span class="ss">:role</span><span class="p">,</span> <span class="ss">name: </span><span class="s2">"Admin"</span><span class="p">,</span> <span class="n">user</span><span class="p">:)</span>
      <span class="n">create</span><span class="p">(</span><span class="ss">:role</span><span class="p">,</span> <span class="ss">name: </span><span class="s2">"User"</span><span class="p">,</span> <span class="n">user</span><span class="p">:)</span>

      <span class="n">expect</span><span class="p">(</span><span class="n">component</span><span class="p">.</span><span class="nf">current_roles</span><span class="p">).</span><span class="nf">to</span> <span class="n">eq</span><span class="p">(</span><span class="s2">"Admin, User"</span><span class="p">)</span>
    <span class="k">end</span>
  <span class="k">end</span>
<span class="k">end</span>
</code></pre></div></div>

<h3 id="usercomponent-system-test">UserComponent System Test</h3>

<p>A system test, tests an end-to-end flow based on what the real world experience may look like. This is a great way to ensure that the component’s content, styles, and sometimes elements are rendered as expected.</p>

<div class="language-ruby highlighter-rouge"><div class="highlight"><pre class="highlight"><code><span class="c1"># spec/components/user_component_spec.rb</span>
<span class="n">describe</span> <span class="no">UserComponent</span><span class="p">,</span> <span class="ss">type: :system</span> <span class="k">do</span>
  <span class="n">let</span><span class="p">(</span><span class="ss">:user</span><span class="p">)</span> <span class="p">{</span> <span class="n">build_stubbed</span><span class="p">(</span><span class="ss">:user</span><span class="p">,</span> <span class="ss">name: </span><span class="s2">"Nic Cage"</span><span class="p">)</span> <span class="p">}</span>

  <span class="n">it</span> <span class="s2">"renders the User within a Table row"</span> <span class="k">do</span>
    <span class="n">render_inline</span><span class="p">(</span><span class="no">UserComponent</span><span class="p">.</span><span class="nf">new</span><span class="p">(</span><span class="n">user</span><span class="p">:))</span>

    <span class="n">expect</span><span class="p">(</span><span class="n">page</span><span class="p">).</span><span class="nf">to</span> <span class="n">have_content</span><span class="p">(</span><span class="n">user</span><span class="p">.</span><span class="nf">name</span><span class="p">)</span>
    <span class="n">expect</span><span class="p">(</span><span class="n">page</span><span class="p">).</span><span class="nf">to</span> <span class="n">have_selector</span><span class="p">(</span><span class="s2">"tr"</span><span class="p">)</span>
  <span class="k">end</span>
<span class="k">end</span>
</code></pre></div></div>

<p>The above is a basic system test that uses Capybara under-the-hood to render and test the UserComponent’s html output. Anything that can be done with Capybara is fair to utilize here.</p>

<h2 id="conclusion">Conclusion</h2>

<p>Now that we’ve abstracted several of the View concerns elsewhere, our top level interface for the Controller is much cleaner. It allows the Controller better focus on business logic giving us a natural place to introduce concepts like Service Objects, Query Objects, and Form Objects.</p>

<p>Here’s the end-result for our Controller &amp; View interface:</p>
<div class="language-ruby highlighter-rouge"><div class="highlight"><pre class="highlight"><code><span class="c1"># users_controller.rb</span>
<span class="k">class</span> <span class="nc">UsersController</span> <span class="o">&lt;</span> <span class="no">ApplicationController</span>
  <span class="no">USERS_PER_PAGE</span> <span class="o">=</span> <span class="mi">30</span>

  <span class="k">def</span> <span class="nf">index</span>
    <span class="vi">@pagy</span><span class="p">,</span> <span class="vi">@users</span> <span class="o">=</span> <span class="n">pagy</span><span class="p">(</span><span class="n">available_users</span><span class="p">,</span> <span class="ss">limit: </span><span class="no">USERS_PER_PAGE</span><span class="p">,</span> <span class="ss">page: </span><span class="n">params</span><span class="p">[</span><span class="ss">:page</span><span class="p">])</span>
  <span class="k">end</span>

  <span class="kp">private</span>

  <span class="k">def</span> <span class="nf">filter_params</span>
    <span class="n">params</span><span class="p">.</span><span class="nf">permit</span><span class="p">(</span><span class="ss">filters: :role</span><span class="p">)</span>
  <span class="k">end</span>

  <span class="k">def</span> <span class="nf">available_users</span>
    <span class="k">if</span> <span class="n">filter_params</span><span class="p">.</span><span class="nf">present?</span>
      <span class="no">User</span><span class="p">.</span><span class="nf">where</span><span class="p">(</span><span class="ss">role: </span><span class="n">filter_params</span><span class="p">)</span>
    <span class="k">else</span>
      <span class="no">User</span><span class="p">.</span><span class="nf">all</span>
    <span class="k">end</span>
  <span class="k">end</span>
<span class="k">end</span>
</code></pre></div></div>

<div class="language-html highlighter-rouge"><div class="highlight"><pre class="highlight"><code><span class="c">&lt;!-- index.html.erb --&gt;</span>
<span class="nt">&lt;</span><span class="err">%=</span> <span class="na">render</span> <span class="na">UsersFilterComponent.new</span> <span class="err">%</span><span class="nt">&gt;</span>
<span class="nt">&lt;</span><span class="err">%=</span> <span class="na">render</span> <span class="na">UsersTableComponent.new</span><span class="err">(</span><span class="na">users:</span> <span class="err">@</span><span class="na">users</span><span class="err">)</span> <span class="na">do</span> <span class="err">|</span><span class="na">users_table_component</span><span class="err">|</span> <span class="err">%</span><span class="nt">&gt;</span>
  <span class="nt">&lt;</span><span class="err">%</span> <span class="err">@</span><span class="na">users.each</span> <span class="na">do</span> <span class="err">|</span><span class="na">user</span><span class="err">|</span> <span class="err">%</span><span class="nt">&gt;</span>
    <span class="nt">&lt;</span><span class="err">%</span> <span class="na">users_table_component.with_users</span><span class="err">(</span><span class="na">user:</span><span class="err">)</span> <span class="err">%</span><span class="nt">&gt;</span>
  <span class="nt">&lt;</span><span class="err">%</span> <span class="na">end</span> <span class="err">%</span><span class="nt">&gt;</span>

  <span class="nt">&lt;</span><span class="err">%</span> <span class="na">users_table_component.with_pagination</span><span class="err">(</span><span class="na">pagination:</span> <span class="err">@</span><span class="na">pagy</span><span class="err">)</span> <span class="err">%</span><span class="nt">&gt;</span>
<span class="nt">&lt;</span><span class="err">%</span> <span class="na">end</span> <span class="err">%</span><span class="nt">&gt;</span>
</code></pre></div></div>

<p>The next engineer now doesn’t need to worry about the various components of this View since they are isolated. This reduces the amount of mental overhead allowing them to focus on the feature requirements. We have dedicated locations for our Component logic, rendering, previewing, and testing.</p>

<p>I’ve only gone surface level with ViewComponents as there much more depth and nuance to them. If you’ve had success (or failures) with utilizing ViewComponents as your View layer, I’d love to hear about it in the comments below. Thanks for reading!</p>]]></content><author><name>Josh Frankel (@joshmfrankel)</name><uri>http://joshfrankel.me/</uri></author><category term="articles" /><category term="rails" /><category term="view components" /><category term="ui library" /><summary type="html"><![CDATA[If you’ve worked with Rails for any measure of time, then you know that Rails’ Views can quickly get out of hand. Between Helpers, instance variables, and inline logic, they quickly become bloated and tightly coupled to other view specific logic. Pushing these concerns into the Controller layer, or even a Presenter helps, but still lands the View in a place where it contains multiple responsibilities. If only there was a better way… Enter ViewComponents or as I like to call them, “The Missing View Layer for Rails”.]]></summary></entry></feed>